Getting into the Spy Game
Overview
Teaching: 5 min
Exercises: 10 minQuestions
How can I give my CI job private information?
Objectives
Add custom environment variables
Learn how to give your CI/CD Runners access to private information
So we’re nearly done with getting the merge request for the CI/CD up and running but we need to deal with this error:
$ ./skim root://eosuser.cern.ch//eos/user/g/gstark/AwesomeWorkshopFeb2020/GluGluToHToTauTau.root skim_ggH.root 19.6 11467.0 0.1
>>> Process input: root://eosuser.cern.ch//eos/user/g/gstark/AwesomeWorkshopFeb2020/GluGluToHToTauTau.root
Error in <TNetXNGFile::Open>: [ERROR] Server responded with an error: [3010] Unable to give access - user access restricted - unauthorized identity used ; Permission denied
Warning in <TTreeReader::SetEntryBase()>: There was an issue opening the last file associated to the TChain being processed.
Number of events: 0
Cross-section: 19.6
Integrated luminosity: 11467
Global scaling: 0.1
Error in <TNetXNGFile::Open>: [ERROR] Server responded with an error: [3010] Unable to give access - user access restricted - unauthorized identity used ; Permission denied
terminate called after throwing an instance of 'std::runtime_error'
  what():  GetBranchNames: error in opening the tree Events
/bin/bash: line 87:    13 Aborted                 (core dumped) ./skim root://eosuser.cern.ch//eos/user/g/gstark/AwesomeWorkshopFeb2020/GluGluToHToTauTau.root skim_ggH.root 19.6 11467.0 0.1
section_end:1581450227:build_script
ERROR: Job failed: exit code 1
Access Control
So we need to give our CI/CD access to our data. This is actually a good thing. It means CMS can’t just grab it! Anyhow, this is done by pretty much done by executing printf $SERVICE_PASS | base64 -d | kinit $CERN_USER assuming that we’ve set the corresponding environment variables by safely encoding them (printf "hunter42" | base64).
Running examples with variables
Sometimes you’ll run into a code example here that you might want to run locally but relies on variables you might not have set? Sure, simply do the following
SERVICE_PASS=hunter42 CERN_USER=GoodWill printf $SERVICE_PASS | base64 -d | kinit $CERN_USER
Base-64 encoding?
Sometimes you have a string that contains certain characters that would be interpreted incorreectly by GitLab’s CI system. In order to protect against that, you can safely base-64 encode the string, store it, and then decode it as part of the CI job. This is entirely safe and recommended.
Service Account or Not?
When you’re dealing with a personal repository (project) that nobody else has administrative access to, e.g. the settings, then it’s ok to use your CERN account/password in the environment variables for the settings…
However, when you’re sharing or part of a group, it is much better to use a group’s service account or a user’s (maybe yours) service account for authentication instead. For today’s lesson however, we’ll be using your account and show pictures of how to set these environment variables.
How to make a service account?
Go to CERN Account Management -> Create New Account and click on the
Servicebutton, then clickNextand follow the steps.
Variables
There are two kinds of environment variables:
- predefined
- custom
Additionally, you can specify that the variable is a file type which is useful for passing in private keys to the CI/CD Runners. Variables can be added globally or per-job using the variables parameter.
Predefined Variables
There are quite a lot of predefined variables. We won’t cover these in depth but link for reference as they’re well-documented in the GitLab docs.
Custom Variables
Let’s go ahead and add some custom variables to fix up our access control.
- Navigate to the
Settings -> CI/CDof your repository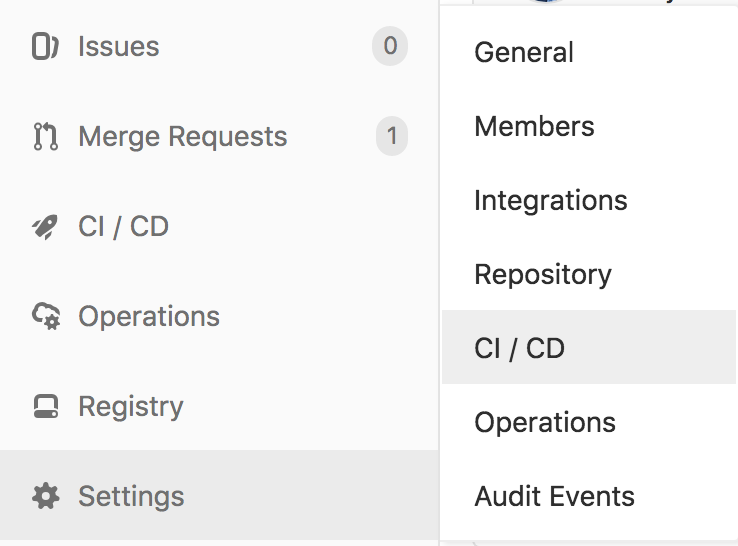
- Expand the
Variablessection on this page by clickingExpand
- Specify two environment variables,
SERVICE_PASSandCERN_USER, and fill them in appropriately. (If possible, mask the password).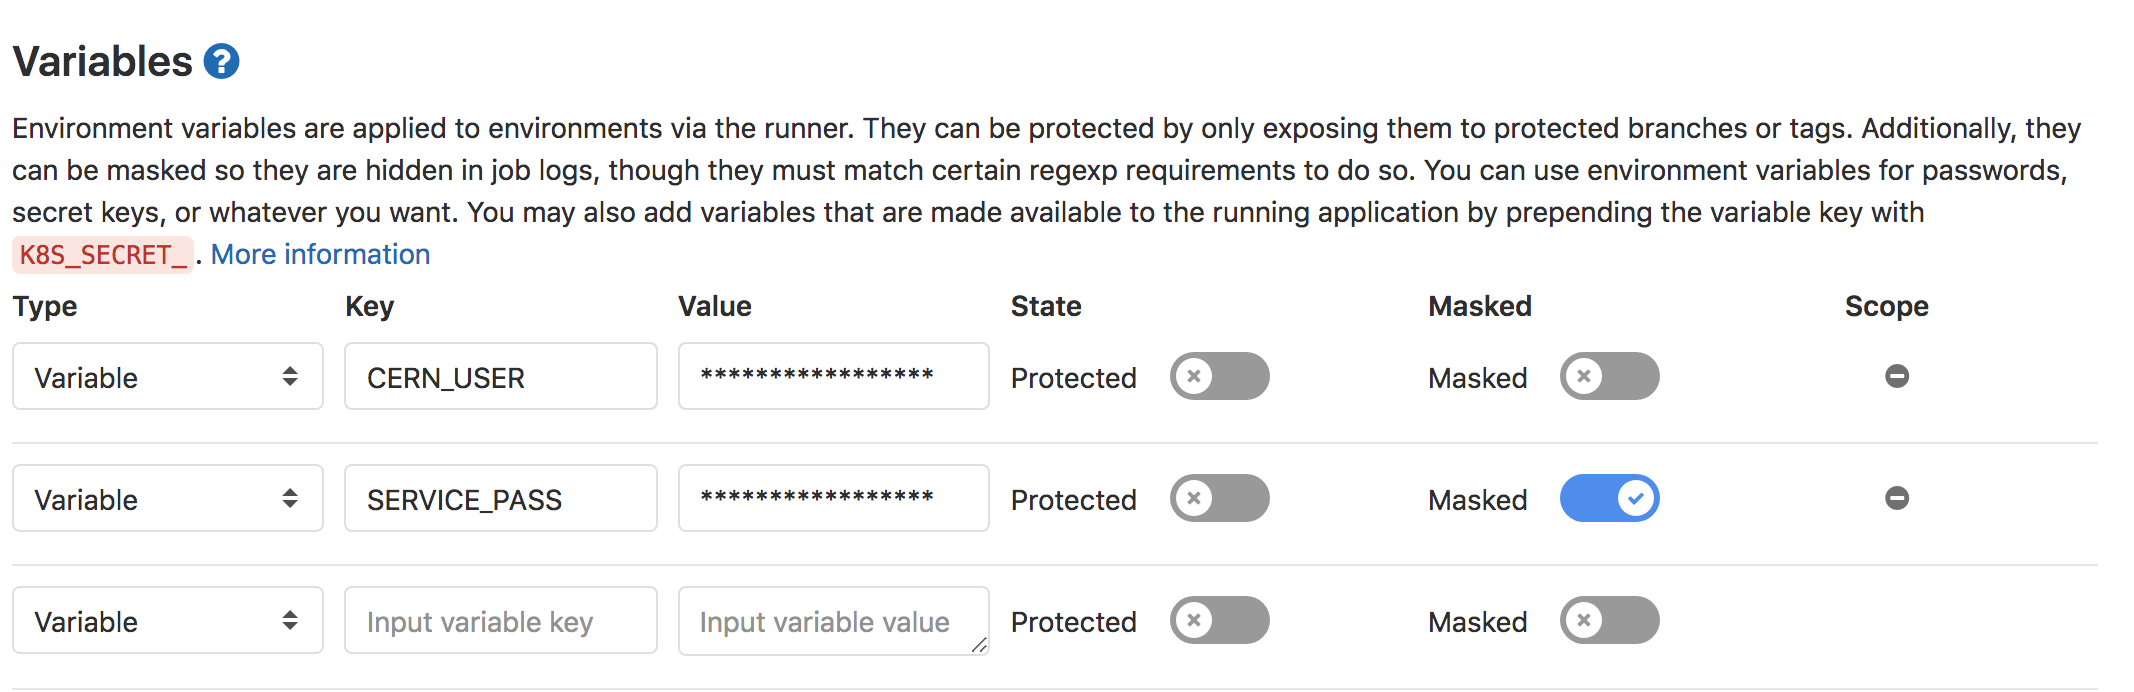
- Click to save the variables.
DON’T PEEK
DON’T PEEK AT YOUR FRIEND’S SCREEN WHILE DOING THIS.
Adding kinit for access control
Now it’s time to update your CI/CD to use the environment variables you defined by adding printf $SERVICE_PASS | base64 -d | kinit $CERN_USER@CERN.CH as part of the before_script to the skim_ggH job as that’s the job that requires access.
Adding Artifacts on Success
As it seems like we have a complete CI/CD that does physics - we should see what came out. We just need to add artifacts for the skim_ggH job. This is left as an exercise to you.
Adding Artifacts
Let’s add
artifactsto ourskim_ggHjob to save theskim_ggH.rootfile. Let’s have the artifacts expire in a week instead.Solution
skim_ggH:
  stage: run
  dependencies:
   - build_skim
  image: rootproject/root-conda:6.18.04
  before_script:
    - printf $SERVICE_PASS | base64 -d | kinit $CERN_USER@CERN.CH
  script:
    - ./skim root://eosuser.cern.ch//eos/user/g/gstark/AwesomeWorkshopFeb2020/GluGluToHToTauTau.root skim_ggH.root 19.6 11467.0 0.1
  artifacts:
    paths:
      - skim_ggH.root
    expire_in: 1 week
And this allows us to download artifacts from the successfully run job
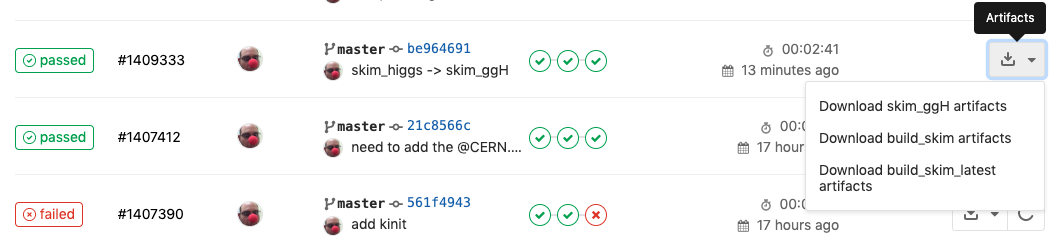
or if you click through to a skim_ggH job, you can browse the artifacts

which should just be the skim_ggH.root file you just made.
Further Reading
Key Points
Service accounts provide an extra layer of security between the outside world and your account
Environment variables in GitLab CI/CD allow you to hide protected information from others who can see your code