All in One View
Content from Introduction
Last updated on 2025-08-14 | Edit this page
Overview
Questions
- What is the point of these exercises?
- Where do I find tutorials and documenation on Git features?
Objectives
- Get an overview of existing Git tutorials
Is this a Git tutorial?
No, this is a hands-on session for you to exercise collaborative work using Git and GitLab so that you do not have to do it with your real projects.
Take your time to do it now, not when you are busy finalizing your analysis code.
Git tutorials
Excellent Git tutorials exist, the teaching approach varies.
- Git’s website: https://git-scm.com/doc
- introductory videos
- quick reference guides
- reference manual
- Git Pro book
- curated external links
- W3 schools: https://www.w3schools.com/git/default.asp
- CodeRefinery Git intro: https://coderefinery.github.io/git-intro/
- good emphasis on “why”
- starts by exploring an existing GitHub repository
- CodeRefinery Collaborative work: https://coderefinery.github.io/git-collaborative/
- very well explained exercises for collaborative work on GitHub
- HEP Software Foundation: https://hsf-training.github.io/analysis-essentials/git/README.html
- starts by working hands-on on a local repository
- explains CERN GitLab features
Where do we start from?
For this session, you should be familiar with the basic Git workflow of commits and pushes to the remote repository as listed in the setup instructions.
- Excellent Git tutorials exist.
- Take your time to work through them.
Content from Undoing things locally
Last updated on 2025-12-16 | Edit this page
Overview
Questions
- Phew! Luckily I haven’t pushed yet — how can I change my commit?
Objectives
- Understand Git logs
- Exercise with local commits
Local commits?
Most Git tutorials start by explaining how to make local commits, track them, and use them during development on your local machine. You would have a neat list of all your commits with clear and concise commit messages. Good habit if you do!
However, in practice, many of us only run git commit
right before pushing our code to the remote repository.
Sometimes, you might want to change a commit — for example:
- You accidentally included files that weren’t meant to be committed.
- You forgot to save some changes before committing.
- Something just went wrong and you need to fix it.
If you haven’t pushed your commit yet, you only need to deal with your local repository — fixing things is straightforward at this stage.
You can find an excellent summary of undoing and recovering in https://coderefinery.github.io/git-intro/recovering/
Exercise 02.1
Create a new repository in the GitLab area.
Clone it locally and create some files.
Commit them in the local respository.
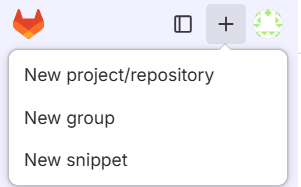
From the GitLab GUI, select “New project/repository”
Make it public and add README.
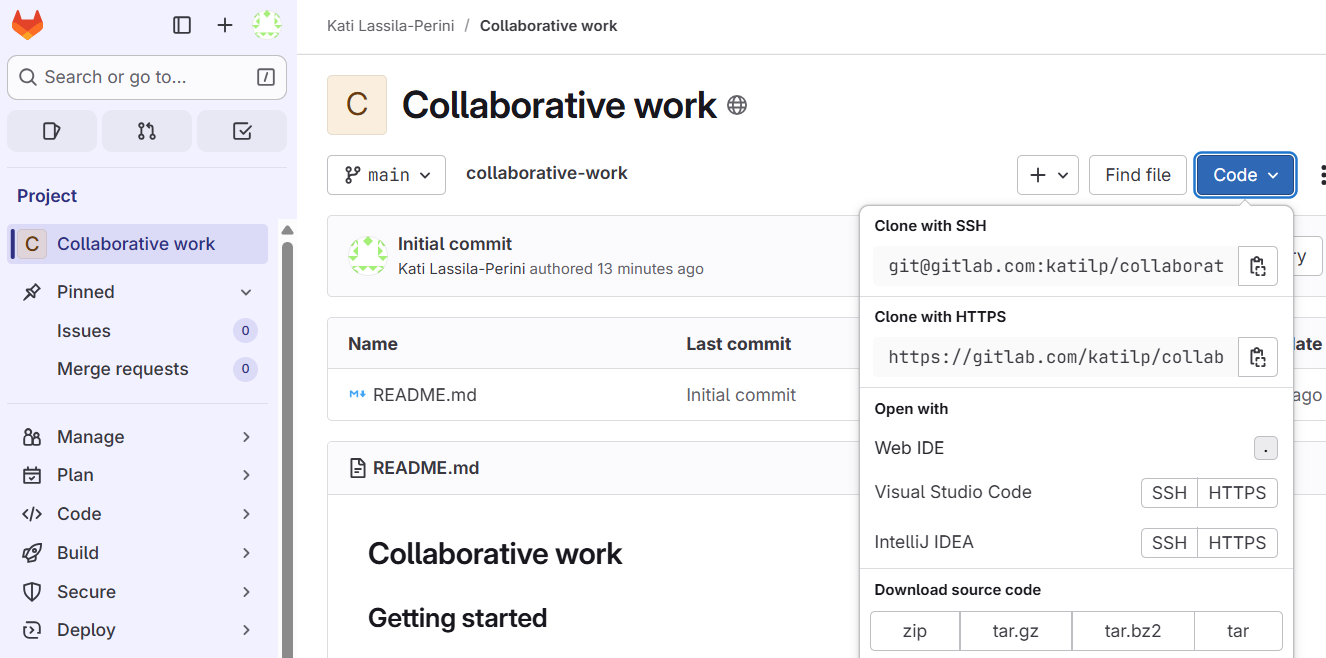
Clone it to your local area:
git clone git@gitlab.com:<your user name>/<your repository>.git
cd <your repository>
Note that you can copy the repository address from the GitLab web GUI:
Create some files, for example:
$ echo "some junk" > test.out
$ echo "my real work" > work.txt
Show the status of your Git area.
$ git status
On branch main
Your branch is up to date with 'origin/main'.

Untracked files:
  (use "git add <file>..." to include in what will be committed)
        test.out
        work.txt

nothing added to commit but untracked files present (use "git add" to track)
Add them and check the status:
$ git add .
$ git status
On branch main
Your branch is up to date with 'origin/main'.

Changes to be committed:
  (use "git restore --staged <file>..." to unstage)
        new file:   test.out
        new file:   work.txt
Commit your updates:
$ git commit -m " Add my work"
[main 4cb5898]  Add my work
 2 files changed, 2 insertions(+)
 create mode 100644 test.out
 create mode 100644 work.txt
Inspect your commit
git status shows the local changes that have not been
committed yet.
git show shows the contents of your commit.
git log shows the commit history.
Exercise 02.2
Explore the format options for the outputs of git show
and git log. How to print logs as a short oneliner for each
commit? Can you print out just the names of the files that have been
changed in your commit?
See:
-
git log --helpor the git log documentation -
git show --helpor the git show documentation.
$ git log --oneline
4cb5898 (HEAD -> main)  Add my work
339a972 (origin/main, origin/HEAD) Initial commit
$ git show --pretty="" --name-only
test.out
work.txtUndoing things
The best guide on undoing things before commit is the Git documentation: https://git-scm.com/book/en/v2/Git-Basics-Undoing-Things
Now as we made the commit already, we can either undo it first with
git reset --soft HEAD^ or use the option
--amend.
Exercise 02.3 - git reset
Read the example on how to undo a commit.
Then find out in the documentation
or in the git status output how to unstage a file.
Commit with your updated changes.
$ git reset --soft HEAD^
$ git status
On branch main
Your branch is up to date with 'origin/main'.

Changes to be committed:
  (use "git restore --staged <file>..." to unstage)
        new file:   test.out
        new file:   work.txt
You can check the logs to see that your recent commit is now gone:
$ git log --oneline
339a972 (HEAD -> main, origin/main, origin/HEAD) Initial commit
Then unstage as instructed, and commit again:
$ git restore --staged test.out
$ git commit -m " Add my work"
[main 3de58c2]  Add my work
 1 file changed, 1 insertion(+)
create mode 100644 work.txtExercise 02.4 - amend
In case you did the previous exercise, recreate another “junk” file and maybe do some changes to your other files.
Stage the updates with git add . and commit them.
Now you realise that you did not want to commit the “junk” file.
Remove it from your local area and check git status. Do
as instructed to update what will be committed.
Use git commit --amend to update your commit and verify
the commit with git show.
You can do the following updates (or use your own):
$ echo "some other junk" > test.out
$ echo "Update my work" >> work.txt
Check the status:
$ git status
On branch main
Your branch is ahead of 'origin/main' by 1 commit.
  (use "git push" to publish your local commits)

Changes not staged for commit:
  (use "git add <file>..." to update what will be committed)
  (use "git restore <file>..." to discard changes in working directory)
        modified:   work.txt

Untracked files:
  (use "git add <file>..." to include in what will be committed)
        test.out

no changes added to commit (use "git add" and/or "git commit -a")
Stage your updates and commit:
$ git add .
$ git commit -m "Update my work"
[main 77b681d] Update my work
 2 files changed, 2 insertions(+)
 create mode 100644 test.out
Whoops! That junk file ended up in your commit. Remove it and check the status
$ rm test.out
$ git status
On branch main
Your branch is ahead of 'origin/main' by 2 commits.
  (use "git push" to publish your local commits)

Changes not staged for commit:
  (use "git add/rm <file>..." to update what will be committed)
  (use "git restore <file>..." to discard changes in working directory)
        deleted:    test.out
Update what will be committed as instructed:
$ git rm test.out
rm 'test.out'
and amend your commit:
$ git commit --amendWhoa, what’s this now?!
  GNU nano 4.8         [...]/gitlab-tutorial-test/.git/COMMIT_EDITMSG
Update my work

# Please enter the commit message for your changes. Lines starting
# with '#' will be ignored, and an empty message aborts the commit.
#
# Date:      Tue Aug 12 16:44:39 2025 +0200
#
# On branch main
# Your branch is ahead of 'origin/main' by 3 commits.
#   (use "git push" to publish your local commits)
#
# Changes to be committed:
#       modified:   work.txt
#


                                                   [ Read 14 lines ]
^G Get Help    ^O Write Out   ^W Where Is    ^K Cut Text    ^J Justify     ^C Cur Pos     M-U Undo       M-A Mark Text
^X Exit        ^R Read File   ^\ Replace     ^U Paste Text  ^T To Spell    ^_ Go To Line  M-E Redo       M-6 Cop
Not familiar with NANO? Here’s a cheatsheet if needed: https://www.nano-editor.org/dist/latest/cheatsheet.html
Or change the default editor as instructed in the git config documentation.
If you are happy with the commit message, just hit Ctrl-X to exit and you will get a confirmation message of your commit. If you want to change the message, just edit it, hit Ctrl-X and confirm with Y.
Check that your commit now has only your work file:
$ git show --pretty="" --name-only
work.txt- Git command outputs are helpful, in particular,
git status. - Git is a powerful tool with a solid documentation.
Content from Undoing things once pushed
Last updated on 2025-12-16 | Edit this page
Overview
Questions
- Uh-oh! I already pushed — how can I fix my commit now?
Objectives
- Changing without breaking.
- Exercise with reverting commits.
Already pushed and it went wrong?
If you are working on your own code, you might be pushing your commits directly to the master/main branch.
We come to the collaborative works soon, and talk about using branches and protecting master/main branch so that only assigned contributors can push to it directly. This protection is a feature of the Git hosting platforms like GitLab and GitHub, not a built-in feature of plain Git itself.
For now, let us assume that you push your updates to your repository (or you are the one who has the right to do so in the common repository), so there’s no “merge request” (MR) on the GitLab side.
You’ve done your commits and now you push. You can check the contents
of your commits with git show.
$ git show --pretty="" --name-only
work.txt
It is also good practice to check your remote setting before pushing, for example:
$ git remote -v
origin  git@gitlab.com:<your user name>/tutorial-test.git (fetch)
origin  git@gitlab.com:<your user name>/tutorial-test.git (push)
origin is a shorthand for the full address which you use
in your push:
$ git push origin main
Enumerating objects: 10, done.
Counting objects: 100% (10/10), done.
Delta compression using up to 2 threads
Compressing objects: 100% (6/6), done.
Writing objects: 100% (9/9), 871 bytes | 45.00 KiB/s, done.
Total 9 (delta 0), reused 0 (delta 0)
To gitlab.com:katilp/tutorial-test.git
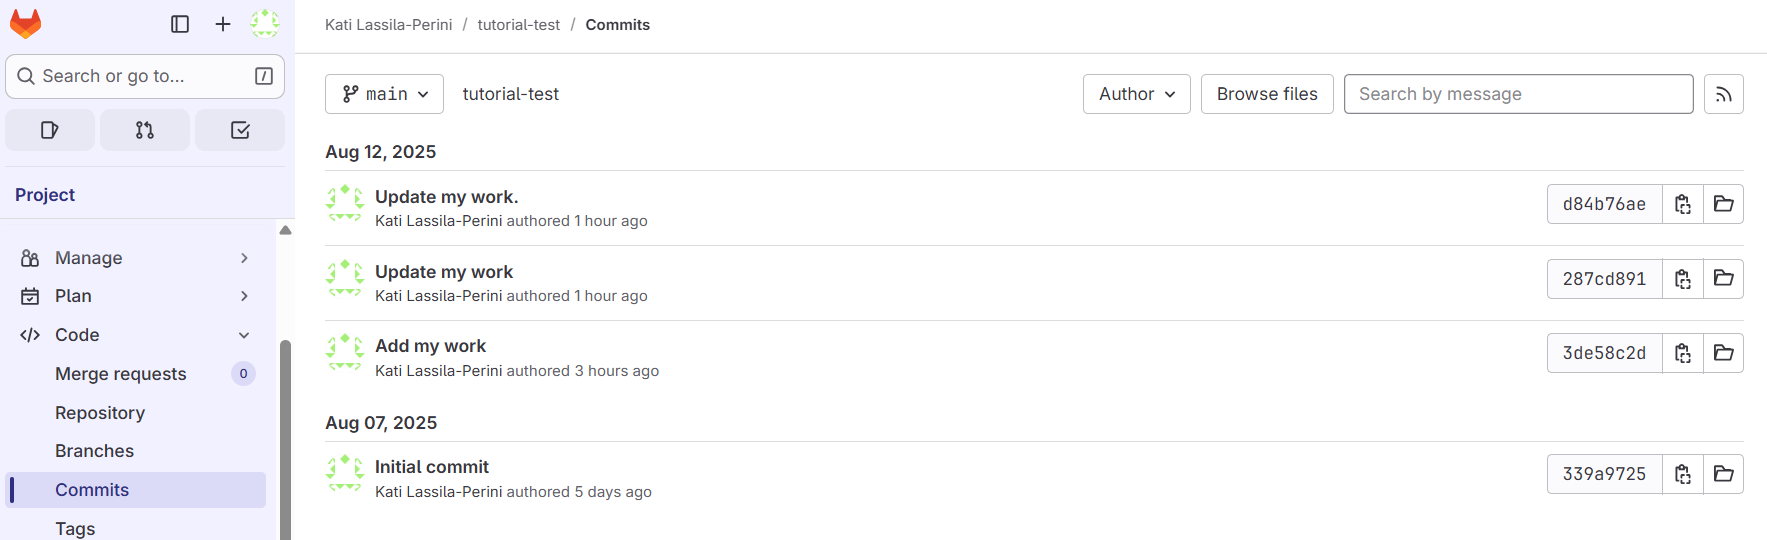
339a972..d84b76a main -> mainYou can see your separate commits listed in “History” on the GitLab Web UI, even if you pushed only once:
You can browse files on the Web UI, or inspect them in your local
area with git show <commit hash> (both short and long
forms of the commit hash work).
Now, we will exercise doing changes.
Note that amending the commit with git commit --amend
once it has been pushed the remote repository is not recommended:
Only amend commits that are still local and have not been pushed somewhere. Amending previously pushed commits and force pushing the branch will cause problems for your collaborators.
Commits can be undone with git revert. For collaborative
work, it is consider safer than git reset because
reset changes the commit history.
Exercise 03.1 - git revert
In the list of commits, undo a commit with
git revert <commit hash>.
On your local Git area, find the last commit to undo.
You will see something like this:
$ git log --oneline
d84b76a (HEAD -> main, origin/main, origin/HEAD) Update my work.
287cd89 Update my work
3de58c2  Add my work
339a972 Initial commit
and you can undo the latest change with
$ git revert d84b76a
[main a77d646] Revert "Update my work."
 1 file changed, 1 deletion(-)
Check the status
$ git status
On branch main
Your branch is ahead of 'origin/main' by 1 commit.
  (use "git push" to publish your local commits)

nothing to commit, working tree clean
and push
$ git push
Enumerating objects: 5, done.
Counting objects: 100% (5/5), done.
Delta compression using up to 2 threads
Compressing objects: 100% (2/2), done.
Writing objects: 100% (3/3), 339 bytes | 33.00 KiB/s, done.
Total 3 (delta 0), reused 0 (delta 0)
To gitlab.com:katilp/tutorial-test.git
d84b76a..a77d646 main -> main- Once commits have been pushed to the remote repository, make your changes so that the commit history is kept - unless you want to modify it.
Content from Working together
Last updated on 2025-12-16 | Edit this page
Overview
Questions
- How to best work on the same code?
Objectives
- Add contributors
- Understand roles
- Use of branches.
Let’s start collaborating!
Now we come to the collaborative work.
In general, there are two approaches:
In the fork and pull model, anyone can fork an existing repository and push changes to their personal fork. You do not need permission to the source repository to push to a user-owned fork. The changes can be pulled into the source repository by the project maintainer. When you open a pull request proposing changes from your user-owned fork to a branch in the source (upstream) repository, you can allow anyone with push access to the upstream repository to make changes to your pull request. This model is popular with open source projects as it reduces the amount of friction for new contributors and allows people to work independently without upfront coordination.
In the shared repository model, collaborators are granted push access to a single shared repository and topic branches are created when changes need to be made. Pull requests are useful in this model as they initiate code review and general discussion about a set of changes before the changes are merged into the main development branch. This model is more prevalent with small teams and organizations collaborating on private projects.
We will be using automated workflows, some of which require authentication features stored as “secrets” in the repository, and they will not be available in forks. Therefore, we choose working on a shared repository where all contributors are added as members.
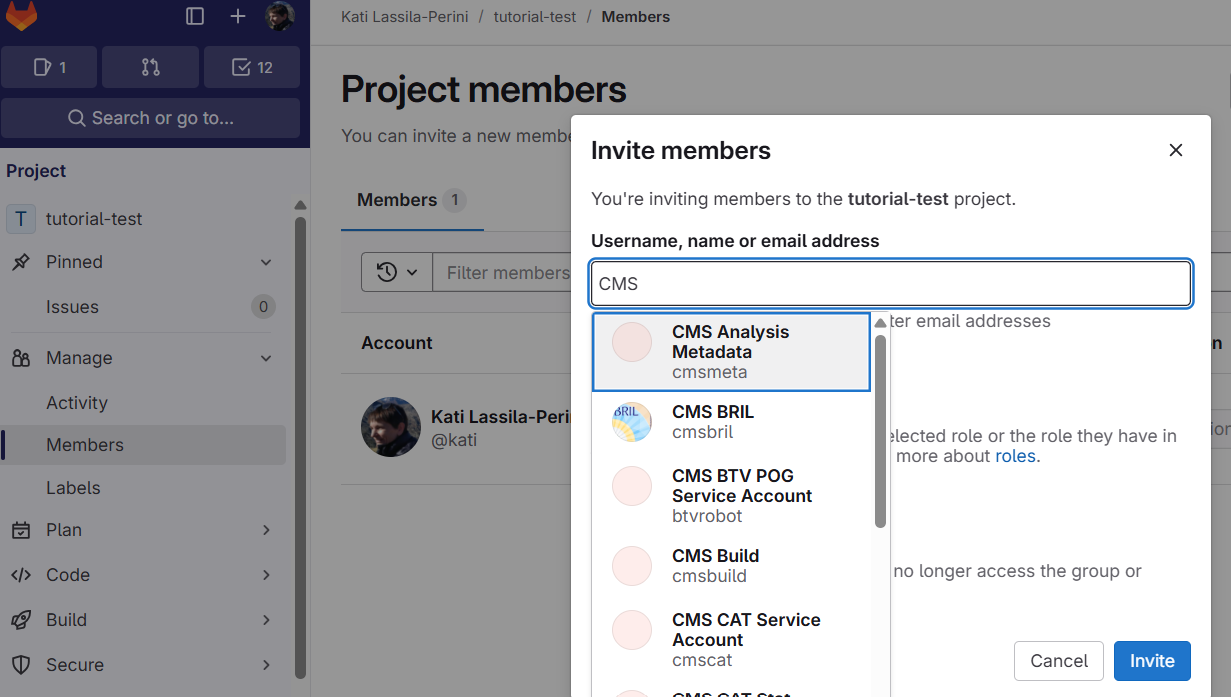
In the shared repository, go to Manage -> Members.
In the CERN GitLab instance, you can find all CERN accounts, including service accounts:
Learn about the roles.
Note in particular the branch rules and protected branches, see them in Settings -> Repository.
Only owners or maintainers can push directly to the default branch.
You will see a message similar to this:
remote: GitLab: You are not allowed to push code to protected branches on this project.
To gitlab.com:<project address>
! [remote rejected] HEAD -> main (pre-receive hook declined)
error: failed to push some refs to 'gitlab.com:<project address>'Make the changes with the usual Git workflow. Note that if you have a local repository with the same name, you will need to define another local name to the newly cloned local area:
git clone <git address> <local-repo-name>
cd <local-repo-name>
Create a new branch:
git checkout -b new-featureDo the edits and then
git add .
git commit -m "Describe your updates"
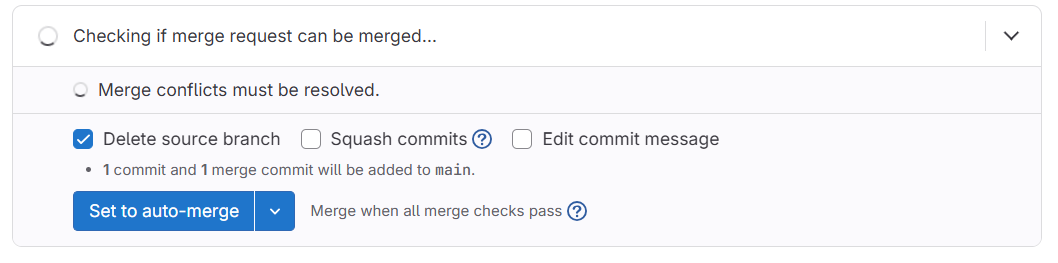
git push origin new-feature Follow the link to make a merge request and the repository owner can review and merge it.

Browse through the tabs and see the changes. Do not merge it yet as we continue to the next exercise to test it locally.
Exercise 04.3 - checking a new feature branch locally
As the project owner or maintainer, test the new feature locally. You would do this, for example, to run some code locally to see if it works as expected.
Use git fetch origin to get the latest changes and then
checkout the new branch.
Once tested, merge the request on the GitLab Web UI and delete your local branch.
Retreive the status of the remote repository so that you know the new branch name.
$ git fetch origin
remote: Enumerating objects: 12, done.
remote: Counting objects: 100% (12/12), done.
remote: Compressing objects: 100% (8/8), done.
remote: Total 11 (delta 3), reused 0 (delta 0), pack-reused 0 (from 0)
Unpacking objects: 100% (11/11), 1.67 KiB | 25.00 KiB/s, done.
From gitlab.com:<project address>
   395b0d5..6372999  main       -> origin/main
 * [new branch]      file4      -> origin/file4
Checkout the branch with
git checkout -b file4 origin/file4To test, you might run some code locally. If it looks OK, merge the
merge request on the GitLab Web UI. You can delete this local branch
after testing. You may need option -D to force it.
Remember to update your local main/master branch!!!
After a merge request have been merged, remember to update your local default branch.
git checkout main
git pull
Do this every time when you start a new development.
You can also delete your previous branch:
git branch -d new-feature- If the use of automated workflows is planned, it is convenient to work in a shared repository instead of using forks.
- You will use branches to contribute to the shared repository (unless you are the owner or the maintainer).
Content from Resolving conflicts
Last updated on 2025-12-16 | Edit this page
Overview
Questions
- How to solve conflicts in code?
Objectives
- Rebasing your working branch to a recent updates in the default branch
- Solving conflicting edits in files
- Defining best practices for contributions
Enter panic mode!
Everybody is frantically working on the code repository. The owner commits straight to the default branch, developers push from their own branches… and soon, conflicts explode.
To keep the conflict on the code — not between people — we’ll practice breaking things on purpose and then fixing them.
Exercise 05.1
Exercise with your pair to add content to you shared repository in the default branch. You can do so if both of you have at least maintainer rights to the repository. Learn how to update your working area with contents of the updated remote.
One of you makes a new local edits. Meanwhile, the other one updates the remote default branch with new files.
If you try to push, you will see a message like this:
 ! [rejected]        main -> main (fetch first)
error: failed to push some refs to 'gitlab.com:katilp/tutorial-test.git'
hint: Updates were rejected because the remote contains work that you do not
hint: have locally. This is usually caused by another repository pushing to
hint: the same ref. If you want to integrate the remote changes, use
hint: 'git pull' before pushing again.
hint: See the 'Note about fast-forwards' in 'git push --help' for details.
A bare git pull, as suggested in the message most likely
gives:
   2f8c69a..d32176b  main       -> origin/main
hint: You have divergent branches and need to specify how to reconcile them.
hint: You can do so by running one of the following commands sometime before
hint: your next pull:
hint:
hint:   git config pull.rebase false  # merge
hint:   git config pull.rebase true   # rebase
hint:   git config pull.ff only       # fast-forward only
hint:
hint: You can replace "git config" with "git config --global" to set a default
hint: preference for all repositories. You can also pass --rebase, --no-rebase,
hint: or --ff-only on the command line to override the configured default per
hint: invocation.
Get the remote changes with
git pull --rebaseand then push your updates.
Did this work in your case?
Exercise 05.2
Exercise with your pair to add content to you shared repository in two different branches. Learn how to update your working branch with contents of the updated remote.
One of you makes a new local edits to a local working branch. Meanwhile, the other one updates the remote default branch with new files.
Create a new branch, make edits, and push them to the shared repository with
git push origin <your branch name>Then make a merge request from the GitLab Web UI.
If the branches diverge you will see a message about it and you can click on “Rebase source branch” and accept
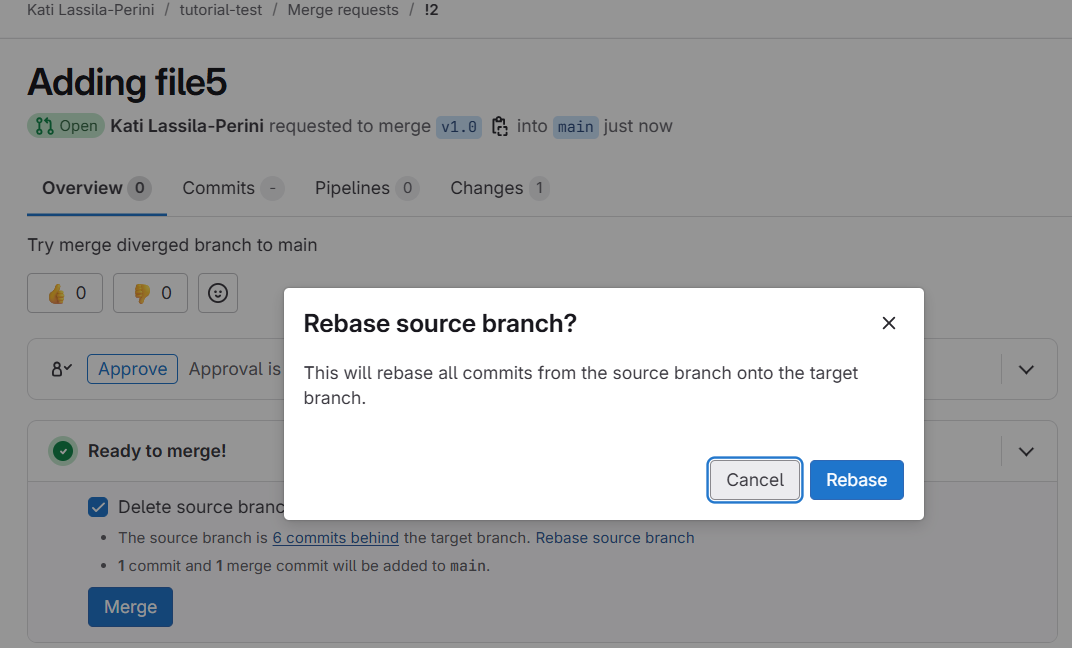
GitLab checks for conflicts
and once done gives

Follow the “Review changes” link, and if there are no conflicts, your can merge again.
Note that you could have avoided this by rebasing before pushing. You could have refreshed your main:
git checkout main
git pull
then moved to your working branch and rebased (after the local commit)
git checkout <your branch name>
git rebase main
If there are not conflicts, i.e. edits to the same files, you would get a message:
First, rewinding head to replay your work on top of it...
Applying: <your commit message>Exercise 05.3
With your pair, make local edits to the same file in the shared repository.
One of you edits a file in a local working branch. Meanwhile, the other one updates the same file in the remote default branch.
Observe the error messages when trying to merge and learn to solve conflicts with confidence!
Exercise conflict solving on the GitLab Web UI and with the Git command line tools.
Do your edits (to the same file that has meanwhile been modified) in a working branch. Commit and push your branch to remote. Go to the branch in the GitLab Web UI and make a merge request.
When trying to merge from the GitLab Web UI, you will see this
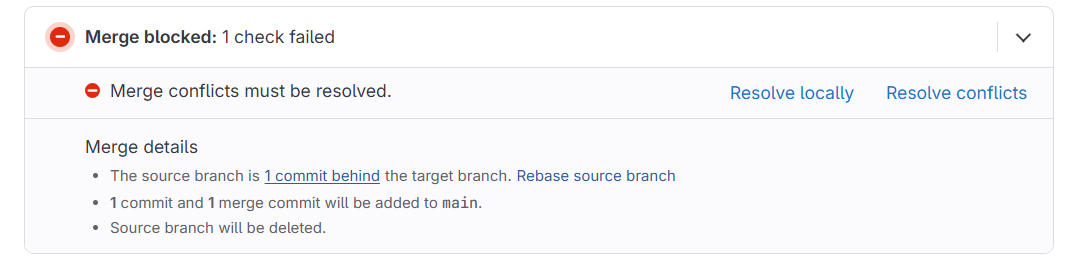
Clicking on “Solve locally” gives instructions to copy-paste to solve them by fetching the branch locally.
Clicking on “Resolve conflicts” gives an online tool to choose among the two divergent versions or to edit inline
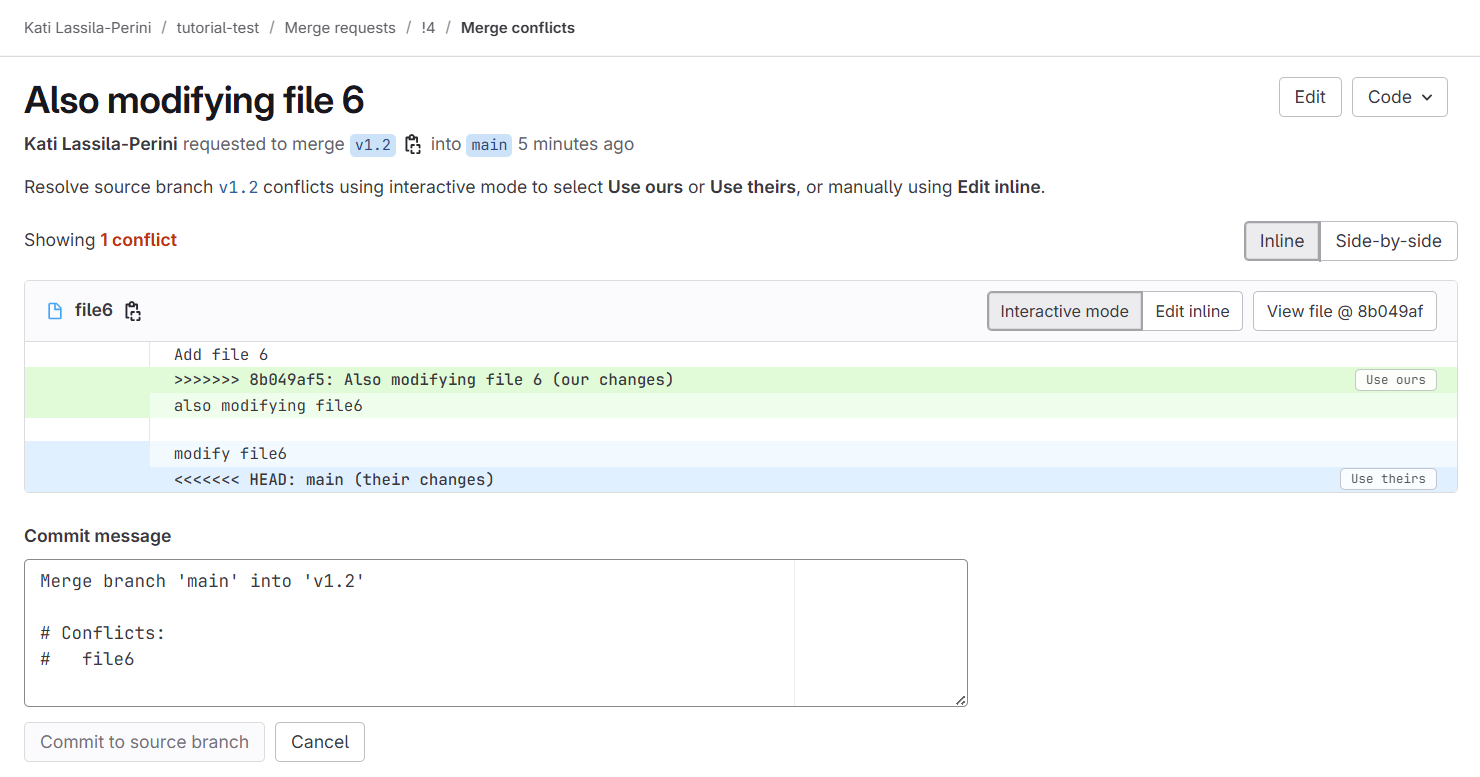
Update the file as needed, commit and merge.
See also https://docs.gitlab.com/user/project/merge_requests/conflicts/
Exercise 05.4
If you have enjoyed resolving conflicts, go ahead with your exercise pair to make further simultaneous divergent changes to the directory structure and the files in the shared repository.
See below!
Avoid modifying the same files simultaneously!
Small conflicts are easy to solve but big divergences are a pain.
Organise the code and its development so that developers can work on separate files.
Avoid big, long-lived development branches!
Read this instructive comment on reddit:
A lot of people use branches as a comfort mechanism. Hiding your code until it’s ‘perfect’ feels safer. Not having your code merged until someone has spent a load of time reviewing it line by line feels safer. The reality is getting changes out there means issues are found sooner, only reviewing changes in PRs delays opportunity to give early feedback on the approach or solution.
Remember to update your local main/master branch!!!
You will avoid a good amount of problems, if you remember to update your local default branch.
git checkout main
git pull
Do this every time when you start a new development.
- Git is the tool for managing collaborative work on code.
- Git automatically integrates changes when it’s safe, and asks you to resolve things when there’s a conflict.
- Conflicts are not errors—they’re a normal part of working with shared code. But resolving them is an extra step for developers or maintainers.
- Merging your work into the default branch regularly prevents large conflicts and saves effort.
Content from Keeping things in order
Last updated on 2025-12-16 | Edit this page
Overview
Questions
- How to use issues to keep things in order?
Objectives
- Opening issues
- Closing issues with merge requests
- Defining best practices for contributions
Keeping things in order
Whether it’s a personal project of your own or a shared repository, keeping track of tasks in issues is a good practice.
Issues help inform all contributors about missing features, work in progress, or topics for discussion. They can also be used to report bugs. GitLab lets you select from three different types of issues — Incident, Issue, or Task — but these only differ if you have defined separate templates to guide contributors in providing useful information.
Issues can be assigned to project members closed through merge
requests. The closing
can be automated by using closes #<issue number>
in the commit message. Similarly,
related to #<issue number> links a commit to an
issue, which helps tracking progress.
Issues can be labeled based on their content, difficulty, urgency, status of work in progress, or other properties. The labels can be defined for each project separately, and a default set of labels can be easily generated from Manage -> Labels. Labels are helpful in search in large projects.
Issues can be viewed in an issue board, and be connected to a milestone. They can be set up Plan -> Issue boards and Plan -> Milestones.
Remember to update your local main/master branch!!!
Always remember to update your local default branch.
git checkout main
git pull
Do this every time when you start a new development.
Exercise 06.1
As the owner of the exercise repository, describe a desired new feature in an issue. Assign it to a developer (that’s your exercise buddy). Let them make the changes suggested in the issue and push it in a branch with a commit message that automatically closes the issue once merged. Review the merge request and merge it if you are satisfied.
Use closes #<issue number> in the commit message
to connect the merge request to the issue and to close it once
merged.
Issues are useful even in single-contributor repositories
If you’re the only contributor, you’ll just be closing your own issues. Still, tracking them helps you stay organized.
Exercise 06.2
Explore setting up and using an Issue board. In addition to the default “Open” and “Closed” lists, add some others, for example “In progress” and “Help needed”.
Follow Plan -> Issue boards.
You will see something like this:
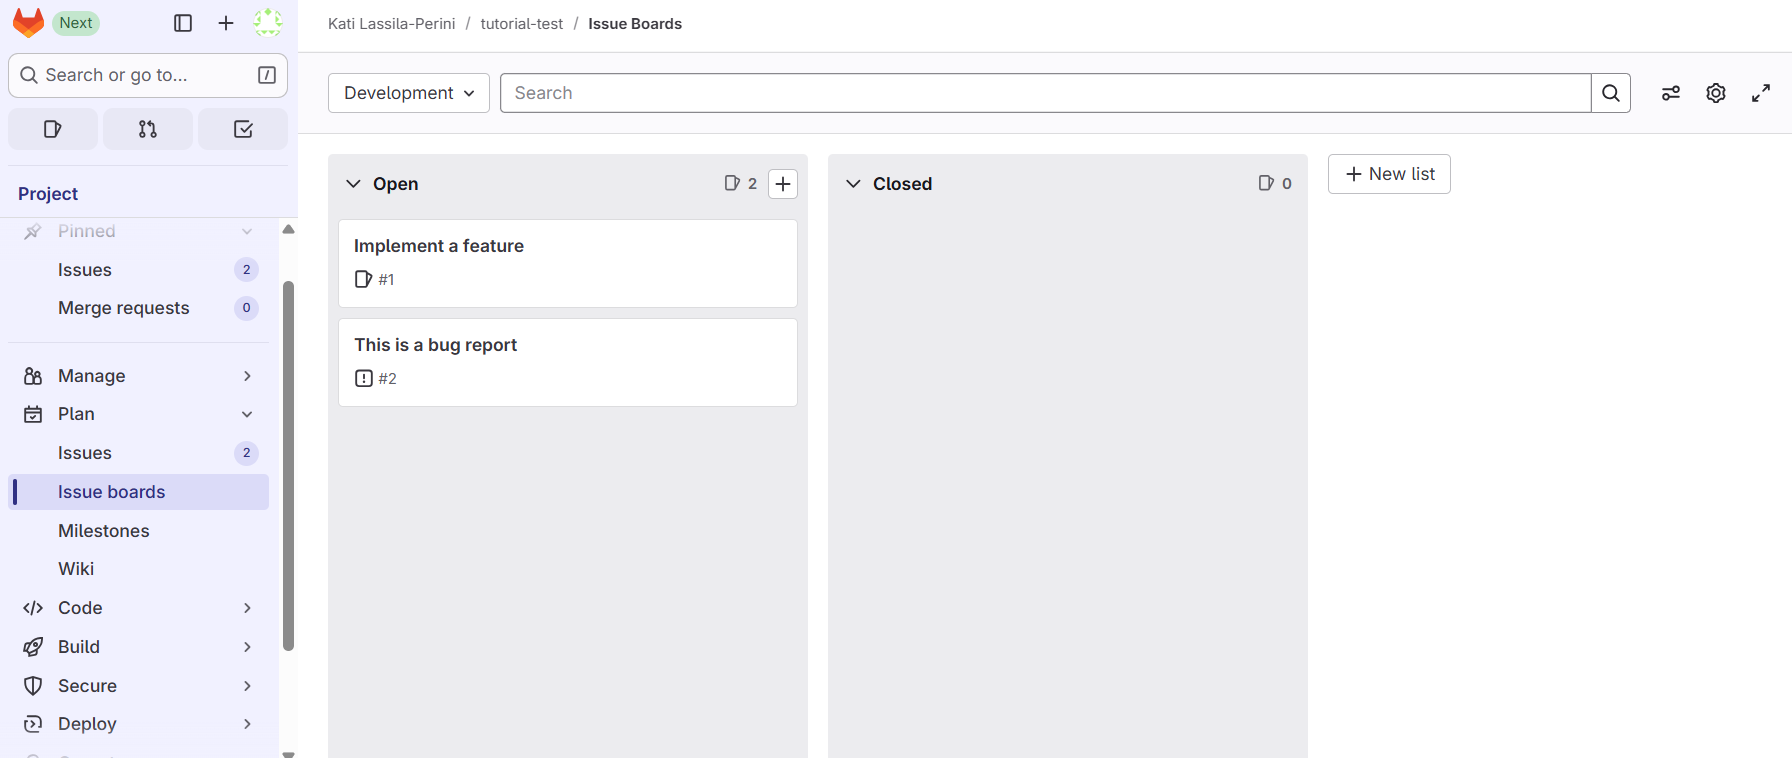
To add lists, you will first have to define the corresponding labels in Plan -> Issues.
Exercise 06.3
Make a quick list of the work you have planned for your code. For real, not for the exercise repository we have been working on.
Could you add them as issues to the code repository?
That’s on you and we come back to this at the end of the day!
- Issue tracker in GitLab is a convenient tool for a centralised discussion for code development in a repository.
- Issues are helpful for tracking the progress and sharing the work.
Content from Automate testing
Last updated on 2025-12-16 | Edit this page
Overview
Questions
- How to automate testing of code updates?
Objectives
- Understand basic GitLab CI/CD pipeline concepts
- Run your first CI/CD pipeline
- Define a test
- Use artifacts
GitLab CI/CD pipelines
CI/CD stands for Continuous Integration and Continuous Delivery. It means that updates are frequently integrated into the codebase and their functionality is tested, so the software is close to “deliverable” at any point in time.
CI/CD pipelines are automated workflows that can be configured to run when new code is updated, or scheduled to run at regular intervals.
When developers push code to GitLab, they can define automated tasks
in a .gitlab-ci.yml file. These tasks might include running
tests, building applications, or deploying code. GitLab Runner is the
application that executes these tasks on computing infrastructure.
GitLab.com offers computing infrastructure for these tasks, and the CERN
GitLab instance has access to dedicated infrastructure at CERN.
yml (or sometimes yaml) is a commonly used
language in various workflow definitions and fairly easy to read and
understand. Keep in mind, however, that correct indentation is crucial,
as YAML uses indentation to define structure.
We will first have a look at the template that GitLab suggests in the “Pipeline editor”.
Exercise 07.1
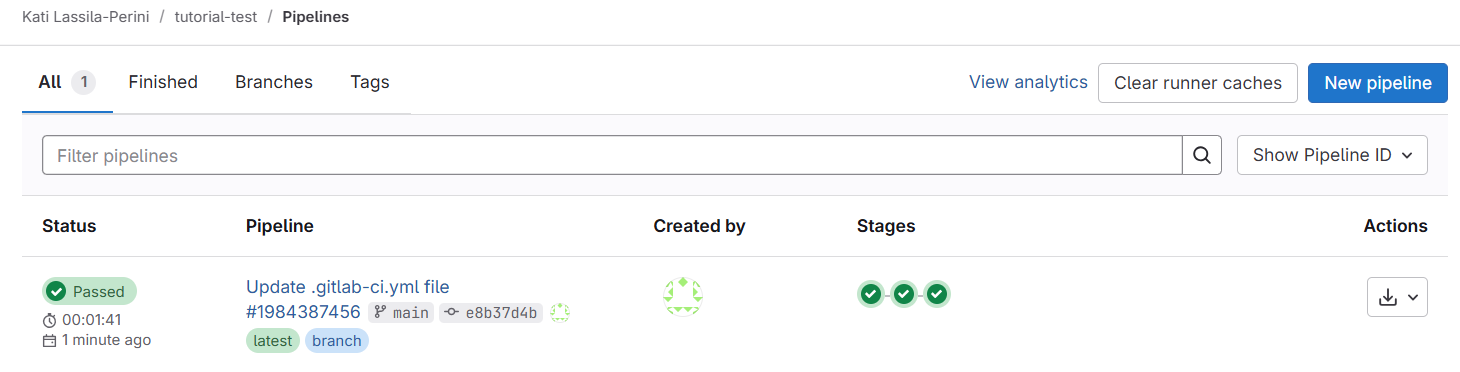
On the exercise repository, follow Build -> Pipeline editor and click on “Configure pipeline”
Inspect it, commit it and follow Build -> Pipelines to see it running.
While inspecting, observe:
- stages with default names
build,testanddeploy, see https://docs.gitlab.com/ci/yaml/#stages - that this a typical software industry pipeline structure that builds a tool that is then deployed
- scripts usually consist of shell commands (or scripts)
Once done you will see something like this in Build -> Pipelines:
Exit codes
Remember that in the earlier exercises, the repository owner pulled the new feature branch locally to test it. This process could also be done automatically.
To do that, we need a test that either passes or fails, which the pipeline can interpret.
Unix exit codes can be used for this purpose. Every command returns
an exit code — 0 for success or greater than 0 for failure. You can
display the exit code of the last command in the terminal with
echo $?.
You can make a script to stop at the first command that returns a
non-zero exit code with set -e.
You can read more about exit codes in the HSF GitLab tutorial.
Exercise 07.2
Exercise with shell commands. Exercise with a python test or a shell script.
Type echo $? after a command on your terminal.
Write a bash script test.sh with some commands in it.
Test what happens when you run the script.
Now we go back to the exercise repository, so just a reminder:
Remember to update your local main/master branch!!!
Always remember to update your local default branch.
git checkout main
git pull
Do this every time when you start a new development.
Exercise 07.3
Add a test to the pipeline template. The repository files are available in the jobs. You could test, for example, the contents of the files in the repository, or some other functionality. Keep it simple, we’ll get to the real work soon.
Replace the default echo ... and sleep ...
commands in the .gitlab-ci.yml file with test commands of
your own. You can also add a test script to your repository and run
it.
Artifacts
In physics analysis, the outcome of the workflow — for example, a result file or a plot — is the best indicator that the code works as expected.
Such outcomes can be defined as artifacts in GitLab CI/CD pipelines, and they can be accessed through the GitLab Web UI.
You can define artifacts in the .gitlab-ci-yml file, and
they are by default available to all stages of the pipeline. Note that
artifacts cannot be modified, so if you plan to use the output of one
step and modify it in a subsequent step, you will need to make a local
copy of it in that job.
Exercise 07.4
Add an artifact to your CI/CD pipeline.
You can use something similar to this:
  script:
    - mkdir -p outputs
    - echo "Compiling the code..." > outputs/build.txt
    - echo "Compile complete." >> outputs/build.txt
  artifacts:
    paths:
      - outputs/
You can check in the subsequent job scripts that what you write in
the outputs directory is visible. Only the jobs that have
the artifacts: keyword, store them as artifacts to be
downloaded. However, even if without the keyword, the
outputs directory is available in all jobs.
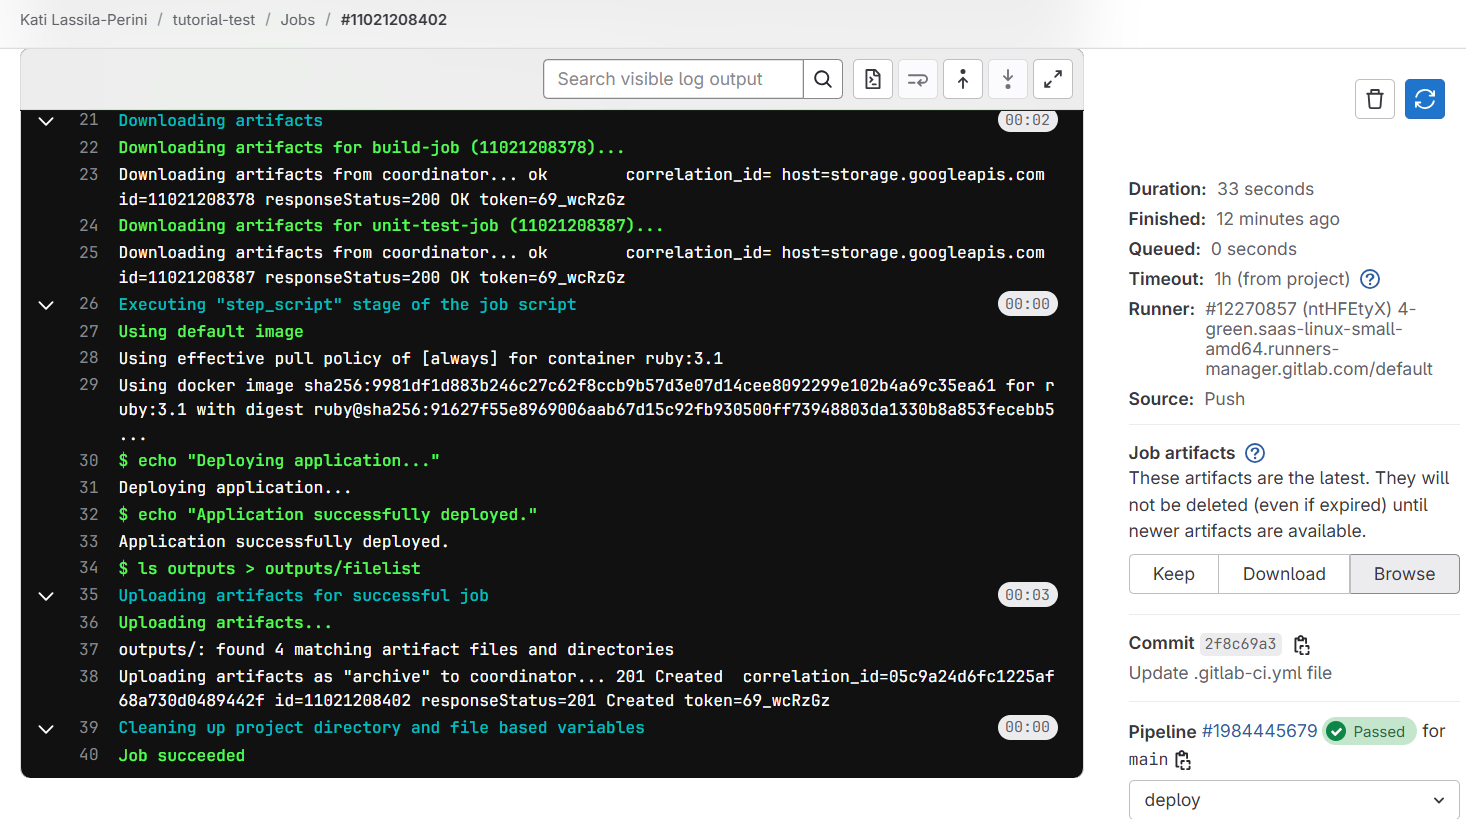
You can download the artifacts from the Pipeline view:

or browse them by clicking on a single job, and following “Browse”:
- GitLab CI/CD pipelines are useful to test the functionality of the code updates.
- They can perform decicated tests or procude a sample output which can indicate that the code works as expected.