Accessing CVMFS from Docker locally
Overview
Teaching: 10 min
Exercises: 15 minQuestions
How can I access CVMFS from my computer?
How can I access CVMFS from Docker?
Objectives
Be aware of CVMFS with Docker options.
Successfully mount CVMFS via a privileged container.
In order to use CVMFS via Docker, a couple of extra steps need to be taken. There are different approaches:
- Installing CVMFS on your computer locally and mounting it from the container.
- Mounting CVMFS via another container and providing it to the analysis container.
- Mounting CVMFS from the analysis container.
We will go through these options in the following.
This is where things get ugly
Unfortunately, all the options below have some caveats, and they might not even work on your computer. At the moment, no clear recommendations can be given. Try for yourself which option works best for you. However, it is not essential for this lesson that any of these options work. We will learn about other options that will work later.
Installing CVMFS on a local computer
CVMFS can be installed locally on your computer. Packages and installation
packages are provided on the CVMFS Downloads page. In the
interest of time, we will not install CVMFS now, but instead use the second
option above in the following. If you would like to install CVMFS on your
computer, make sure to read the
CVMFS Client Quick Start Guide.
Please also have a look at the
CVMFS with Docker documentation
to avoid common pitfalls when running Linux on your computer and trying to
bind mount CVMFS from the host. This is not necessary when running on a Mac.
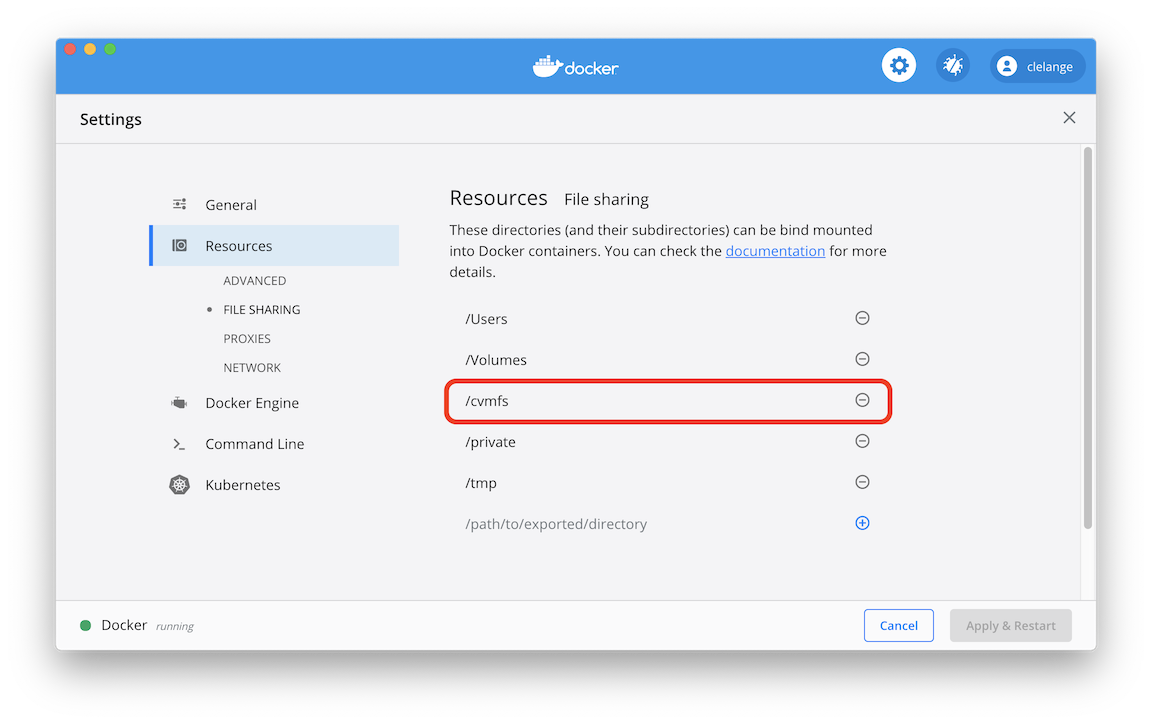
However, on a Mac you need to go to Docker Settings -> Resources -> File Sharing
and add /cvmfs to enable bind mounting.
To run your analysis container and give it access to the /cvmfs mount, run
the following command (mind that --rm deletes the container after exiting):
docker run --rm -it -v /cvmfs:/cvmfs gitlab-registry.cern.ch/clange/cc7-cms /bin/bash
Using the cvmfs-automounter
The first option needed CVMFS to be installed on your computer. Using the
cvmfs-automounter is effectively mimicking what is done on GitLab. First, a
container, the cvmfs-automounter, is started that mounts CVMFS, and then
this container provides the CVMFS mount to other containers. If you are
running Linux, the following command should work.
On a Mac, however, this will not work (at least at the moment). This could
work if you are using Windows Subsystem for Linux 2 (WSL2) in combination
with Docker for WSL2.
sudo mkdir /shared-mounts
docker run -d --name cvmfs --pid=host --user 0 --privileged --restart always -v /shared-mounts:/cvmfsmounts:rshared gitlab-registry.cern.ch/vcs/cvmfs-automounter:master
This container is running as a daemon (-d), but you can still see it via
docker ps and also kill it using docker kill cvmfs.
docker run -v /shared-mounts/cvmfs:/cvmfs:rslave -v $(pwd):$(pwd) -w $(pwd) --name ${CI_PROJECT_NAME} ${FROM} /bin/bash
Mounting CVMFS from the analysis container
This is what I personally would recommend at the moment. It seems to work on both Mac, Windows 10 Pro, and most Linux systems. The caveat is that the container runs with elevated privileges, but if you trust me, you can use it.
docker run --rm --cap-add SYS_ADMIN --device /dev/fuse -it gitlab-registry.cern.ch/clange/cmssw-docker/cc7-cmssw-cvmfs:latest bash
If you get an error similar to:
/bin/sh: error while loading shared libraries: libtinfo.so.5: failed to map segment from shared object: Permission denied
you need to turn off SElinux security policy enforcing:
sudo setenforce 0
This can be changed permanently by editing /etc/selinux/config, setting SELINUX to permissive or disabled. Mind, however, that there are certain security issues with disabling SElinux security policies as well as running privileged containers.
Exercise: Give it a try!
Try if you can run the following command from your cloned repository base directory:
docker run --rm --cap-add SYS_ADMIN --device /dev/fuse -it -v $(pwd):$(pwd) -w $(pwd) gitlab-registry.cern.ch/clange/cmssw-docker/cc7-cmssw-cvmfs:latest bashThis should set up CMSSW, compile your code, and then exit the container again. You can of course also do this manually, i.e. start bash in the container and execute the
build.shafterwards so that you stay inside the container.
The downside to starting CVMFS in the container
The CVMFS daemon is started when the container is started for the first time. It is not started again when you e.g. lose your network connection or simply connect back to the container at a later stage. At that point, you won’t have CVMFS access anymore.
Developing CMS code on your laptop
By using containers, you can effectively develop any all HEP-related code (and beyond) on your local development machine, and it doesn’t need to know anything about CVMFS or CMSSW in the first place.
Key Points
You can install CVMFS on your local computer.
The
cvmfs-automounterallows you to provide CVMFS to other containers on Linux.Privileged containers can be dangerous.
You can mount CVMFS from within a container on container startup.