Introduction
Overview
Teaching: 10 min
Exercises: 0 minQuestions
Which options are available to run CMSSW in a container?
Objectives
Be aware of what container images exists and their individual caveats.
CMS does not have a clear concept of separating analysis software from the rest of the experimental software stack such as event generation, data taking, and reconstruction. This means that there is just one CMSSW, and the releases have a size of several Gigabytes (>20 GB for the last releases).
From the user’s and computing point of view, this makes it very impractical to build and use images that contain a full CMSSW release. Imagine running several hundred batch jobs where each batch node first needs to download several Gigabytes of data before the job can start, amounting to a total of tens of Terabytes. These images, however, can be useful for offline code development, in case CVMFS is not available, as well as for overall preservation of the software.
An alternative to full CMSSW release containers are Linux containers that only contain the underlying base operating system (e.g. Scientific Linux 5/6 or CentOS 7/8) including additionally required system packages. The CMSSW release is then mounted from the host system on which the container is running (which could be your laptop, a GitLab runner, or a Kubernetes node). These images have a size of a few hundred Megabytes, but rely on a good network connection to access the CVMFS share.
Analysis software based on LCG-provided software stacks, available at
/cvmfs/sft.cern.ch/, is a similar use case, in that it can be more practical
to pick packages from the CVMFS share rather than rebuilding each of them.
One thing that has not been covered in detail in the introduction to Docker is that containers do not necessarily have to be executed using Docker. There are several so-called container run-times that allow the execution of containers. CMS uses Apptainer (previously Singularity) for sample production, and use of Singularity is also centrally supported and documented. The main reason for that is that Singularity is popular in high-performance and high-throughput computing and does not require any root privileges.
While executing images on LXPLUS and HTCondor is more practical with Apptainer/Singularity, running in GitLab CI is by default done using Docker. Since Apptainer uses a proprietary image format, but supports reading and executing Docker images, building images is better done using Docker.
Key Points
Full CMSSW release containers are very big.
It is more practical to use light-weight containers and obtain CMSSW via CVMFS.
The centrally supported way to run CMSSW in a container is using Apptainer.
Using full CMSSW containers
Overview
Teaching: 10 min
Exercises: 0 minQuestions
How can I obtain a standalone CMSSW container?
Objectives
Understanding how to find and use standalone CMSSW containers.
As discussed in the introduction, the images that contain full CMSSW releases can be very big. CMS computing therefore does not routinely build these images. However, as part of the CMS Open Data effort, images are provided for some releases. You can find those on Docker Hub. In addition, a build service is available.
If you would like to use these images, you can use them in the same way as
the other CMS images with the only difference that the CMSSW software in the
container is in /opt/cms and not within /cvmfs/cms.cern.ch.
You can run the containers as follows (pick either bash or zsh) when
using the version published on Docker Hub:
docker run --rm -it cmsopendata/cmssw:10_6_8_patch1 /bin/zsh
Do not use for large-scale job submission nor on GitLab!
Due to the large size of these images, they should only be used for local development.
Key Points
Standalone CMSSW containers are currently not routinely built due to their size.
They need to be built/requested when needed.
Containers based on CVMFS
Overview
Teaching: 15 min
Exercises: 10 minQuestions
How can I get a more light-weight CMSSW container?
What are the caveats of using a light-weight CMSSW container?
Objectives
Understand how the light-weight CMS containers can be used.
In a similar way to running CMSSW in GitLab, the images containing only the base operating system (e.g. Scientific Linux 5/6 or CentOS 7/8) plus additionally required system packages can be used to run CMSSW (and other related software). CMSSW needs to be mounted via CVMFS. This is the recommended way!
For this lesson, we will continue with the repository we used for the GitLab CI for CMS lesson and just add to it.
Adding analysis code to a light-weight container
Instead of using these containers only for compiling and running CMSSW, we can add our (compiled) code to those images, building on top of them. The advantage in doing so is that you will effectively be able to run your code in a version-controlled sandbox, in a similar way as grid jobs are submitted and run. Adding your code on top of the base image will only increase their size by a few Megabytes. CVMFS will be mounted in the build step and also whenever the container is executed.
Docker containers can be built in GitLab CI jobs using the kaniko tool. Additionally, skopeo cab be used to tag the container images.
Luckily, templates are provided in the Common Analysis Tools (CAT) managed GitLab area cms-analysis, which make creating the GitLab CI jobs quite easy to write.
Creating a Dockerfile
Before using those templates, however, we need to write a Dockerfile, containing the commands to build our code. Please refer to this introduction to learn about Docker and how to write a Dockerfile.
The Dockerfile required looks as follows:
FROM gitlab-registry.cern.ch/cms-cloud/cmssw-docker/cc7-cms:latest

ENV CMS_PATH /cvmfs/cms.cern.ch
ENV CMSSW_RELEASE CMSSW_10_6_8_patch1
ENV SCRAM_ARCH slc7_amd64_gcc820

COPY ZPeakAnalysis /ZPeakAnalysis

RUN shopt -s expand_aliases && \
    set +u && source ${CMS_PATH}/cmsset_default.sh && set -u  && \
    export SCRAM_ARCH=${SCRAM_ARCH} && \
    cmsrel ${CMSSW_RELEASE} && \
    cd ${CMSSW_RELEASE}/src && \
    cmsenv && \
    mkdir -p AnalysisCode && \
    cp -r /ZPeakAnalysis AnalysisCode && \
    scram b
This is pretty complicated, so let’s break it into smaller pieces.
The FROM directive defines the image we build on top of.
The ENV directives define environment variables that will be used during the build.
The COPY directive copies the local directory ZPeakAnalysis into a specified
location in the container. You have to remember that this Dockerfile will be used to
build a container image in the context of a GitLab CI job, so the ZPeakAnalysis
directory will be available, as the first thing the GitLab CI job does is clone the
repository.
Finally, the RUN directive contains the commands that need to be run to setup the
CMSSW developer area, move the ZPeakAnalysis code in a [subsystem]/[package] structure,
and compile with scram.
If you want to be able to build the container on your laptop you need CVMFS at build time
You can in principle build the container locally, but you need to mount CVMFS (which must be available on the host machine) at build time. Docker does not allow to mount volumes at build time, only at runtime, unless one uses docker-compose. A more straightforward way is to use
podman, instead of Docker, to build the image locally, sincepodmanallows mounting volumes at build time.cd [the directory where you cloned your repository] podman build . -v /cvmfs:/cvmfs --format docker -t [somename]The
build .command tellspodmanto build the current directory, where it will search for a file calledDockerfile. The-v /cvmfs:/cvmfsinstructspodmanto mount directory/cvmfson the host to directory/cvfmson the container (the syntax is-v [host path]:[dest path]). Finally, the--format dockeroption instructspodmanto create a docker image, rather thanoci.
Building containers in the GitLab CI
Docker images can be built in the CI using the kaniko image builder.
This tool allows building images from a Docker file, while running inside a container.
Using kaniko circumvents the problem we were alluding to before, that CVMFS needs to be
available at build time, which cannot be achieved with ‘vanilla’ docker commands.
Up until October 2023 one could build containers with CVMFS mounted at build time in the GitLab CI via the use of dedicated, so called docker-provileged, GitLab runners. These runners, however, have been decommissioned, see here. Since then, the recommended way to build docker images needing CVMFS at build time is via
kaniko.
CAT provides GitLab CI job templates for building images with kaniko and for tagging them (with skopeo).
The templates are hosted in the cms-analysis/general/container-image-ci-templates project.
You can find below a .gitlab-ci.yml file for building the image is the following using the CAT templates.
include:
  - project: 'cms-analysis/general/container-image-ci-templates'
    file:
      - 'kaniko-image.gitlab-ci.yml'
      - 'skopeo.gitlab-ci.yml'

build_image:
  stage: build
  extends: .build_kaniko
  variables:
    DOCKER_FILE_NAME: "Dockerfile"
    REGISTRY_IMAGE_PATH: "${CI_REGISTRY_IMAGE}:${CI_COMMIT_SHORT_SHA}"
  rules:
    - if: $CI_COMMIT_BRANCH == $CI_DEFAULT_BRANCH
      variables:
        PUSH_IMAGE: "true"
    - when: always
      variables:
        PUSH_IMAGE: "false"
  tags:
    - cvmfs

tag_image:
  stage: tag
  extends: .tag_skopeo
  variables:
    IMAGE_ORIGIN_TAG: "${CI_REGISTRY_IMAGE}:${CI_COMMIT_SHORT_SHA}"
    IMAGE_DESTINATION_TAG: "${CI_REGISTRY_IMAGE}:latest"
This is pretty complicated, so let us break it down to smaller pieces.
The include statement imports the templates.
Those templates define jobs called .build_kaniko and .tag_skopeo,
which are then used to define the jobs that are actually run, i.e.
build_image and tag_image (those two jobs extend, i.e. include, the
ones defined in the templates).
The build_image job defines the variable DOCKER_FILE_NAME, identifying the
path of the Dockerfile, and REGISTRY_IMAGE_PATH, declaring the registry where
the image will be published. The REGISTRY_IMAGE_PATH variable itself points to a value
that is formed using other variable, that GitLab pre-defines for every CI job,
(along with many others, see here).
The CI_REGISTRY_IMAGE variable points to the container registry associated with the repository.
In case of the CERN GitLab installation, this usually corresponds to
gitlab-registry.cern.ch/[namespace]/[project].
Notice the rules for this job: the job will publish the image to the registry
only if the CI runs on the default branch (master or main, typically).
The tag_image job will take the image with the name specified in IMAGE_ORIGIN_TAG
and copy it to the name specified in IMAGE_DESTINATION_TAG.
This job only runs on the default branch (this behavior is set directly in the .tag_skopeo
job).
Since developing this using GitLab is tricky, the next episodes will cover how you can develop this interactively on LXPLUS using Singularity or on your own computer running Docker. The caveat of using these light-weight images is that they cannot be run autonomously, but always need to have CVMFS access to do anything useful.
Key Points
The light-weight CMS containers need to mount CVMFS.
They will only work with CVMFS available.
Accessing CVMFS from Docker locally
Overview
Teaching: 10 min
Exercises: 15 minQuestions
How can I access CVMFS from my computer?
How can I access CVMFS from Docker?
Objectives
Be aware of CVMFS with Docker options.
Successfully mount CVMFS via a privileged container.
In order to use CVMFS via Docker, a couple of extra steps need to be taken. There are different approaches:
- Installing CVMFS on your computer locally and mounting it from the container.
- Mounting CVMFS via another container and providing it to the analysis container.
- Mounting CVMFS from the analysis container.
We will go through these options in the following.
This is where things get ugly
Unfortunately, all the options below have some caveats, and they might not even work on your computer. At the moment, no clear recommendations can be given. Try for yourself which option works best for you. However, it is not essential for this lesson that any of these options work. We will learn about other options that will work later.
Installing CVMFS on a local computer
CVMFS can be installed locally on your computer. Packages and installation
packages are provided on the CVMFS Downloads page. In the
interest of time, we will not install CVMFS now, but instead use the second
option above in the following. If you would like to install CVMFS on your
computer, make sure to read the
CVMFS Client Quick Start Guide.
Please also have a look at the
CVMFS with Docker documentation
to avoid common pitfalls when running Linux on your computer and trying to
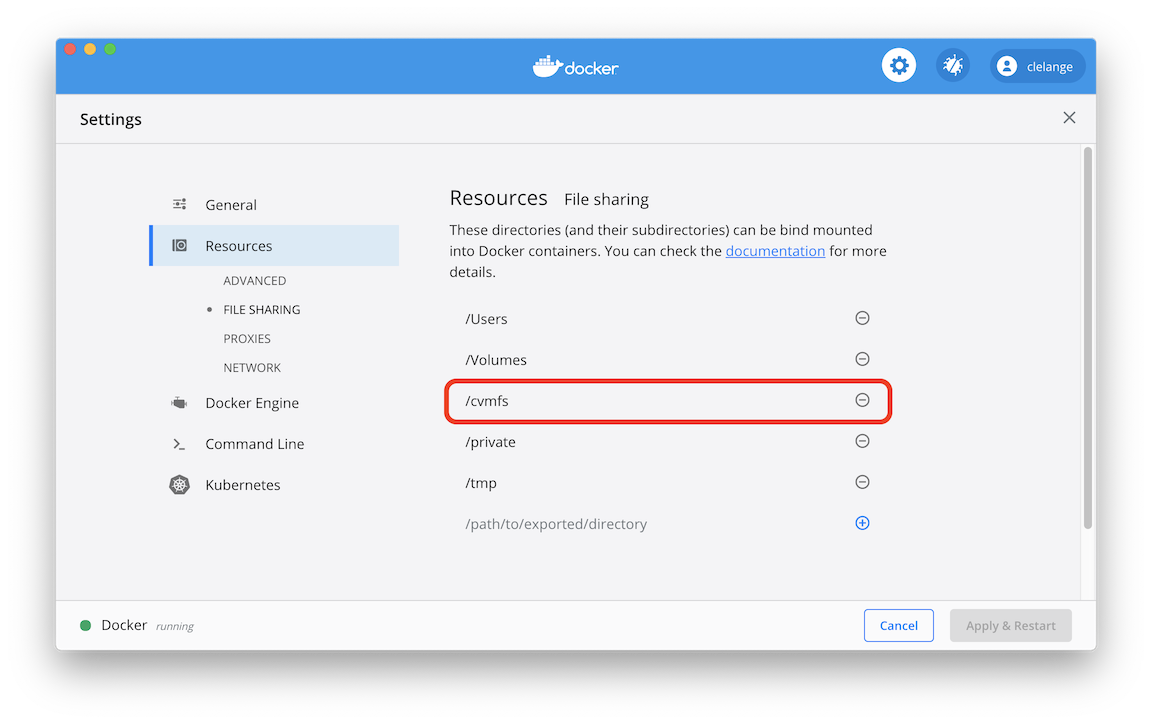
bind mount CVMFS from the host. This is not necessary when running on a Mac.
However, on a Mac you need to go to Docker Settings -> Resources -> File Sharing
and add /cvmfs to enable bind mounting.
To run your analysis container and give it access to the /cvmfs mount, run
the following command (mind that --rm deletes the container after exiting):
docker run --rm -it -v /cvmfs:/cvmfs gitlab-registry.cern.ch/clange/cc7-cms /bin/bash
Using the cvmfs-automounter
The first option needed CVMFS to be installed on your computer. Using the
cvmfs-automounter is effectively mimicking what is done on GitLab. First, a
container, the cvmfs-automounter, is started that mounts CVMFS, and then
this container provides the CVMFS mount to other containers. If you are
running Linux, the following command should work.
On a Mac, however, this will not work (at least at the moment). This could
work if you are using Windows Subsystem for Linux 2 (WSL2) in combination
with Docker for WSL2.
sudo mkdir /shared-mounts
docker run -d --name cvmfs --pid=host --user 0 --privileged --restart always -v /shared-mounts:/cvmfsmounts:rshared gitlab-registry.cern.ch/vcs/cvmfs-automounter:master
This container is running as a daemon (-d), but you can still see it via
docker ps and also kill it using docker kill cvmfs.
docker run -v /shared-mounts/cvmfs:/cvmfs:rslave -v $(pwd):$(pwd) -w $(pwd) --name ${CI_PROJECT_NAME} ${FROM} /bin/bash
Mounting CVMFS from the analysis container
This is what I personally would recommend at the moment. It seems to work on both Mac, Windows 10 Pro, and most Linux systems. The caveat is that the container runs with elevated privileges, but if you trust me, you can use it.
docker run --rm --cap-add SYS_ADMIN --device /dev/fuse -it gitlab-registry.cern.ch/clange/cmssw-docker/cc7-cmssw-cvmfs:latest bash
If you get an error similar to:
/bin/sh: error while loading shared libraries: libtinfo.so.5: failed to map segment from shared object: Permission denied
you need to turn off SElinux security policy enforcing:
sudo setenforce 0
This can be changed permanently by editing /etc/selinux/config, setting SELINUX to permissive or disabled. Mind, however, that there are certain security issues with disabling SElinux security policies as well as running privileged containers.
Exercise: Give it a try!
Try if you can run the following command from your cloned repository base directory:
docker run --rm --cap-add SYS_ADMIN --device /dev/fuse -it -v $(pwd):$(pwd) -w $(pwd) gitlab-registry.cern.ch/clange/cmssw-docker/cc7-cmssw-cvmfs:latest bashThis should set up CMSSW, compile your code, and then exit the container again. You can of course also do this manually, i.e. start bash in the container and execute the
build.shafterwards so that you stay inside the container.
The downside to starting CVMFS in the container
The CVMFS daemon is started when the container is started for the first time. It is not started again when you e.g. lose your network connection or simply connect back to the container at a later stage. At that point, you won’t have CVMFS access anymore.
Developing CMS code on your laptop
By using containers, you can effectively develop any all HEP-related code (and beyond) on your local development machine, and it doesn’t need to know anything about CVMFS or CMSSW in the first place.
Key Points
You can install CVMFS on your local computer.
The
cvmfs-automounterallows you to provide CVMFS to other containers on Linux.Privileged containers can be dangerous.
You can mount CVMFS from within a container on container startup.
Using Singularity
Overview
Teaching: 10 min
Exercises: 5 minQuestions
How can I use CMSSW inside a container on LXPLUS?
Objectives
Understand some of the differences between Singularity and Docker.
Successfully run a custom analysis container on LXPLUS.
The previous episode has given you an idea how complicated it can be to run containers with CVMFS access on your computer. However, at the same time it gives you the possibility to develop code on a computer that doesn’t need to know anything about CMS software in the first place. The only requirement is that Docker is installed.
You will also have noticed that in several cases privileged containers
are needed. These are not available to you on LXPLUS (nor is the docker
command). On LXPLUS, the tool to run containers is Singularity.
The following commands will therefore all be run on LXPLUS
(lxplus7.cern.ch or later specifically).
CMS documentation on Singularity
Before we go into any detail, you should be aware of the
central CMS documentation. These commands are only
available via /cvmfs/cms.cern.ch/common. The cmssw-env command is
actually a shell script that sets some variables automatically and then
runs Singularity. The nice thing about Singularity is that you can
mount /cvmfs, /eos, and /afs without any workarounds. This is
automatically done when running the cmssw-env command.
Exercise: Run the CC7 Singularity container
Confirm that you can access your EOS home directory (
/eos/user/${USER:0:1}/${USER}) from the Singularity CC7 shell.
Solution: Run the CC7 Singularity container
cmssw-cc7
ls /eos/user/${USER:0:1}/${USER}
exit
Running custom images with Singularity
The CMS script discussed above is “nice-to-have” and works well if you simply want to run some CMSSW code on a different Linux distribution, but it also hides a lot of the complexity when running Singularity. For the purpose of running your analysis image, we cannot use the script above, but instead need to run Singularity manually.
As an example, we are going to run the image that we used for
getting the VOMS proxy in the GitLab CI session. Before running
Singularity, mind that you should set the cache directory, i.e.
the directory to which the images are being pulled, to a
place outside your AFS space (here we use the tmp directory):
export SINGULARITY_CACHEDIR="/tmp/$(whoami)/singularity"
singularity shell -B /afs -B /eos -B /cvmfs docker://cmssw/cc7:latest
source /cvmfs/cms.cern.ch/cmsset_default.sh
If you are asked for a docker username and password, just hit enter twice. If you get an error message such as:
FATAL: While making image from oci registry: failed to get checksum for docker://cmssw/cc7:latest: unable to retrieve auth token: invalid username/password
this is just a
Singularity bug.
To fix it, just delete the ~/.docker/config.json file.
If you are past the authentication issue, you will get to see a
lot of garbage output and the singularity shell command will still
fail. The reason for this is a
bug in Singularity.
One particular difference to note w.r.t. to Docker is that the image
name needs to be prepended by docker:// to tell Singularity that this
is a Docker image.
As you can see from the output, Singularity first downloads the layers
from the registry, and is then unpacking the layers into a format that
can be read by Singularity. This is somewhat a technical detail, but
this step is what fails at the moment (and is different w.r.t. Docker).
ERROR:   build: failed to make environment dirs: mkdir /tmp/clange/rootfs-ef013f60-51c7-11ea-bbe0-fa163e528257/.singularity.d: permission denied
FATAL:   While making image from oci registry: while building SIF from layers: packer failed to pack: while inserting base environment: build: failed to make environment dirs: mkdir /tmp/clange/rootfs-ef013f60-51c7-11ea-bbe0-fa163e528257/.singularity.d: permission denied
Once there is a new Singularity version (check via
singularity --version) more recent than
3.5.2-1.1.el7 this will hopefully be fixed. For now, we cannot
use Singularity in this way. Otherwise, we’d be able to use
the shell to develop code interactively, and then use
exec to execute a script such as yesterday’s build.sh
script:
export SINGULARITY_CACHEDIR="/tmp/$(whoami)/singularity"
singularity exec -B /afs -B /eos -B /cvmfs docker://cmssw/cc7:latest bash .gitlab/build.sh
execvs.shellSingularity differentiates between providing you with an interactive shell (
singularity shell) and executing scripts non-interactively (singularity exec).
Authentication with Singularity
In case your image is not public, you can authenticate to
the registry in two different ways: either you append the
option --docker-login to the singularity command, which
makes sense when running interactively, or via environment
variables (e.g. on GitLab):
export SINGULARITY_DOCKER_USERNAME=${CERNUSER}
export SINGULARITY_DOCKER_PASSWORD='mysecretpass'
In the following episode we will try to work around the issues observed above by using a very nice way to access unpacked images directly via CVMFS.
Key Points
Singularity needs to be used on LXPLUS.
CMS Computing provides a wrapper script to run CMSSW in different Linux environments (SLC5, SLC6, CC7, CC8).
To run your own container, you need to run Singularity manually.
Using unpacked.cern.ch
Overview
Teaching: 10 min
Exercises: 5 minQuestions
What is
unpacked.cern.ch?How can I use
unpacked.cern.ch?Objectives
Understand how your images can be put on
unpacked.cern.ch
As was pointed out in the previous episode, Singularity uses unpacked Docker
images. These are by default unpacked into the current working directory,
and the path can be changed by setting the SINGULARITY_CACHEDIR variable.
The EP-SFT group provides a service that unpacks Docker images and makes them available via a dedicated CVMFS area. In the following, you will learn how to add your images to this area. Once you have your image(s) added to this area, these images will be automatically synchronised from the image registry to the CVMFS area within a few minutes whenever you create a new version of the image.
We will continue with the ZPeakAnalysis example, but for demonstration
purposes we will use an example payload.
Exploring the CVMFS unpacked.cern.ch area
The unpacked area is a directory structure within CVMFS:
ls /cvmfs/unpacked.cern.ch/
gitlab-registry.cern.ch registry.hub.docker.com
You can see the full directory structure of an image:
ls /cvmfs/unpacked.cern.ch/gitlab-registry.cern.ch/awesome-workshop/payload-docker-cms:3daaa96e
afs  builds  dev          eos  home  lib64       media  opt   proc  run   singularity  sys  usr
bin  cvmfs   environment  etc  lib   lost+found  mnt    pool  root  sbin  srv          tmp  var
This can be useful for investigating some internal details of the image.
As mentioned above, the images are synchronised with the respective registry. However, you don’t get to know when the synchronisation happened, but there is an easy way to check by looking at the timestamp of the image directory:
ls -l /cvmfs/unpacked.cern.ch/gitlab-registry.cern.ch/awesome-workshop/payload-docker-cms:3daaa96e
lrwxrwxrwx. 1 cvmfs cvmfs 79 Feb 18 00:31 /cvmfs/unpacked.cern.ch/gitlab-registry.cern.ch/awesome-workshop/payload-docker-cms:3daaa96e -> ../../.flat/28/28ba0646b6e62ab84759ad65c98cab835066c06e5616e48acf18f880f2c50f90
In the example given here, the image has last been updated on February 18th at 00:31.
Adding to the CVMFS unpacked.cern.ch area
You can add your image to the unpacked.cern.ch area by making a merge
request to the unpacked sync repository. In this repository
there is a file called recipe.yaml, to which you
simply have to add a line with your full image name (including registry)
prepending https://:
- https://gitlab-registry.cern.ch/awesome-workshop/payload-docker-cms:3daaa96e
As of 14th February 2020, it is also possible to use wildcards for the tags, i.e. you can simply add
- https://gitlab-registry.cern.ch/awesome-workshop/payload-docker-cms:*
and whenever you build an image with a new tag it will be synchronised
to /cvmfs/unpacked.cern.ch.
Running Singularity using the unpacked.cern.ch area
Running Singularity using the unpacked.cern.ch area is done using the
same commands as listed in the previous episode with the only difference
that instead of providing a docker:// image name to Singularity,
you provide the path in /cvmfs/unpacked.cern.ch:
singularity shell -B /afs -B /eos -B /cvmfs /cvmfs/unpacked.cern.ch/gitlab-registry.cern.ch/awesome-workshop/payload-docker-cms:3daaa96e
Now you should be in an interactive shell almost immediately without any
image pulling or unpacking. One important thing to note is that for most
CMS images the default username is cmsusr, and if you compiled your
analysis code in the container, it will by default reside in
/home/cmsusr:
Singularity> cd /home/cmsusr/CMSSW_10_6_8_patch1/src/
Singularity> source /cvmfs/cms.cern.ch/cmsset_default.sh
Singularity> cmsenv
Singularity> cd AnalysisCode/ZPeakAnalysis/
Singularity> cmsRun test/MyZPeak_cfg.py
And there we are, we run the analysis in a container interactively!
However, there is one issue we will run in. After running over the
input file, the cmsRun command will exit with a warning:
Warning in <TStorageFactoryFile::Write>: file myZPeak.root not opened in write mode
The output file will actually not be written. The reason for that is that
we cannot write into the container file system with Singularity.
We will have to change the MyZPeak_cfg.py file such that it writes
out to a different path.
Challenge: Patch
MyZPeak_cfg.pyto write out to your EOS homeOr even better, use an environment variable to define this that if not set defaults to
./. Mind that you cannot change files in the container, so the way to go is change the python config in the repository and have a new image built that can then be used.
Solution: Patch
MyZPeak_cfg.pyto write out to your EOS homeA possible solution could look like this
import os
outPath = os.getenv("ANALYSIS_OUTDIR") + "/"
if not outPath:
  outPath = "./"
process.TFileService = cms.Service("TFileService",
                                   fileName = cms.string(outPath + 'myZPeak.root')
                                   )
Commit these changes, push them, and your new image will show up on
CVMFS within a few minutes. The new image has the tag 0950e980.
singularity shell -B /afs -B /eos -B /cvmfs /cvmfs/unpacked.cern.ch/gitlab-registry.cern.ch/awesome-workshop/payload-docker-cms:0950e980
Singularity> cd /home/cmsusr/CMSSW_10_6_8_patch1/src/
Singularity> source /cvmfs/cms.cern.ch/cmsset_default.sh
Singularity> cmsenv
Singularity> cd AnalysisCode/ZPeakAnalysis/
Singularity> export ANALYSIS_OUTDIR="/eos/user/${USER:0:1}/${USER}"
Singularity> cmsRun test/MyZPeak_cfg.py
Singularity> exit
ls -l /eos/user/${USER:0:1}/${USER}/myZPeak.root
Where to go from here?
Knowing that you can build images on GitLab and have them synchronised to the
unpacked.cern.charea, you now have the power to run reusable and versioned stages of your analysis. While we have only run test jobs using these containers, you can run them on the batch system, i.e. your full analysis in containers with effectively only advantages. The next step after this is to connect these stages using workflows, which will be taught tomorrow.
Key Points
The
unpacked.cern.chCVMFS area provides a very fast way of distributing unpacked docker images for access via Singularity.Using this approach you can run versioned and reusable stages of your analysis.
Finding container images
Overview
Teaching: 10 min
Exercises: 5 minQuestions
How do I find existing container images?
How can I make use of them?
Objectives
Be aware of good locations for container images
When wanting to create a container image for your analysis, starting from scratch can be quite challenging since it can involve installing the correct system packages, creating new users, defining entrypoints and a lot more. However, this is also typically not needed. Instead, it is very likely that there are already images available that cover your needs. In the following, you will get an idea where you can find suitable images.
Common pitfalls
Before pointing you to locations where and how you can find images and their
corresponding Dockerfiles, a few words of warning.
You will find several tutorials on building container images online that
target web developers and data scientists who are using generic Javascript
and Python libraries.
For example, for Python development, they will recommend to use a
Python image on Docker Hub
(more on Docker Hub below).
While this makes it easy to obtain a Python version in a software container,
this is not suitable for the majority of applications in HEP.
One of the main reasons is that such images are based on Linux distributions that are (very) different from those used in HEP environments. For example, to be able to read ROOT files on the Grid or EOS, you might rely on XRootD and a Kerberos token or VOMS proxy. Installing and configuring the required packages on Debian or Alpine Linux (the typical distributions used for the Python images), can get very complicated or might even be impossible. Furthermore, since the focus in the example is on the Python version, but not the underlying Linux distribution, it can happen that this distribution changes from one day to the other. To avoid such issues, follow the advice listed below.
CAT-supported frameworks
The CMS Common Analysis Tools (CAT) group supports several
analysis frameworks
with different target groups.
The majority of those frameworks will have a container image that you can
directly use for your analysis.
How to do that is part of the
GitLab CI for CMS lesson.
These images should also be available on CVMFS on unpacked.cern.ch.
Should those images not be listed in the documentation, you can find them
through the GitLab project:
- On the GitLab project/repository page, click “Deploy” on the left-hand side menu
- Select “Container registry”
On the page that opens, you will see all the available container images and their respective tags.
Other frameworks often also have container images available.
You can find them in a similar way.
A good indication of the availability of a container image for an analysis
framework is the existence of a Dockerfile in the repository.
There is unfortunately no container image search available for the GitLab
container image registry.
However, you can find a large number of images used at CERN in the
CERN unpacked sync repository.
CMS base images
CMS Offline and Computing provides base images to be used with CMSSW on the grid. The source for these images is in the CMSSW GitHub area, which also links to their Docker Hub location. They are used for the CMSSW Singularity setup.
Another alternative, which typically also has more utility libraries and tools installed already, are the CMS Open Data container images. They often provide a good starting point to build your own images.
CERN base images
If you need to build your own image from scratch, the next-best recommendation is to use the (Alma) Linux images provided by CERN IT. In contrast to bare Alma Linux images, they already have some of the CERN software repositories configured such that installing CERN software should be easier. Mind, however, that these images contain very little packages and you will have to install them yourself.
Docker Hub
Docker Hub is the original container image registry. You will find a huge number of images for all kinds of use cases on it. Make sure to check the build dates of the available images to avoid using very old ones. Furthermore, make sure to check the build logs that are linked in most cases to understand which software is installed into those images. There are often links provided to the Git repositories from which these images have been built.
Using software images from the internet is dangerous
It is highly recommended to only use the official images from Docker Hub. While running a container image on your system is in principle safe since it is isolated from the rest of your computer, this can change as soon as you enter/mount your personal credentials into a running container.
Note also that Docker Hub has pull limits, and it may happen that the pull fails with
Too Many Requests - Server message: toomanyrequests: You have reached your unauthenticated pull rate limit.
To avoid this, you can pull images from Docker Hub through
the pull through cache at CERN.
You can do that by appending registry.cern.ch/docker.io/ to the image name so that:
rootproject/rootbecomesregistry.cern.ch/docker.io/rootproject/rootfor images with a project namealpinebecomesregistry.cern.ch/docker.io/library/alpinefor images with only one part in the name.
Outside the CERN network, you need to login to the CERN registry.
Other registries
Besides Docker Hub, there are also other container image registries available.
An example is the GitHub Container Registry (images starting with ghcr.io),
where the image names point to the GitHub repositories from which the container
images have been built.
In those repositories, you will again most likely find the corresponding
Dockerfile.
Key Points
Container images are available from different registries.
The images can be found in different ways.
There are most likely already images available that work for your analysis.
You can build on top of those images.