Setting up an environment using CVMFS in GitLab CI (e.g. to run CMSSW)
Overview
Teaching: 10 min
Exercises: 10 minQuestions
Which GitLab runners are needed?
What’s different w.r.t. LXPLUS?
Objectives
Know how to source the CMSSW environment
Understand the different commands that need to be used
Before getting into details, a few links to useful documentation on GitLab CI/CD and also CERN-specific information:
These pages serve as a good entrypoint in case of problems and questions.
Create a new GitLab project to follow along
Please create a new GitLab project now to follow along. To do so, select “Create blank project” and provide a project name. You can for instance call it
awesome-gitlab-cms. You need to specify the project visibility level. Private, the default, is fine for this tutorial. In the following, we will assume that all your work is in a directory calledawesome-workshopin your home directory and we will now clone the newly created project in a local repository therein:~/awesome-workshop/awesome-gitlab-cms
The commands would look like this (replace ${USER} by your CERN
username in case it isn’t the same as on your laptop):
mkdir -p ~/awesome-workshop
cd awesome-workshop
git clone ssh://git@gitlab.cern.ch:7999/${USER}/awesome-gitlab-cms.git
cd awesome-gitlab-cms
Choosing the correct GitLab runner
We are now going to setup a GitLab CI. For that, we need to create a .gitlab-ci.yml file.
Standard GitLab CI runners at CERN
do not mount CVMFS, which is required in many cases, for example for setting up CMSSW, to create a grid proxy, or to access LCG software stacks in /cvmfs/sft.cern.ch/.
In order to get a runner that mounts CVMFS, you need
to add a tag to your gitlab-ci.yml file:
tags:
  - cvmfs
A minimal .gitlab-ci.yml file to get a runner with CVMFS looks like the following:
cmssw_setup:
  tags:
    - cvmfs
  script:
    - ls /cvmfs/cms.cern.ch/
The cmssw_setup line defines the name of the job, and all the job does is
list /cvmfs/cms.cern.ch/, which would fail if CVMFS isn’t mounted.
To trigger the pipeline we need to commit the file and push it to GitLab:
git add .gitlab-ci.yml
git commit -m "added a CI"
git push
If you now navigate the GitLab UI with your browser you will see the CI running and eventually finishing.
You can check the output, and also the cvmfs label:

In the following you’ll will learn how to setup a GitLab CI job that runs CMSSW.
This should be regarded as an example for any CI job requiring access to CVMFS and accessing CMS-restricted files.
Setting up CMSSW
CMS-specific setup
Since the default user in the runner is not your username and the container doesn’t know anything about you in the first place, it doesn’t have any CMS-related environment as people registered as CMS members (via the zh group on LXPLUS). This means that everything needs to be set up manually.
To set up a CMSSW release (for example CMSSW_10_6_30), you would usually
run the following commands on LXPLUS:
cmssw-el7
source /cvmfs/cms.cern.ch/cmsset_default.sh
cmsrel CMSSW_10_6_30
cd CMSSW_10_6_30/src
cmsenv
The first command is needed because CMSSW_10_6_30 is pretty old (we chose an old one on purpose!) and it does not have any build for the recent alma9 LXPLUS.
So we need to start a CentOS7 container first, which we do with the cmssw-el7 command, as described in the CMS singularity guide.
Depending on the software version chosen, the third command may print out a warning such as
WARNING: Developer's area is created for non-production architecture slc7_amd64_gcc820. Production architecture for this release is slc7_amd64_gcc700.
which can be ignored in this case (or could be removed by first executing
export SCRAM_ARCH=slc7_amd64_gcc700).
The command source /cvmfs/cms.cern.ch/cmsset_default.sh sets several
environment variables, in particular adding /cvmfs/cms.cern.ch/common to
the ${PATH}. You can check this by running echo ${PATH}. Another effect
of this command is that a few helper functions are defined, such as cmsrel and cmsenv.
Exercise: Determining CMSSW-related aliases
What are the actual commands behind
cmsenvandcmsrel?
Solution: Determining CMSSW-related aliases
The most important aliases are in the table below:
Alias Command cmsenveval `scramv1 runtime -sh`cmsrelscramv1 project CMSSWThe meaning of
eval: The args are read and concatenated together into a single command. This command is then read and executed by the shell, and its exit status is returned as the value ofeval. If there are no args, or only null arguments,evalreturns 0.
A common pitfall when setting up CMSSW in GitLab is that the execution
fails because the setup script doesn’t follow best practices for shell
scripts such as returning non-zero return values even if the setup is OK or
using unset variables. Even if the script exits without visible error message,
there could be something wrong. It is therefore often a good idea to
circumvent issues like that by disabling strict checks (issuing set +u) before running the
setup command and enabling these checks afterwards again (issuing set -u).
Exercise: Set up CMSSW in GitLab
Knowing all this, can you write the
.gitlab-ci.ymlfile to set up CMSSW in GitLab starting from the fragment above and check if this is all working by executingcmsRun --helpat the end?
Solution: Set up CMSSW in GitLab
Here is a possible solution:
cmssw_setup:
  image: registry.cern.ch/docker.io/cmssw/el7:x86_64
  tags:
    - cvmfs
  variables:
    # This is also set on LXPLUS
    CMS_PATH: /cvmfs/cms.cern.ch
  script:
    - set +u && source ${CMS_PATH}/cmsset_default.sh; set -u
    - export  SCRAM_ARCH=slc7_amd64_gcc700
    - cmsrel CMSSW_10_6_30
    - cd CMSSW_10_6_30/src
    - cmsenv
    - cmsRun --help
The
imagedirective tells the gitlab runner that it should run in a CentOS7 container, just like you would manually do on LXPLUS issuingcmssw-el7. Theset +ucommand turns off errors for referencing unset variables. It isn’t really needed here, since-u(i.e. not allowing to use unset variables) isn’t set by default, but the script would fail if one usedset -usomewhere else, so it’s safer to catch this here.
The reason why in the example above the variable ${CMS_PATH} is used and not simply
/cvmfs/cms.cern.ch directly is just to mimic the default environment you would get on
LXPLUS. You can check if this is the case for you as well by running env | grep CMS_PATH
after logging on to LXPLUS.
You can see some examples in the payload GitLab repository for this lesson.
Key Points
Special GitLab CVMFS runners are required to run CI jobs that need CVMFS, e.g. to run CMSSW.
If the setup script tries to access unset variables, then that can cause the CI to fail when using strict shell scripting checks.
Compiling a CMSSW package
Overview
Teaching: 10 min
Exercises: 5 minQuestions
How can I compile my CMSSW package using GitLab CI?
How do I add other CMSSW packages?
Objectives
Successfully compile CMSSW example analysis code in GitLab CI
Now that you know how to get a CMSSW environment, it is time to do something useful with it.
Compiling code within the repository
For your analysis to be compiled with CMSSW, it needs to reside in the
workarea’s src directory, and in there follow the directory structure of
two subdirectories (e.g. AnalysisCode/MyAnalysis) within which there can be
src, interface, plugin and further directories. Your analysis code
(under version control in GitLab/GitHub) will usually not contain the
CMSSW workarea. The git repository will either
contain the analysis code at the lowest level or have a subdirectory
for the analysis code, to disentangle it from your configuration files such as the
.gitlab-ci.yml file.
We will use an example analysis, which selects pairs of electrons and muons.
Download the zip file containing the analysis
and extract it now. The analysis code is
in a directory called ZPeakAnalysis within which plugins (the C++ code)
and test (the python config) directories reside.
Add this directory to your repository:
# unzip ZPeakAnalysis.zip
# mv ZPeakAnalysis ~/awesome-workshop/awesome-gitlab-cms/
cd ~/awesome-workshop/awesome-gitlab-cms/
git add ZPeakAnalysis
git commit -m "Add ZPeakAnalysis"
When compiling the code in a GitLab pipeline, the ZPeakAnalysis needs
to be copied into the CMSSW workarea, and it’s advisable to use environment
variables for this purpose. This would be achieved like this:
mkdir ${CMSSW_BASE}/src/AnalysisCode
cp -r "${CI_PROJECT_DIR}/ZPeakAnalysis" "${CMSSW_BASE}/src/AnalysisCode/"
With these two commands we will now be able to extend the .gitlab-ci.yml
file such that we can compile our analysis code in GitLab. To improve the
readability of the file, the CMSSW_RELEASE is defined as a variable:
cmssw_compile:
  image: registry.cern.ch/docker.io/cmssw/el7:x86_64
  tags:
    - cvmfs
  variables:
    CMS_PATH: /cvmfs/cms.cern.ch
    CMSSW_RELEASE: CMSSW_10_6_30
    SCRAM_ARCH: slc7_amd64_gcc700
  script:
    - set +u && source ${CMS_PATH}/cmsset_default.sh; set -u
    - export SCRAM_ARCH=${SCRAM_ARCH}
    - cmsrel ${CMSSW_RELEASE}
    - cd ${CMSSW_RELEASE}/src
    - cmsenv
    - mkdir -p AnalysisCode
    - cp -r "${CI_PROJECT_DIR}/ZPeakAnalysis" "${CMSSW_BASE}/src/AnalysisCode/"
    - scram b
Exercise: Test that compilation works
Commit the updated
.gitlab-ci.ymlfile and check whether the GitLab pipeline succeeds.
Adding CMSSW packages
Always add CMSSW packages before compiling analysis code!
Adding CMSSW packages has to happen before compiling analysis code in the repository, since
git cms-addpkgwill callgit cms-initfor the$CMSSW_BASE/srcdirectory, andgit initdoesn’t work if the directory already contains files.
When developing CMSSW code, you will sometimes find yourself in the situation where you need to rebuild one of the CMSSW packages. This need can arise either from the fact you are modifying this package, or from the fact that another CMSSW package depends on the one you are developing and thus needs to be rebuilt.
Assuming that you would like to check out CMSSW packages using the commands described in the CMSSW FAQ, a couple of additional settings need to be applied. For instance, try running the following command in GitLab CI after having set up CMSSW:
git cms-addpkg PhysicsTools/PatExamples
This will fail:
Cannot find your details in the git configuration.
Please set up your full name via:
    git config --global user.name '<your name> <your last name>'
Please set up your email via:
    git config --global user.email '<your e-mail>'
Please set up your GitHub user name via:
    git config --global user.github <your github username>
There are a couple of options to make things work:
- set the config as described above,
- alternatively, create a
.gitconfigin your repository and use it as described here, - run
git cms-init --upstream-onlybeforegit cms-addpkgto disable setting up a user remote.
For simplicity, and since we do not need to commit anything back to CMSSW from
GitLab, we will use the latter approach.
A complete yaml fragment that checks out a CMSSW package after having set up
CMSSW and then compiles the code looks as follows:
cmssw_addpkg:
  image: registry.cern.ch/docker.io/cmssw/el7:x86_64
  tags:
    - cvmfs
  variables:
    CMS_PATH: /cvmfs/cms.cern.ch
    CMSSW_RELEASE: CMSSW_10_6_30
    SCRAM_ARCH: slc7_amd64_gcc700
  script:
    - set +u && source ${CMS_PATH}/cmsset_default.sh; set -u
    - export SCRAM_ARCH=${SCRAM_ARCH}
    - cmsrel ${CMSSW_RELEASE}
    - cd ${CMSSW_RELEASE}/src
    - cmsenv
    # If within CERN, we can speed up interaction with CMSSW:
    - export CMSSW_MIRROR=https://:@git.cern.ch/kerberos/CMSSW.git
    # This is another trick to speed things up independent of your location:
    - export CMSSW_GIT_REFERENCE=/cvmfs/cms.cern.ch/cmssw.git.daily
    # Important: run git cms-init with --upstream-only flag to not run into
    # problems with git config
    - git cms-init --upstream-only
    - git cms-addpkg PhysicsTools/PatExamples
    - scram b
The additional two variables that are exported here, CMSSW_MIRROR and
CMSSW_GIT_REFERENCE can speed up interaction with git, in particular
faster package checkouts. The CMSSW_MIRROR points to a GitHub mirror within the CERN network,
accessible only from machines within the same network, which is the case for the GitLab runners.
Settings these variables is not mandatory.
Bonus: have you tried putting both
cmssw_compileandcmssw_addpkgin the same.gitlab-ci.ymlfile?If you do that, the two jobs will run in parallel. GitLab CI also allows running jobs in stages. Stages define group of jobs running together. To assign a job to a stage, just add
stage: some_namein its definition. Stages run in sequence according to the order typically defined at the beginning of your.gitlab-ci.yml. If any job in a stage fails, the next stage will not run.
Exercise: can you put
cmssw_compileandcmssw_addpkgin two stages?
Solution
stages:
- compile
- addpackage

variables:
  CMS_PATH: /cvmfs/cms.cern.ch
  CMSSW_RELEASE: CMSSW_10_6_30
  SCRAM_ARCH: slc7_amd64_gcc700

cmssw_compile:
  stage: compile
  image: registry.cern.ch/docker.io/cmssw/el7:x86_64
  tags:
    - cvmfs
  script:
    - set +u && source ${CMS_PATH}/cmsset_default.sh; set -u
    - export SCRAM_ARCH=${SCRAM_ARCH}
    - cmsrel ${CMSSW_RELEASE}
    - cd ${CMSSW_RELEASE}/src
    - cmsenv
    - mkdir -p AnalysisCode
    - cp -r "${CI_PROJECT_DIR}/ZPeakAnalysis" "${CMSSW_BASE}/src/AnalysisCode/"
    - scram b

cmssw_addpkg:
  stage: addpackage
  image: registry.cern.ch/docker.io/cmssw/el7:x86_64
  tags:
    - cvmfs
  script:
    - set +u && source ${CMS_PATH}/cmsset_default.sh; set -u
    - export SCRAM_ARCH=${SCRAM_ARCH}
    - cmsrel ${CMSSW_RELEASE}
    - cd ${CMSSW_RELEASE}/src
    - cmsenv
    # If within CERN, we can speed up interaction with CMSSW:
    - export CMSSW_MIRROR=https://:@git.cern.ch/kerberos/CMSSW.git
    # This is another trick to speed things up independent of your location:
    - export CMSSW_GIT_REFERENCE=/cvmfs/cms.cern.ch/cmssw.git.daily
    # Important: run git cms-init with --upstream-only flag to not run into
    # problems with git config
    - git cms-init --upstream-only
    - git cms-addpkg PhysicsTools/PatExamples
    - scram b
In the solution above you will also notice that we have moved the definition of some variables outside of the job definition, because they are used by both jobs.
Key Points
For code to be compiled in CMSSW, it needs to reside within the work area’s
srcdirectory.The analysis code from the Git repository is copied to the CMSSW work area in the CI script.
When using commands such as
git cms-addpkg, the git configuration needs to be adjusted/set first.
Obtaining a grid proxy
Overview
Teaching: 10 min
Exercises: 15 minQuestions
How can I obtain a grid proxy in GitLab?
Objectives
Securely add grid proxy certificates and passwords to GitLab
Successfully obtain a grid proxy for the CMS VO
Securely adding passwords and files to GitLab
When trying to access CMS data, a grid, or often also referred to as Virtual
Organization Membership Service (VOMS) proxy is needed in most cases. In
order to be able to obtain this proxy, your userkey.pem and usercert.pem
files, which by default will reside in the ~/.globus directory, will need
to be stored in GitLab.
Keep your secrets secret!
Please be extra careful when it comes to your account and grid passwords as well as your certificates! They should never be put in any public place. Putting them under version control is risky, since even if you delete them from the
HEADof yourmasterbranch, they will still be in the commit history. Furthermore, putting them in a public, or even a private but shared repository, is a violation of grid policy, and could lead to access being revoked for the offending user. Should you accidentally have put sensitive data to a repository, please see the guides by GitHub and GitLab to remove them (though the data should still be considered compromised).
For more information see the section on private information/access control from the Continuous Integration / Continuous Development (CI/CD) on how to add variables in GitLab CI/CD in general. From that lesson you will know how to add e.g. your grid proxy password. The grid certificate itself, however, consists of two files that look like this:
cat ~/.globus/usercert.pem
Bag Attributes
    localKeyID: 95 A0 95 B0 1e AB BD 13 59 D1 D2 BB 35 5A EA 2E CD 47 BA F7
subject=/DC=ch/DC=cern/OU=Organic Units/OU=Users/CN=username/CN=123456/CN=Anonymous Nonamious
issuer=/DC=ch/DC=cern/CN=CERN Grid Certification Authority
-----BEGIN CERTIFICATE-----
TH1s1SNT4R34lGr1DC3rt1f1C4t3But1Th4s4l3NgtH0F64CH4r4ct3rSP3rL1N3
1amT00La2YT0wR1T345m0r3l1N3S0fn0ns3NS3S01/lLSt0pH3r3AndADdsPAc3S
...45 more lines of l33t dialect...
+4nd+heL4S+38cH4r4c+ersBef0rE+HE1+enDs==
-----END CERTIFICATE-----
We need more base: base64
Simply pasting them into GitLab does not work since the line breaks will not
be reflected correctly. There is a trick we can play though: we can encode the
files including line breaks so that they are simply a string, which we can
decode to yield the same result as the input. The tool of our choice is
base64. Let’s give this a go.
Exercise: Encode using
base64Copy the output of the
cat ~/.globus/usercert.pemoutput above into a text file calledtestcert.txt, and pipe the content of this file to thebase64command or use it as input file directly (hint:base64 --help).
Solution: Encode using
base64The command should be (when piping):
cat testcert.txt | base64or (when using the input file directly - this is better):
base64 -i testcert.txtand the output will then be the following:
QmFnIEF0dHJpYnV0ZXMKICAgIGxvY2FsS2V5SUQ6IDk1IEEwIDk1IEIwIDFlIEFCIEJEIDEzIDU5IEQxIEQyIEJCIDM1IDVBIEVBIDJFIENEIDQ3IEJBIEY3CnN1YmplY3Q9L0RDPWNoL0RDPWNlcm4vT1U9T3JnYW5pYyBVbml0cy9PVT1Vc2Vycy9DTj11c2VybmFtZS9DTj0xMjM0NTYvQ049QW5vbnltb3VzIE5vbmFtaW91cwppc3N1ZXI9L0RDPWNoL0RDPWNlcm4vQ049Q0VSTiBHcmlkIENlcnRpZmljYXRpb24gQXV0aG9yaXR5Ci0tLS0tQkVHSU4gQ0VSVElGSUNBVEUtLS0tLQpUSDFzMVNOVDRSMzRsR3IxREMzcnQxZjFDNHQzQnV0MVRoNHM0bDNOZ3RIMEY2NENINHI0Y3QzclNQM3JMMU4zCjFhbVQwMExhMllUMHdSMVQzNDVtMHIzbDFOM1MwZm4wbnMzTlMzUzAxL2xMU3QwcEgzcjNBbmRBRGRzUEFjM1MKLi4uNDUgbW9yZSBsaW5lcyBvZiBsMzN0IGRpYWxlY3QuLi4KKzRuZCtoZUw0UyszOGNINHI0YytlcnNCZWYwckUrSEUxK2VuRHM9PQotLS0tLUVORCBDRVJUSUZJQ0FURS0tLS0tCg==
Decoding works by adding the -d (Linux) or -D (MacOS) flag to the
base64 command. You can verify that this works by directly decoding again
as follows:
base64 -i testcert.txt | base64 -d
which should give you the pseudo-certificate from above. Have a go at the exercise below and try to decode the secret phrase:
Exercise: Decode using
base64Decode the following string using the
base64command:SSB3aWxsIG5ldmVyIHB1dCBteSBzZWNyZXRzIHVuZGVyIHZlcnNpb24gY29udHJvbAo=
Solution: Decode using
base64The command should be (mind the capitalisation of the
-D/-dflag):echo "SSB3aWxsIG5ldmVyIHB1dCBteSBzZWNyZXRzIHVuZGVyIHZlcnNpb24gY29udHJvbAo=" | base64 -Dand the output should be the following:
I will never put my secrets under version control
Adding grid certificate and password to GitLab
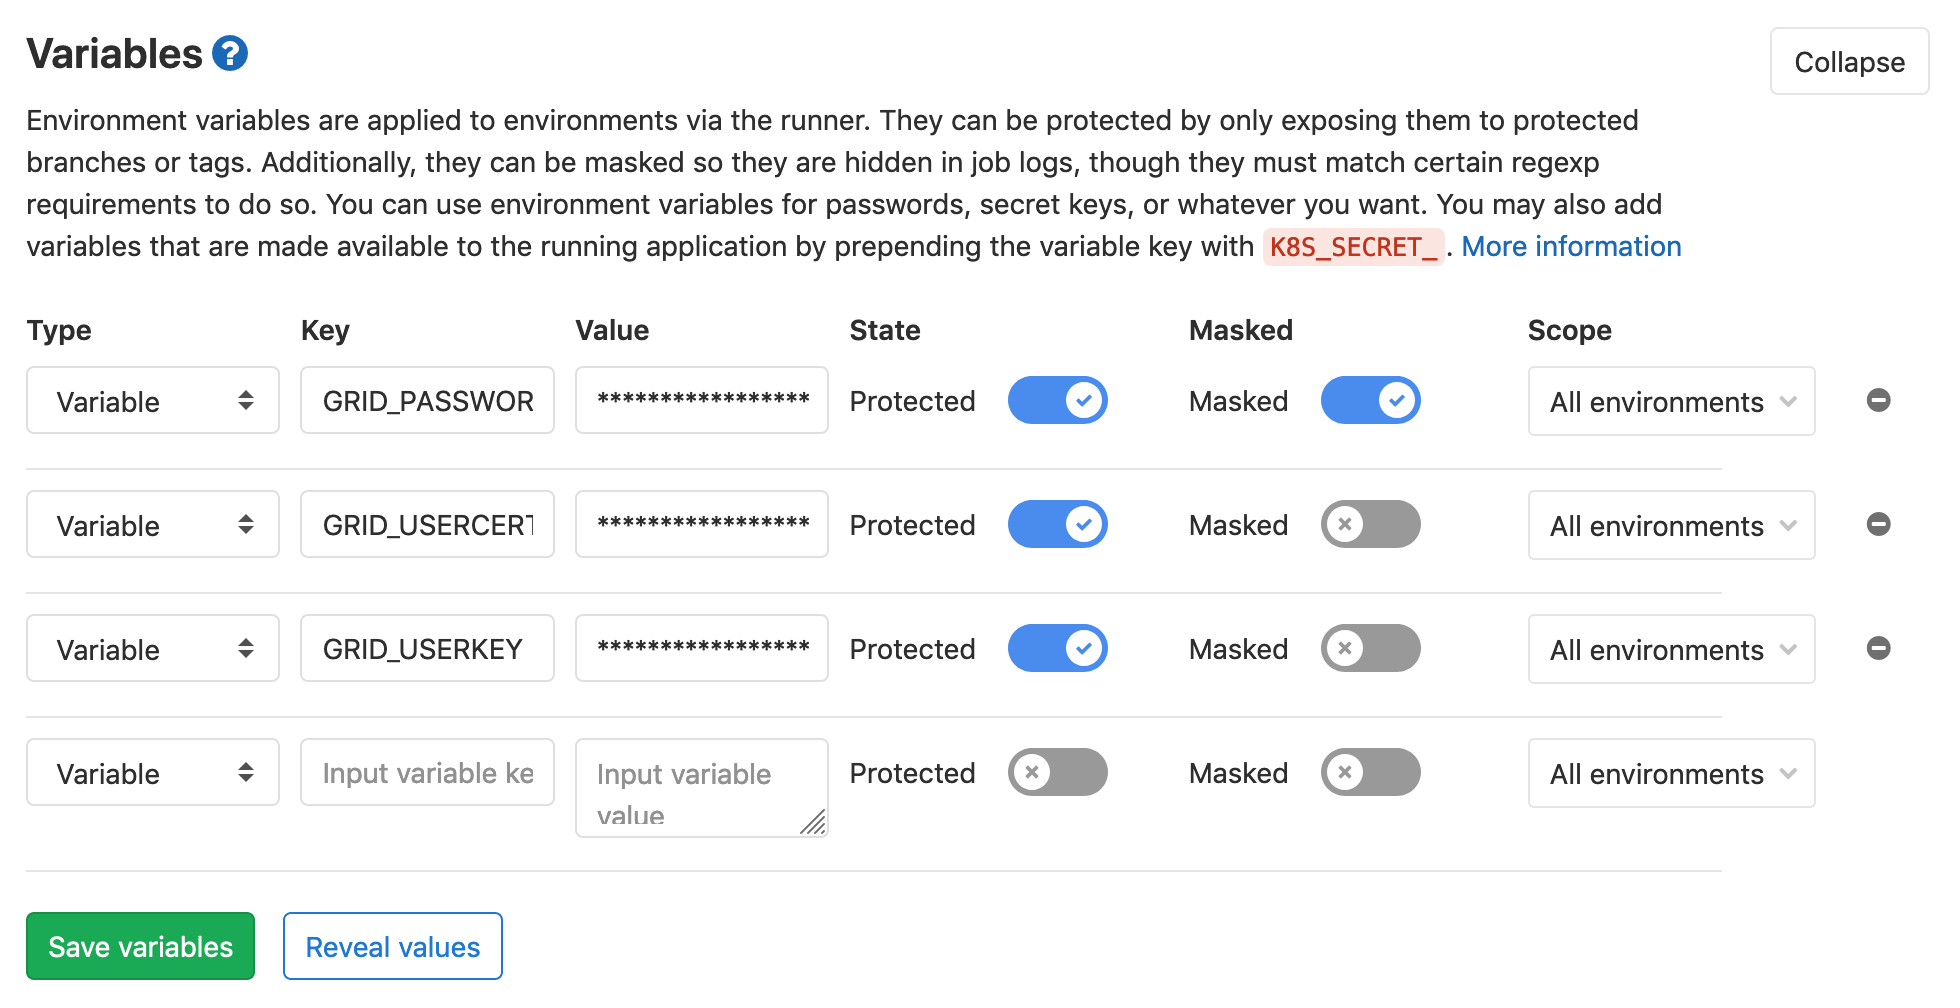
There are a couple of important things to keep in mind when adding passwords and certificates as variables to GitLab:
- Variables should always be set to
Protectedstate. - As an additional safety measure, set them as
Maskedas well if possible (this will not work for the certificates but should for your grid password).
For more details, see the
GitLab CI/CD variables
of the GitLab documentation. Setting variables to Protected means that
they are only available in protected branches, e.g. your master branch.
This is important when collaborating with others, since anyone with access
could just echo the variables when making a merge request if you run
automated tests on merge requests.
We will add the following three variables:
GRID_PASSWORD: password for the grid certificateGRID_USERCERT: grid user certificate (usercert.pem)GRID_USERKEY: grid user key (userkey.pem)
For safety and to avoid issues with special characters, you should not
simply add your grid proxy password in GitLab,
but always encode it using base64.
For your password do the following
(make sure nobody’s peeking at your screen):
printf 'mySecr3tP4$$w0rd' | base64
Mind the single quotes (') and not double quotes ("). If you are on Linux,
you should add -w 0 to the base64 command, as by default the encoded string
is wrapped after 76 characters.
The option -w 0 disables wrapping.
For the two certificates, use them as input to base64 directly:
base64 -i ~/.globus/usercert.pem -w 0
base64 -i ~/.globus/userkey.pem -w 0
and copy the output into GitLab.
Every equal sign counts!
Make sure to copy the full string including the trailing equal signs.
The Settings –> CI / CD –> Variables section should look like this:
Better safe than sorry
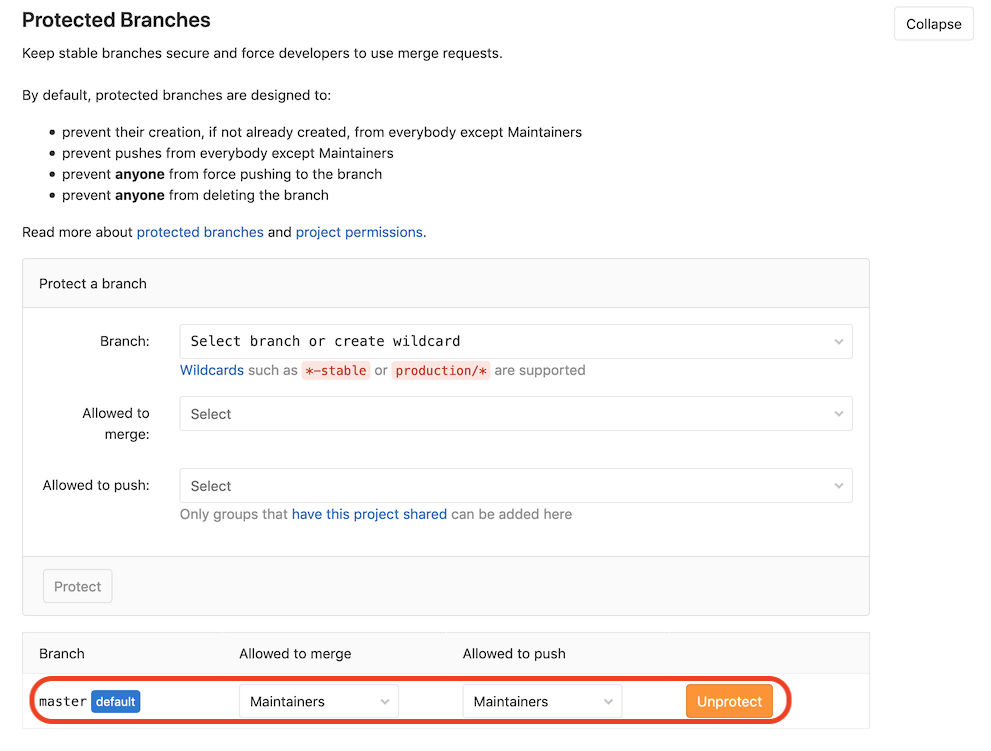
To reduce the risk of leaking your passwords and certificates to others, you should protect your master branch, effectively preventing others from pushing to it directly and e.g. print your password to the job logs. To do so, go to Settings -> Repository -> Protected Branches. Mind that the option chosen below still puts a lot of trust in your collaborators. With the Protected option chosen above for the variables, the variables are then only available to those branches (but still allow Maintainers to push to them):
Using the grid proxy
With the grid secrets stored, we can now make use of them. We need to first
restore the grid certificate files in the ~/.globus directly, then run the
voms-proxy command and pass the grid proxy password to it. This is done as
follows:
mkdir -p ${HOME}/.globus
printf "${GRID_USERCERT}" | base64 -d > ${HOME}/.globus/usercert.pem
printf "${GRID_USERKEY}" | base64 -d > ${HOME}/.globus/userkey.pem
chmod 400 ${HOME}/.globus/userkey.pem
printf "${GRID_PASSWORD}" | base64 -d | voms-proxy-init --voms cms --pwstdin
Trying this with the standard GitLab CC7 runner will fail, since the
CMS-specific certificates are not included in the image. An image that
has these certificates installed already is
gitlab-registry.cern.ch/cms-cloud/cmssw-docker/cc7-cms:latest.
An example to obtain a grid proxy, check it, and then destroy it again
would result in the following yaml:
voms_proxy_test:
  image:
    name: gitlab-registry.cern.ch/cms-cloud/cmssw-docker/cc7-cms:latest
    entrypoint: [""]
  tags:
    - cvmfs
  script:
    - mkdir -p ${HOME}/.globus
    - printf "${GRID_USERCERT}" | base64 -d > ${HOME}/.globus/usercert.pem
    - printf "${GRID_USERKEY}" | base64 -d > ${HOME}/.globus/userkey.pem
    - chmod 400 ${HOME}/.globus/userkey.pem
    - printf "${GRID_PASSWORD}" | base64 -d | voms-proxy-init --voms cms --pwstdin
    - voms-proxy-info --all
    - voms-proxy-destroy
You could take this further by e.g. performing a DAS query to keep your input files up-to-date.
Confirm that this works for you before moving on to the next section!
In case of problems, you might need to add -w 0 to the base64 -d
command.
Key Points
Special care is needed when adding secrets in GitLab
Passwords and certificates should always be set to
ProtectedstateCertificates need to be
base64-encoded for use as secrets
CAT services for GitLab CI
Overview
Teaching: 10 min
Exercises: 15 minQuestions
How can I more easily access CMS resources in GitLab CI?
Objectives
Demonstrate the use of the CAT EOS file service
Demonstrate the use of the CAT VOMS proxy service
The cms-analysis user code space
The Common Analysis Tools (CAT) group in CMS maintains a CERN GitLab area called cms-analysis, where anyone in CMS can store their analysis code. The area is documented in the CAT documentation pages. The area is organized in groups and subgroups, following the CMS Physics Coordination group structure. You can request the creation of an area in the PAG-specific group that best matches your analysis.
You can request an area for your analysis at any time
Bear in mind that it is always a good idea to keep you analysis code under version control. At any stage in your analysis you can request an area for your code. In fact we invite you to do so. The area can be created with a temporary name, which can then be changed to match the CADI line, when your analysis is mature enough to have one.
The services described here only work in cms-analysis
For security reasons, the services described in the following only work if your project is in the
cms-analysisnamespace. You can move the project you have been using so far in this lesson to thecms-analysisnamespace by going toSettings–>General–>Advanced–>Transfer projectand selectcms-analysis / CMSDAS / CAT-tutorialsas a new namespace. Thecms-analysis / CMSDAS / CAT-tutorialsis to be used for the purpose of testing. You should in general select a target namespace in the relevant POG/PAG subgroups.
Using the CAT EOS file service
CAT has a service account, cmscat, that is in the zh group and is a member of the CMS VO. CAT provides a service to request an EOS token in a GitLab CI job to be able to access CMS files on EOS on behalf of the cmscat service account.
The service is described in more detail in here.
The files accessible through this method are hosted in /eos/cms/store/group/cat.
The file you need is not there?
You can request more datasets to be stored in
/eos/cms/store/group/catby creating a MR to https://gitlab.cern.ch/cms-analysis/services/ci-dataset-files/-/blob/master/datasets.txt.
Exercise: setup a CI job the copies a file using the CAT EOS file service
There is a few technical aspects that are involved in this. First, your GitLab CI job needs to be configured to that it creates an authentication token. This is achieved with the following lines:
id_tokens:
    MY_JOB_JWT:
       aud: "cms-cat-ci-datasets.app.cern.ch"
Second, you need to query a service, hosted at
https://cms-cat-ci-datasets.app.cern.ch, to give you a short lived token to access a file on EOS, on behalf of thecmscatservice account. This is achieved with the following lines:XrdSecsssENDORSEMENT=$(curl -H "Authorization: ${MY_JOB_JWT}" "https://cms-cat-ci-datasets.app.cern.ch/api?eospath=${EOSPATH}" | tr -d \")Where
EOSPATHis a variable holding a path of a file on EOS. Now you can access the file with a path that includes the newly generated token at the end, as:root://eoscms.cern.ch/${EOSPATH}?authz=${XrdSecsssENDORSEMENT}&xrd.wantprot=unix. Try copying the file:/eos/cms/store/group/cat/datasets/MINIAODSIM/RunIISummer20UL17MiniAODv2-106X_mc2017_realistic_v9-v2/DYJetsToLL_M-50_TuneCP5_13TeV-amcatnloFXFX-pythia8/2C5565D7-ADE5-2C40-A0E5-BDFCCF40640E.root
Solution
A possible solution to the exercise above is the following:
test_eos_service:
  image:
    name: registry.cern.ch/docker.io/cmssw/el7:x86_64
  tags:
    - cvmfs
  id_tokens:
    MY_JOB_JWT: # or any other variable name
        aud: "cms-cat-ci-datasets.app.cern.ch"
  variables:
    # File is taken from https://cms-cat-ci-datasets.web.cern.ch/
    EOSPATH: '/eos/cms/store/group/cat/datasets/MINIAODSIM/RunIISummer20UL17MiniAODv2-106X_mc2017_realistic_v9-v2/DYJetsToLL_M-50_TuneCP5_13TeV-amcatnloFXFX-pythia8/2C5565D7-ADE5-2C40-A0E5-BDFCCF40640E.root'
    EOS_MGM_URL: root://eoscms.cern.ch
  before_script:
  - 'XrdSecsssENDORSEMENT=$(curl -H "Authorization: ${MY_JOB_JWT}" "https://cms-cat-ci-datasets.app.cern.ch/api?eospath=${EOSPATH}" | tr -d \")'
  script:
    - xrdcp "${EOS_MGM_URL}/${EOSPATH}?authz=${XrdSecsssENDORSEMENT}&xrd.wantprot=unix" test.root
    - ls -l test.root
Using the CAT VOMS proxy service
The cmscat service account is also a member of the CMS VO, so it can request a VOMS proxy.
If your project is in cms-analysis it can request a VOMS proxy from a service hosted at cms-cat-grid-proxy-service.app.cern.ch, in much the same way as the CAT EOS service requests a proxy to cms-cat-ci-datasets.app.cern.ch above.
The VOMS proxy is provided as a base64-encoded string, and it has a lifetime as long as the CI job that requests it.
Exercise: Set up a CI job that obtains a VOMS proxy
There are a few technical aspects that involved in this. First, your GitLab CI job needs to be configured to that it creates an authentication token. This is achieved with the following lines:
id_tokens:
    MY_JOB_JWT:
       aud: "cms-cat-grid-proxy-service.app.cern.ch"
Second, you need to query a service, hosted at
https://cms-cat-grid-proxy-service.app.cern.ch, to give you a short-lived VOMS proxy, on behalf of thecmscatservice account. This is achieved with the following lines:proxy=$(curl --fail-with-body -H "Authorization: ${MY_JOB_JWT}" "https://cms-cat-grid-proxy-service.app.cern.ch/api" | tr -d \")Finally, you need to decode the proxy, store it as a file, and set the
X509_USER_PROXYenvironment variable using something like:- printf $proxy | base64 -d > myproxy - export X509_USER_PROXY=$(pwd)/myproxyWarning
The image you use needs to have CVMFS mounted. Depending on how the environment of the image you use is set, you may also need to export a few other environment variables, in particular:
- export X509_VOMS_DIR=/cvmfs/grid.cern.ch/etc/grid-security/vomsdir/
- export VOMS_USERCONF=/cvmfs/grid.cern.ch/etc/grid-security/vomses/
- export X509_CERT_DIR=/cvmfs/grid.cern.ch/etc/grid-security/certificates/
Solution
A possible solution to the exercise above is the following:
test_proxy_service:
  image:
    name: registry.cern.ch/docker.io/cmssw/el7:x86_64
  tags:
    - cvmfs
  id_tokens:
    MY_JOB_JWT: # or any other variable name
        aud: "cms-cat-grid-proxy-service.app.cern.ch"
  before_script:
    - 'proxy=$(curl -H "Authorization: ${MY_JOB_JWT}" "https://cms-cat-grid-proxy-service.app.cern.ch/api" | tr -d \")'
  script:
    - printf $proxy | base64 -d > myproxy
    - export X509_USER_PROXY=$(pwd)/myproxy
    - export X509_CERT_DIR=/cvmfs/grid.cern.ch/etc/grid-security/certificates/
    - voms-proxy-info # to test it
Key Points
To use CAT services your project needs to reside into cms-analysis.
You won’t need to expose any personal credentials.
It is easy to host your analysis code in cms-analysis.
Running a CMSSW job
Overview
Teaching: 10 min
Exercises: 10 minQuestions
How can I run CMSSW in GitLab CI?
How can avoid compiling my code for each job?
Objectives
Successfully run a test job of a simplified Z to leptons analysis
Use GitLab artifacts to pass compiled analysis code
Being able to set up CMSSW and to compile code in GitLab, and knowing how to access CMS data, the next step is to run test jobs to confirm that the code yields the expected results.
Fair use
Please remember that the provided runners are shared among all users, so please avoid massive pipelines and CI stages with more than 5 jobs in parallel or that run with a parallel configuration within a job higher than 5.
If you need to run these pipelines please deploy your own private runners to avoid affecting the rest of the users. Check the Private GitLab Runners registration guide.
Requirements for running CMSSW
In most cases, you will run your tests on centrally produced files. In order
to be able to access those, you will require a grid proxy valid for the CMS
virtual organisation (VO) as described in the previous section.
For files located on EOS, please check the section on
private information/access control
from the
Continuous Integration / Continuous Development (CI/CD)
on how to get a Kerberos token via kinit (we won’t be using this here).
For the analysis example provided in this lessons, we’ll use a single file
from the /DYJetsToLL_M-50_TuneCP5_13TeV-amcatnloFXFX-pythia8/RunIISummer20UL17MiniAODv2-106X_mc2017_realistic_v9-v2/MINIAODSIM data set.
A copy of one file of this dataset is permanently stored on EOS in the following path: /eos/cms/store/group/cat/datasets/MINIAODSIM/RunIISummer20UL17MiniAODv2-106X_mc2017_realistic_v9-v2/DYJetsToLL_M-50_TuneCP5_13TeV-amcatnloFXFX-pythia8/2C5565D7-ADE5-2C40-A0E5-BDFCCF40640E.root.
Ingredients for executing cmsRun
In principle, all we need to do is compile the code as demonstrated in
Compiling a CMSSW package,
adding the grid proxy as just done in
Obtaining a grid proxy or, preferably, in CAT services for GitLab CI
and then execute the cmsRun command.
Mind that, if you tried out the example for adding CMSSW packages in the previous section, you can remove that job (cmssw_addpkg) from the .gitlab-ci.yml file, it is not needed!
Putting this together, the additional commands to run would be:
cd ${CMSSW_BASE}/src/AnalysisCode/ZPeakAnalysis/
cmsRun test/MyZPeak_cfg.py inputFiles=/store/group/cat/datasets/MINIAODSIM/RunIISummer20UL17MiniAODv2-106X_mc2017_realistic_v9-v2/DYJetsToLL_M-50_TuneCP5_13TeV-amcatnloFXFX-pythia8/2C5565D7-ADE5-2C40-A0E5-BDFCCF40640E.root
ls -l myZPeak.root
where the last command just checks that an output file has been created. However, imagine that you would like to run test jobs on more than one file and to speed things up do this in parallel. This would mean that you would have to compile the code N times, which is a waste of resources and time. Instead, we can pass the compiled code from the compile step to the run step as described below.
Using artifacts to compile code only once
Artifacts have been introduced to you as part of the Continuous Integration / Continuous Development (CI/CD) lesson. You can find more detailed information in the GitLab documentation for using artifacts.
Artifacts are write-protected
One important thing to note is that artifacts are write-protected. You cannot write into the artifact directory in any of the following steps.
For the compiled code to be available in the subsequent steps, the directories
that should be provided need to be listed explicitly. The yaml code from
the compilation step in
episode 2
needs to be extended as follows:
artifacts:
  # artifacts: untracked ignores configuration in the repository’s .gitignore file.
  untracked: true
  expire_in: 20 minutes
  paths:
    - ${CMSSW_RELEASE}
The expire_in is used to specify how long artifacts are to be kept before they are marked for deletion.
As path we use ${CMSSW_RELEASE}, i.e. the full CMSSW area. Since this area
is write protected, in the subsequent steps we need to copy the whole area to a new directory and
recursively add write permissions again. In the following, this new workarea
will have to be used:
script:
  # ...
  - mkdir run
  - cp -r ${CMSSW_RELEASE} run/
  - chmod -R +w run/${CMSSW_RELEASE}/
  - cd run/${CMSSW_RELEASE}/src
  - cmsenv
Exercise: Run CMSSW using the artifact from the compile step
You should now have all required ingredients to be able to extend the
.gitlab-ci.ymlfile such that you can reuse the compiled code in thecmsRunstep.
Solution: Run CMSSW using the artifact from the compile step (personal proxy)
A possible implementation could look like this:
cmssw_run:
  needs:
    - job: cmssw_compile
      artifacts: true
  image:
    name: gitlab-registry.cern.ch/cms-cloud/cmssw-docker/cc7-cms:latest
    entrypoint: [""]
  variables:
    CMS_PATH: /cvmfs/cms.cern.ch
    EOS_MGM_URL: "root://eoscms.cern.ch"
    CMSSW_RELEASE: CMSSW_10_6_30
    SCRAM_ARCH: slc7_amd64_gcc700
  tags:
    - cvmfs
  script:
    - set +u && source ${CMS_PATH}/cmsset_default.sh; set -u
    - export SCRAM_ARCH=${SCRAM_ARCH}
    - mkdir run
    - cp -r ${CMSSW_RELEASE} run/
    - chmod -R +w run/${CMSSW_RELEASE}/
    - cd run/${CMSSW_RELEASE}/src
    - cmsenv
    - mkdir -p ${HOME}/.globus
    - printf $GRID_USERCERT | base64 -d > ${HOME}/.globus/usercert.pem
    - printf $GRID_USERKEY | base64 -d > ${HOME}/.globus/userkey.pem
    - chmod 400 ${HOME}/.globus/userkey.pem
    - printf ${GRID_PASSWORD} | base64 -d | voms-proxy-init --voms cms --pwstdin
    - cd AnalysisCode/ZPeakAnalysis/
    - cmsRun test/MyZPeak_cfg.py inputFiles=/store/group/cat/datasets/MINIAODSIM/RunIISummer20UL17MiniAODv2-106X_mc2017_realistic_v9-v2/DYJetsToLL_M-50_TuneCP5_13TeV-amcatnloFXFX-pythia8/2C5565D7-ADE5-2C40-A0E5-BDFCCF40640E.root
    - ls -l myZPeak.root
Solution: Run CMSSW using the artifact from the compile step (CAT EOS service)
A possible implementation could look like this:
cmssw_run_eosservice:
  needs:
    - job: cmssw_compile
      artifacts: true
  image:
    name: gitlab-registry.cern.ch/cms-cloud/cmssw-docker/cc7-cms:latest
    entrypoint: [""]
  tags:
    - cvmfs
  id_tokens:
    MY_JOB_JWT: # or any other variable name
        aud: "cms-cat-ci-datasets.app.cern.ch"
  variables:
    # File is taken from https://cms-cat-ci-datasets.web.cern.ch/
    EOSPATH: '/eos/cms/store/group/cat/datasets/MINIAODSIM/RunIISummer20UL17MiniAODv2-106X_mc2017_realistic_v9-v2/DYJetsToLL_M-50_TuneCP5_13TeV-amcatnloFXFX-pythia8/2C5565D7-ADE5-2C40-A0E5-BDFCCF40640E.root'
    EOS_MGM_URL: root://eoscms.cern.ch
    CMS_PATH: /cvmfs/cms.cern.ch
    EOS_MGM_URL: "root://eoscms.cern.ch"
    CMSSW_RELEASE: CMSSW_10_6_30
    SCRAM_ARCH: slc7_amd64_gcc700
  before_script:
  - 'XrdSecsssENDORSEMENT=$(curl -H "Authorization: ${MY_JOB_JWT}" "https://cms-cat-ci-datasets.app.cern.ch/api?eospath=${EOSPATH}" | tr -d \")'
  script:
    - set +u && source ${CMS_PATH}/cmsset_default.sh; set -u
    - export SCRAM_ARCH=${SCRAM_ARCH}
    - mkdir run
    - cp -r ${CMSSW_RELEASE} run/
    - chmod -R +w run/${CMSSW_RELEASE}/
    - cd run/${CMSSW_RELEASE}/src
    - cmsenv
    - cd AnalysisCode/ZPeakAnalysis/
    - cmsRun test/MyZPeak_cfg.py inputFiles="${EOS_MGM_URL}/${EOSPATH}?authz=${XrdSecsssENDORSEMENT}&xrd.wantprot=unix"
    - ls -l myZPeak.root
Solution: Run CMSSW using the artifact from the compile step (CAT VOMS proxy service)
A possible implementation could look like this:
cmssw_run_proxyservice:
  needs:
    - job: cmssw_compile
      artifacts: true
  image:
    name: gitlab-registry.cern.ch/cms-cloud/cmssw-docker/cc7-cms:latest
    entrypoint: [""]
  tags:
    - cvmfs
  id_tokens:
    MY_JOB_JWT: # or any other variable name
        aud: "cms-cat-grid-proxy-service.app.cern.ch"
  variables:
    # File is taken from https://cms-cat-ci-datasets.web.cern.ch/
    EOSPATH: '/store/group/cat/datasets/MINIAODSIM/RunIISummer20UL17MiniAODv2-106X_mc2017_realistic_v9-v2/DYJetsToLL_M-50_TuneCP5_13TeV-amcatnloFXFX-pythia8/2C5565D7-ADE5-2C40-A0E5-BDFCCF40640E.root'
    EOS_MGM_URL: root://eoscms.cern.ch
    CMS_PATH: /cvmfs/cms.cern.ch
    EOS_MGM_URL: "root://eoscms.cern.ch"
    CMSSW_RELEASE: CMSSW_10_6_30
    SCRAM_ARCH: slc7_amd64_gcc700
  before_script:
    - 'proxy=$(curl -H "Authorization: ${MY_JOB_JWT}" "https://cms-cat-grid-proxy-service.app.cern.ch/api" | tr -d \")'
  script:
    - set +u && source ${CMS_PATH}/cmsset_default.sh; set -u
    - export SCRAM_ARCH=${SCRAM_ARCH}
    - printf $proxy | base64 -d > myproxy
    - export X509_USER_PROXY=$(pwd)/myproxy
    - export X509_CERT_DIR=/cvmfs/grid.cern.ch/etc/grid-security/certificates/
    - voms-proxy-info # to test it
    - mkdir run
    - cp -r ${CMSSW_RELEASE} run/
    - chmod -R +w run/${CMSSW_RELEASE}/
    - cd run/${CMSSW_RELEASE}/src
    - cmsenv
    - cd AnalysisCode/ZPeakAnalysis/
    - cmsRun test/MyZPeak_cfg.py inputFiles=${EOSPATH}
    - ls -l myZPeak.root
In the solutions above you will notice that we have used the needs keyword in the yaml file to introduce dependencies between jobs.
The use of needs is described in the GitLab documentation on need.
Another possibility to introduce job dependencies is using the dependencies keyword, as described in the GitLab documentation on dependencies.
The crucial difference between the two approaches is that when using need,
the dependent job will start as soon as the needed condition is met, regardless of the stages configuration.
The dependencies instead, can only be imposed between jobs in different stages,
so the dependent job will start only when all the jobs in the stage it depends on are completed.
Bonus: Store the output ROOT file as artifact
It could be useful to store the output ROOT file as an artifact so that you simply download it after job completion. Do you know how to do it? Hint: you need to provide the full path to it.
Key Points
A special CMSSW image is required to successfully run CMSSW jobs
Running on CMS data requires a grid proxy, or the files to be stored in the CAT managed area
Several ways are available to access CMS specific files
CAT provides services that avoid the danger of leaking credentials
The use of artifacts allows passing results of one step to the other
Since artifacts are write-protected, the directory needs to be copied before running CMSSW
Building a container image
Overview
Teaching: 10 min
Exercises: 10 minQuestions
How can I build a container image with my own code in a GitLab CI/CD pipeline?
Objectives
Know how to build and store a container image in a GitLab CI/CD pipeline
Build a container image
Using container images locally is explained in the CMS Docker lesson. In this lesson, we have used many of them already. We will now see to build a container image including files from your repository in a GitLab CI/CD pipeline.
Here, we expect that you have a Dockerfile in your repository. This file defines what “base” image of your new image and what files goes in it.
See the HSF Docker tutorial to learn more about containers.
For the build you can use an existing yml template and extend it in your pipeline. You can do this with include: in your .gitlab-ci.yml.
You will add a job that extends this template with the variables you need:
stages:
  - build
  - test_code

include:
  - project: 'cms-analysis/general/container-image-ci-templates'
    file:
      - 'kaniko-image.gitlab-ci.yml'

build_image:
  extends: .build_kaniko
  stage: build
  variables:
    PUSH_IMAGE: "true"
    REGISTRY_IMAGE_PATH: "${CI_REGISTRY_IMAGE}:${CI_COMMIT_SHORT_SHA}"

code_testing:
  stage: test_code
  script:
    - echo "I'm testing the code"
The variables starting with CI_ are predefined variables for the GitLab CI/CD pipelines, you can find them in the GitLab CI/CD documentation. Here, they are used to get a one-to-one correspondance between the image and the code.
Once the pipeline completes, you will find the container image in the container registry of your repository which you can find in Deploy -> Container registry.
In this manner, you can build a container image even without having docker-engine installed locally. If your repository is public, anyone can use this image.
With snippet above, your container images always have a tag that corresponds to the commit has of your code.
If you want to have an image with the latest tag, you can add another tag by defining it in a variable called EXTRA_TAGS
in the build_image step:
[...]

build_image:
  extends: .build_kaniko
  stage: build
  variables:
    PUSH_IMAGE: "true"
    REGISTRY_IMAGE_PATH: "${CI_REGISTRY_IMAGE}:${CI_COMMIT_SHORT_SHA}"
    EXTRA_TAGS: "latest"

[...]
You can use this image in GitLab pipelines (or in other workflows):
  image:
    name: gitlab-registry.cern.ch/<your username>/><your repository>:latest
or even use it e.g. on lxplus:
apptainer shell docker://gitlab-registry.cern.ch/<your username>/><your repository>:latest
For specific code versions, you can the commit hash as the tag, instead of :latest.
Key Points
Easy-to-use yml templates exist for container image building