Using Buildah and Podman
Overview
Teaching: 30 min
Exercises: 30 minQuestions
Why should I use Buildah and Podman?
Are these cross-platform solutions?
What limitation or extras do Buildah and Podman possess compared to Moby BuildKit and Docker?
Objectives
Be able to choose for yourself whether Buildah and Podman are right for your workflow.
Learn how to use Podman and Buildah as replacements for Docker.
This is the world of containers as you now know it …
Build, store, run, delete ↻
End of story?
No! I already said there was a whole container tool ecosystem!
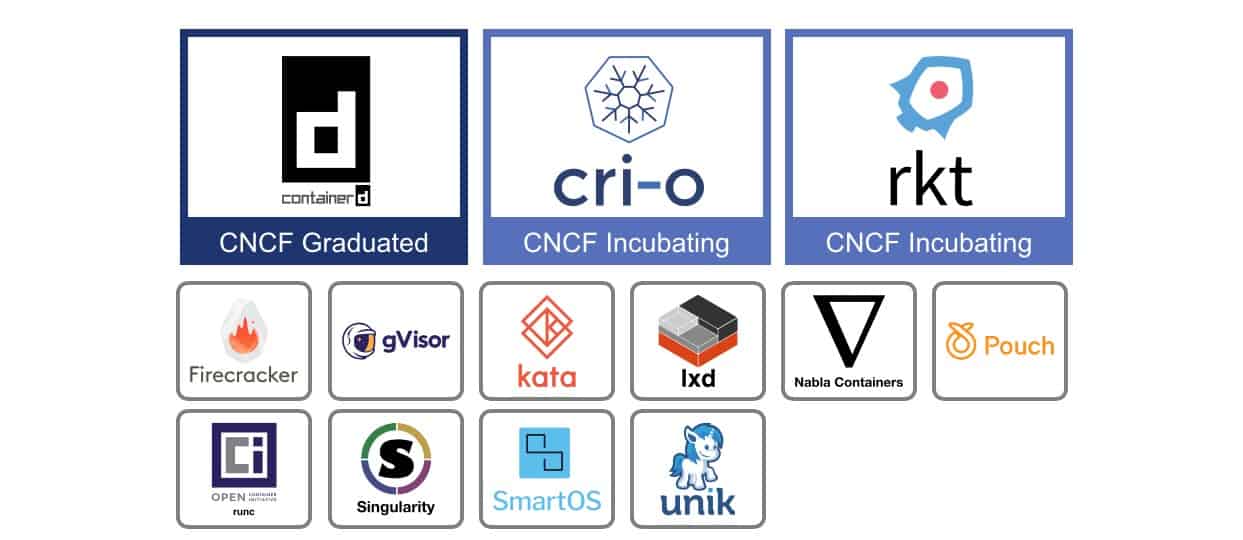
Here I will talk to you about two more applications in that ecosystem – Podman and Buildah, both Red Hat projects.


But first, let’s start to dissect how the various Docker components interact as a case study. This will help you to understand what motivates the use of these different applications. The image below shows how the Docker CLI (or desktop application) isn’t really the main component of the system. It’s the Docker daemon which is controlling everything – talking to the registries, working with image, communicating with the containers, and talking to the underlying kernel. The CLI is just the users way of communicating with the daemon.
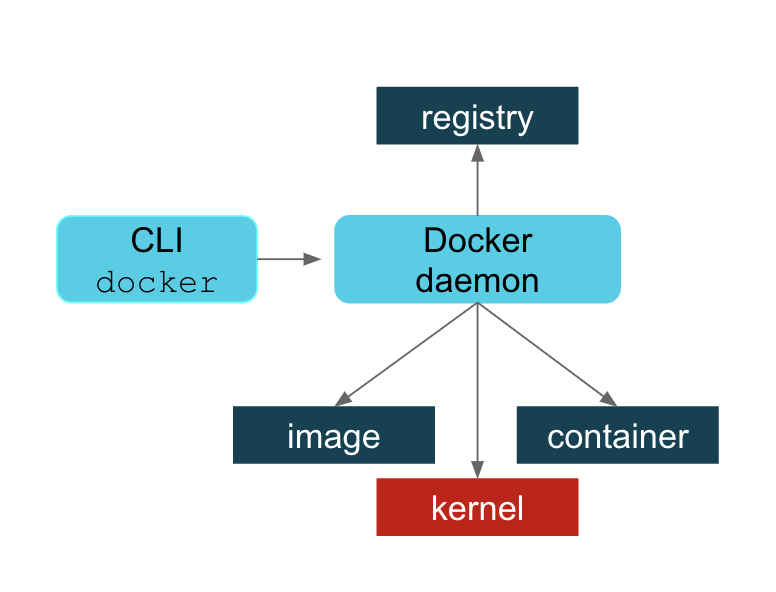
I’m not going to get into the wisdom or folly of choosing a centralized daemon. I’ll just say that some people feel strongly that this was not a wise design choice. A few of those reasons are:
- The daemon is a single point of failure.
- The daemon owns of of the child processes (the running containers).
- A failure of the daemon could mean orphaned processes.
- All Docker operations must be conducted using
rootprivileges. Everyone with access to the Docker CLI, even non-root users, can bypass most, if not all, of the security features. Anyone with access to thedockergroup should be treated as therootand since the daemon is running asroot, the user can then mount protected system folders and becomeroot. - Using the
--privilegedoption allows the container to run asrootand if the user breaks out, they will berooton the host.
Keep in mind, the person writing this tutorial is not a professional pen-tester nor a systems administrator. The descriptions here are very high level. Much of this information can be found in blog posts, articles, and tutorials. For example, I highly recommend watching:
R. McCune, Docker: security myths, security legends, Security BSides London, NCC Group, (July 2016) https://www.youtube.com/watch?v=uQigvjSXMLw.
Podman
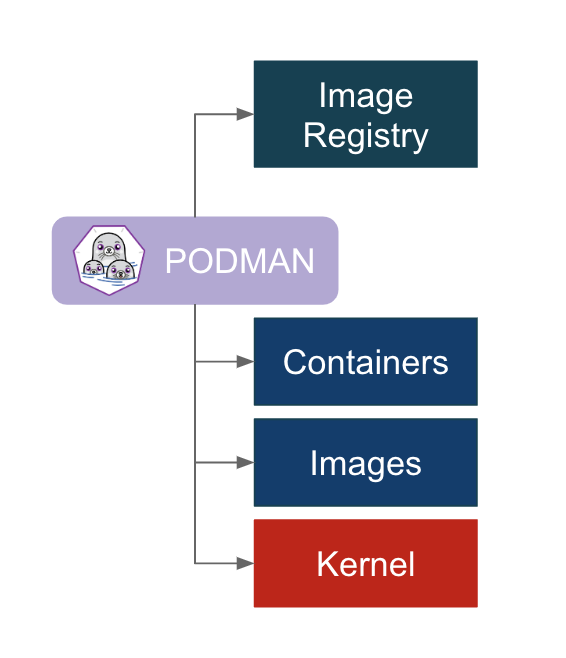
To help alleviate some of these issues, Podman (the POD MANager) takes a different design approach. Instead of using an intermediary daemon to communicate with the various components, Podman directly interacts with the registries, images, containers, and kernels. One key outcome of this design choice is that Podman can be run both as the root user or as a non-root user (default). More on that later. Other than the major design choices, Podman makes a few other changes, like storing the images in a different place.
Special note for MacOS and Windows users
The one caveat to what I have just described is that on MacOS and Microsoft Windows Podman needs to be run inside a lightweight Linux virtual machine (VM). This is because all containers, that I’m aware of, use a Linux kernel and thus cannot run natively on MacOS or Windows. Docker does something similar using its LinuxKit VM, but is slightly more successful at hiding the VM usage from the casual user.
The first time the user starts the VM they will need Podman to download an image and do some setup. This is accomplished by using the command:
podman machine initThis step doesn’t need to be repeated unless you’d like to use a different VM or if the VM is deleted.
The following commands will allow you to start and/or stop the VM:
podman machine start
# do something interesting
podman machine stop
The goal when designing Podman was that is could seamlessly – yes, you heard me, seamlessly – be dropped in as a replacement for Docker. Therefore, all of the Docker commands you are familiar with should work with Podman. Occasionally something is developed for Docker that isn’t ported to Podman right away, but these usually aren’t very disruptive unless you are on the bleeding edge of Docker usage. Additionally, some convenience flags have been added to the Podman commands.
For example, a typical command to run a container using Docker would be:
docker run --name <container_name> <image> <command>
The same command using Podman would be:
podman run --name <container_name> <image> <command>
Note
By default Podman stores images and containers in the users home area. To avoid filling up your home area when space constrained, you will want to use the options
--root <path> --runroot <path>to specify a new path for Podman to use.
Additionally, both Docker and Podman images are based on the same OCI standard, so they are compatible. Podman can create containers from Docker images pulled from Docker Hub and can push images back there or any other OCI compatible container registry. The local repository of Podman images and containers is kept separate from Docker – because of the new rootless feature and to be compatible with the OCI standard – but otherwise works similarly to Docker. Podman even has the capability to push and pull images from the local repository managed by the Docker daemon into its own repository. For example:
podman push <image name> docker-daemon:<image name>:<tag>
podman pull docker-daemon:<image name>:<tag>
I hope you see that Podman isn’t somehow inferior to Docker, but instead takes a different design approach.
Buildah
We just said that Podman is a drop-in replacement for Docker and has image building capabilities. Why then do we need Buildah? Well, in fact Podman uses the same code as Buildah to do its image building, but contains a subset of Buildah’s functionality. Buildah, can be used on its own, without Podman and contains a superset of image creation and management features. While you can still use Dockerfiles to tell Buildah what to build, the most powerful way to interact with Buildah is by writing Bash scripts. There are a few additional points you should keep in mind:
- Buildah gives the user finer control of creating image layers and the ability to commit many changes to a single layer.
- Buildah’s
runcommand is like a Dockerfile’sRUNcommand, not Docker or Podman’sruncommand. This is because Buildah is meant for building images. Basically, you’re telling Buildah how to build an image, not how to run it. - Buildah can actually create images from scratch, meaning you start with nothing … yes. This is useful for creating lightweight images containing only the packages needed in order to run your application.
- Buildah makes OCI compatible images by default, but it can also produce other image formats.
- Buildah runs as an unprivileged user. Big win for security!
Fun Fact
Buildah is named because of the way Dan Walsh, a Distinguished Red Hat Developer, pronounces “builder” due to his Boston accent.
A typical set of commands to build and view an image using Docker would be:
docker build -f <dockerfile> -t <tag> <path>
docker images
The same commands using Buildah would be:
buildah build -f <dockerfile> -t <tag> <path>
buildah images
Note
By default Buildah stores the images in the users home area. To avoid filling up your home area when space constrained, you will want to use the options
--root <path> --runroot <path>to specify a new path for Buildah to use. Typically you will want this to be the same path used by Podman.
Running Unprivileged Containers
As mentioned before, one of the key advantages of Buildah and Podman are the ability to run the applications and containers in a rootless mode. While Docker also has the capability of running in rootless mode (i.e. executing the Docker daemon and containers in a user namespace), it’s seemingly less of a cross-platform solution.
More concretely, because the Podman program can be run as a normal user, a Podman container will use the user namespaces, even when running as root inside the container. Although some additional capabilities can be returned using the -privileged flag, rootless containers will never have more privileges than the user that launched them. This is true no matter which directories or volumes a user mounts inside their container. As a consequence of this, root inside a rootless Podman container will be the user on the host.
While all modern Podman releases can be used in rootless mode, some additional host side setup may be required. That said, the system administrator duties are somewhat beyond the scope of this tutorial. Instead we will focus on the Buildah and Podman installations already setup at the LPC. For more information about the prerequisites for rootless Buildah/Podman you can look at the article Basic setup and use of podman in a rootless environment.
To explain rootless Podman, image a user with username theuser, UID 12345, and GID 6789. Based on this, the user will have subuid (subordinate UID) and subgid (subordinate GID) values of 12345:123450000:10000, which means that user with UID 12345 has 10000 subuids starting at 123450000. Remember also that the root user has a UID and GID of 0.
The following test will show that no matter the image, running rootless Podman will enable users to run containers in a safe, non-privileged manner.
Rootless Podman With the root User
Next we will spin up a container using the sl:6 Docker image. By default this image runs as the root user inside the container. This will help us test what happens when a user runs a less secure images; one that does not drop the user into an unprivileged user namespace.
podman --root /tmp/`whoami`/ --runroot /tmp/`whoami`/ run -d --name useroutside-rootinside docker://docker.io/library/sl:6 tail -f /dev/null
podman --root /tmp/`whoami`/ --runroot /tmp/`whoami`/ exec -it useroutside-rootinside /bin/bash
Once inside you will find that you are the root user with UID 0 and GID 0. All processes running inside that container will belong to the same UID. However, outside the container you will find that the container processes are running with the UID 12345, meaning that those processes have no greater privileges than the user who started the container. Additionally, you’ll find that the podman process is running within a user namespace and owned by theuser.
From all of this we can infer that although the container didn’t use the best security practices, the host machine is nevertheless protected from the container user having elevated privileges.
Rootless Podman With a Non-root User
Next we will perform the exact same procedure as in the previous section. However, this time we will specify that we would like to run as a non-root user inside the container. We will need to chose a user in the /etc/passwd file on the host. For this example we will choose the sync user.
podman --root /tmp/`whoami`/ --runroot /tmp/`whoami`/ run -d -u sync --name useroutside-userinside docker://docker.io/library/sl:6 tail -f /dev/null
This time you should find that you are the sync user within the container, with UID 5 and GID 0. You will therefore find that within the container all of the processes are running with UID 5. Outside the container the processes will have a UID in the range [123450000,123460000].
Rootless Podman With a Built-in Non-root User
So far we’ve examined what happens when we run as root inside the container and as a non-privileged user in the container created at runtime. Next we will see what happens when we use a container which was built with an existing non-privileged user without sudo capabilities. For this example we will be using the fnallpc/cms-cvmfs-docker:latest image. By default this image runs as cmsusr inside of the container.
podman --root /tmp/`whoami`/ --runroot /tmp/`whoami`/ run --rm -it --name useroutside-userinside docker://docker.io/fnallpc/cms-cvmfs-docker:latest
Once the container is running it will drop us inside a bash shell. You will find that the UID and GID are 1000, the default for this image, and that the username is cmsusr. Outside the container you will find that the container processes once again run with a UID in the range [123450000,123460000].
Resources
If you would like to read some more articles on the differences between Docker and Podman/Buildah, take a look at:
For more information about what’s running under the hood and why containers running on MacOS and Windows need a VM, take a look at:
For more information on rootless Podman from the master himself (Dan Walsh), take a look at:
Key Points
Podman can be used as a replacement for Docker in almost every circumstance.
Buildah is a powerful image building platform with fine control over how layers are created.
Rootless Podman is a safe way to allow non-
rootusers to run containers on shared resources.