Introduction
Overview
Teaching: 10 min
Exercises: 0 minQuestions
What are containers?
What is Docker?
What is it used for?
What are its components?
How is Docker different on OSX/Windows/Linux?
Objectives
Understand what is a container and how it differs from a virtual machine.
Understand the purpose of Docker.
Understanding why docker is useful to CMS researchers.
Containers and Images
Containers are like lightweight virtual machines. They behave as if they were their own complete OS, but actually only contain the components necessary to operate. Instead, containers share the host machine’s system kernel, significantly reducing their size. In essence, they run a second OS natively on the host machine with just a thin additional layer, which means they can be faster than traditional virtual machines. These container only take up as much memory as necessary, which allows many of them to be run simultaneously and they can be spun up quite rapidly.
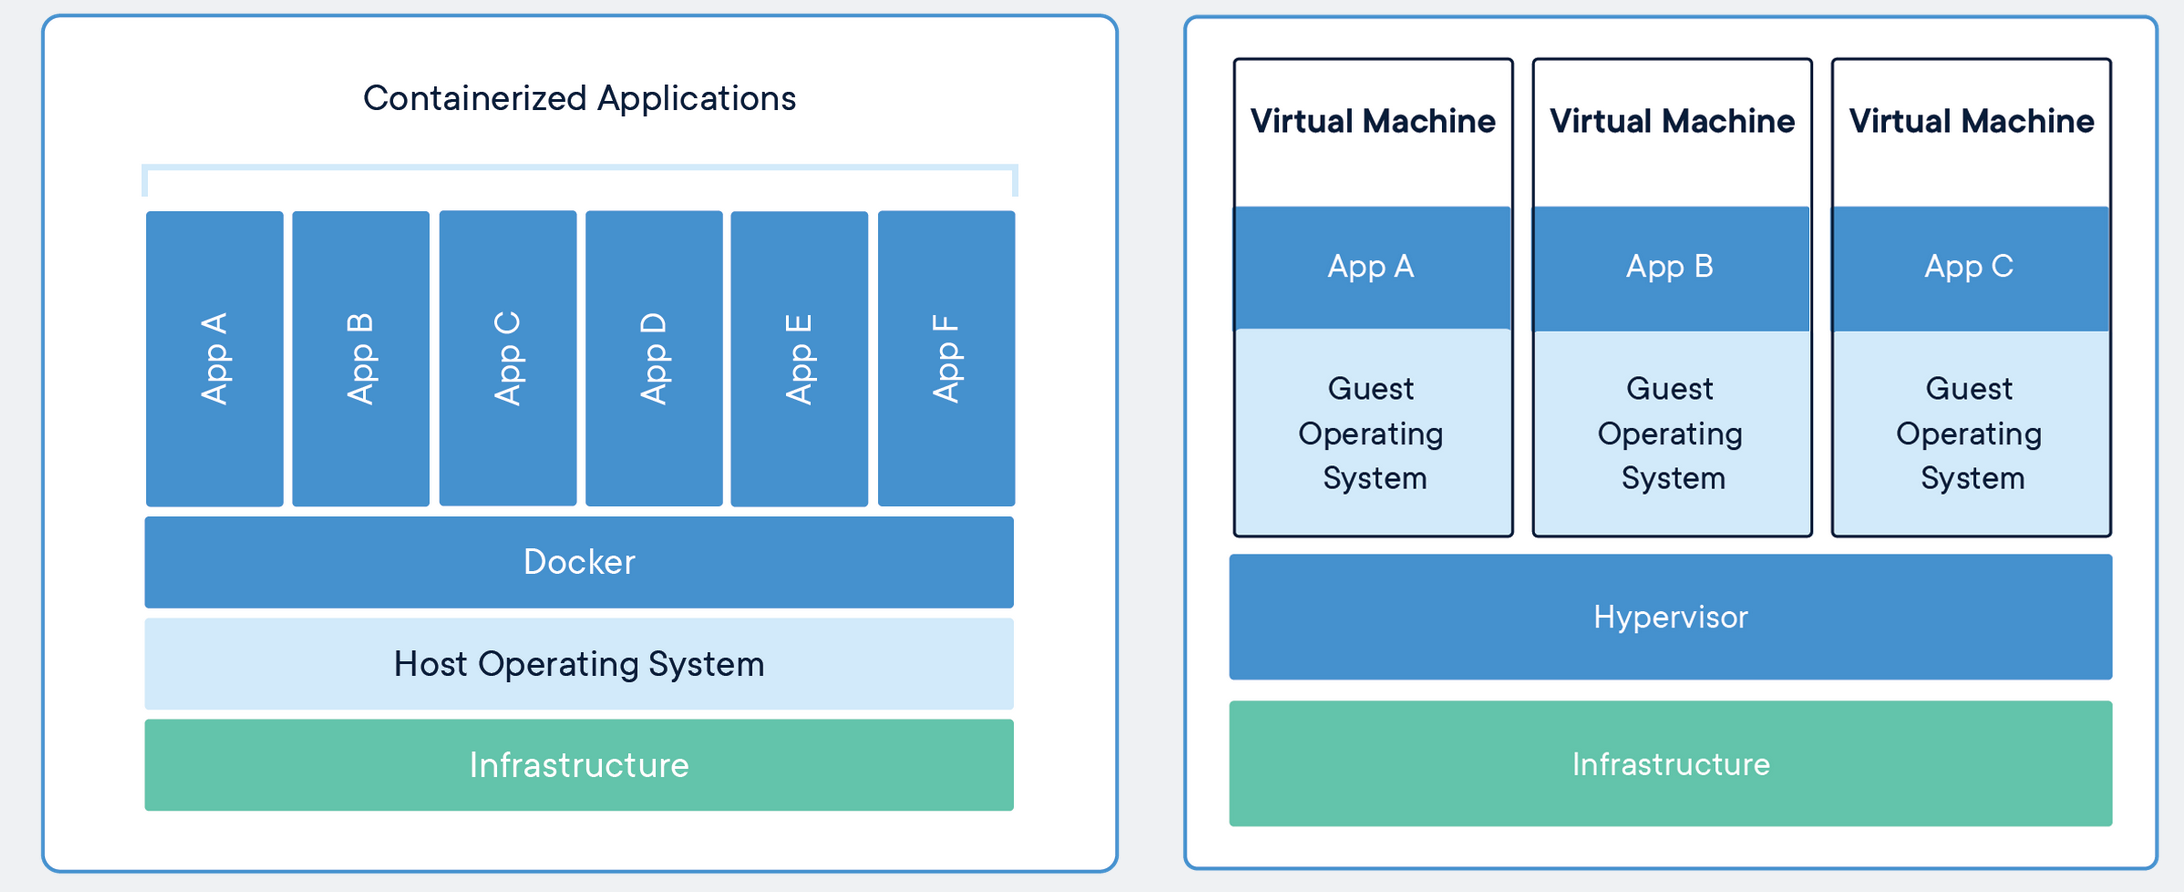
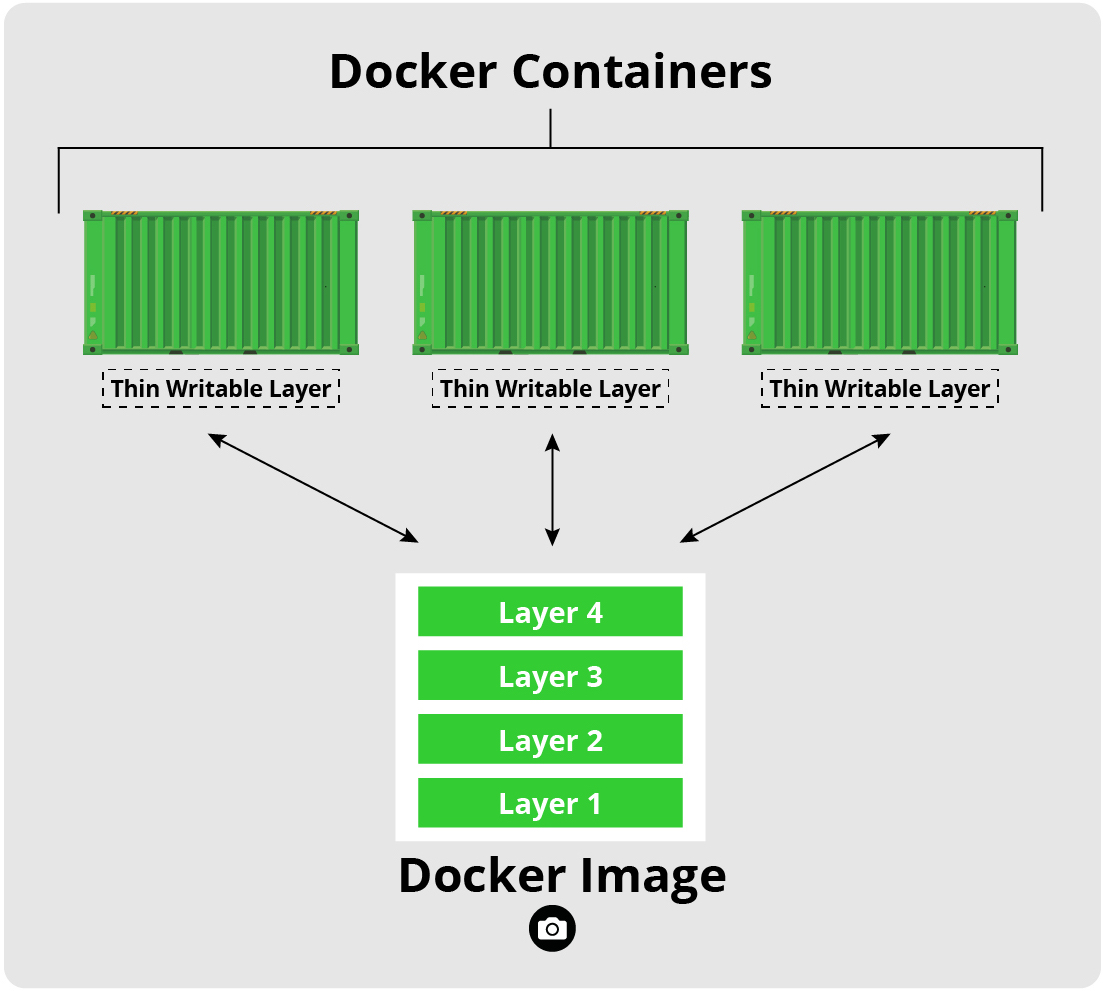
Images are read-only templates that contain a set of instructions for creating a container. Different container orchestration programs have different formats for these images. Often a single image is made of several files (layers) which contain all of the dependencies and application code necessary to create and configure the container environment. In other words, Docker containers are the runtime instances of images — they are images with a state.
This allows us to package up an application with just the dependencies we need (OS and libraries) and then deploy that image as a single package. This allows us to:
- replicate our environment/workflow on other host machines
- run a program on a host OS other than the one for which is was designed (not 100% foolproof)
- sandbox our applications in a secure environment (still important to take proper safety measures)
Docker
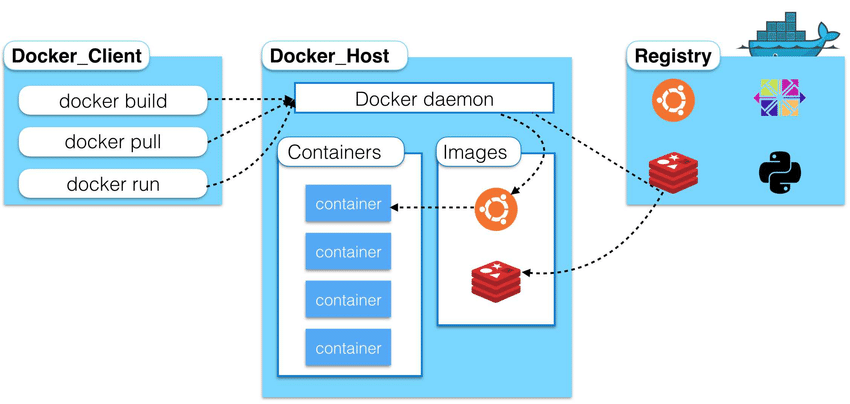
Docker is a multifaceted tool used to work with images and containers. You can think of the container life cycle as needing three components:
- A way to programmatically define and build and image
- A way to run a container
- A way to manage images and orchestrate many containers Docker and its various components satisfy this entire ecosystem.
Documentation
The official Docker documentation and tutorial can be found on the Docker website. It is quite thorough and useful. It is an excellent guide that should be routinely visited, but the emphasis of this introduction is on using Docker, not how Docker itself works.
As a side note, Docker has very similar syntax to Git and Linux, so if you are familiar with the command line tools for them then most of Docker should seem somewhat natural (though you should still read the docs!).
Licensing
The Docker engine license can be found here.
The Docker Desktop application has a separate license, which can be found here; see also the FAQ.
Container Tool-chain Ecosystem
Docker is one among many container platforms which are governed by the Open Container Initiative (OCI). Started by Docker and others in 2015, the OCI fosters industry standards and innovation among the various groups developing container environments. The OCI defines an image specification (image-spec) and a runtime specification (runtime-spec). These specifications provide for common ways to download, unpack, and run images/containers, allowing for greater interoperability among the containerization tool-chains. This way we can choose to work with Docker, Podman, Buildah, OpenShift, and others.
Key Points
Docker provides loosely isolated environments called containers.
These containers are lightweight alternatives to virtual machines.
You can package and run software in containers.
You can run many containers simultaneously on a single host machine.
Pulling Images
Overview
Teaching: 10 min
Exercises: 5 minQuestions
How are images downloaded?
How are images distinguished?
Objectives
Pull images from Docker Hub image registry
List local images
Introduce image tags
Docker Hub and Image Registries
Much like GitHub allows for web hosting and searching for code, the Docker Hub image registry allows the same for Docker images. Hosting and building of images is free for public repositories and allows for downloading images as they are needed. Additionally, through integrations with GitHub and Bitbucket, Docker Hub repositories can be linked against Git repositories so that automated builds of Dockerfiles on Docker Hub will be triggered by pushes to repositories.
While Docker Hub is maintained by Docker and is the defacto default registry for Docker images, it is not the only registry in existence. There are many registries, both private and public, in existence. For example, the GitLab software allows for a registry service to be setup alongside its Git and CI/CD management software. CERN’s GitLab instance has such a registry available. See later episodes for more information on CERN’s GitLab Docker image registry. GitHub also now provides its own container registry called GHCR, which uses the namespace https://ghcr.io.
Pulling Images
To begin with we’re going to pull down the Docker image we’re going to be working in for the tutorial (Note: If you did all the docker pulls in the setup instructions, this image will already be on your machine. In this case, docker should notice it’s there and not attempt to re-pull it, unless the image has changed in the meantime.):
docker pull sl

# if you run into a permission error, use "sudo docker run ..." as a quick fix
# to fix this for the future, see https://docs.docker.com/install/linux/linux-postinstall/
Using default tag: latest
latest: Pulling from library/sl
be7dd8a3f6cc: Pull complete
Digest: sha256:d20a8476d2369be2f3553382c9cce22f1aace2804cf52450b9dbacc93ae88012
Status: Downloaded newer image for sl:latest
docker.io/library/sl:latest
The image names are composed of NAME[:TAG|@DIGEST], where the NAME is composed of REGISTRY-URL/NAMESPACE/IMAGE and is often referred to as a repository. Here are some things to know about specifying the image:
- Some repositories will include a
USERNAMEas part of the image name (i.e.fnallpc/fnallpc-docker), and others, usually Docker verified content, will include only a single name (i.e.sl). - A registry path (
REGISTRY-URL/NAMESPACE) is similar to a URL, but does not contain a protocol specifier (https://). Docker uses the https:// protocol to communicate with a registry, unless the registry is allowed to be accessed over an insecure connection. Registry credentials are managed by docker login. If no registry path is given, the docker daemon assumes you meant to pull from Docker Hub and automatically appendsdocker.io/libraryto the beginning of the image name. - If no tag is provided, Docker Engine uses the
:latesttag as a default. - The SHA256
DIGESTis much like a Git hash, where it allows you to pull a specific version of an image. - CERN GitLab’s repository path is
gitlab-registry.cern.ch/<username>/<repository>/<image_name>[:<tag>|@<digest>].
Now, let’s list the images that we have available to us locally
docker images
If you have many images and want to get information on a particular one you can apply a filter, such as the repository name
docker images sl
REPOSITORY   TAG       IMAGE ID       CREATED       SIZE
sl           latest    33957a339e91   2 weeks ago   187MB
or more explicitly
docker images --filter=reference="sl"
REPOSITORY   TAG       IMAGE ID       CREATED       SIZE
sl           latest    33957a339e91   2 weeks ago   187MB
You can see here that there is the TAG field associated with the
sl image.
Tags are way of further specifying different versions of the same image.
As an example, let’s pull the 7 release tag of the
sl image (again, if it was already pulled during setup, docker won’t attempt to re-pull it unless it’s changed since last pulled).
docker pull sl:7
docker images sl
7: Pulling from library/sl
Digest: sha256:d20a8476d2369be2f3553382c9cce22f1aace2804cf52450b9dbacc93ae88012
Status: Downloaded newer image for sl:7
docker.io/library/sl:7

REPOSITORY   TAG       IMAGE ID       CREATED       SIZE
sl           7         33957a339e91   2 weeks ago   187MB
sl           latest    33957a339e91   2 weeks ago   187MB
Pulling Python
Pull the image python:3.7-slim for Python 3.7 and then list all
pythonimages along with thesl:7imageSolution
docker pull python:3.7-slim
docker images --filter=reference="sl" --filter=reference="python"
3.7-slim: Pulling from library/python 42c077c10790: Pull complete f63e77b7563a: Pull complete dca49bd08fde: Pull complete 51a05345c44d: Pull complete e69ebd661d90: Pull complete Digest: sha256:f61a4c6266a902630324fc10814b1109b3f91ac86dfb25fa3fa77496e62f96f5 Status: Downloaded newer image for python:3.7-slim docker.io/library/python:3.7-slim REPOSITORY TAG IMAGE ID CREATED SIZE python 3.7-slim 600bb8fe36b6 2 weeks ago 123MB sl 7 33957a339e91 2 weeks ago 187MB sl latest 33957a339e91 2 weeks ago 187MB
Key Points
Pull images with
docker pullList images with
docker imagesImage tags distinguish releases or version and are appended to the image name with a colon
The default registry is Docker Hub
Running Containers
Overview
Teaching: 10 min
Exercises: 5 minQuestions
How are containers run?
How do you monitor containers?
How are containers exited?
How are containers restarted?
Objectives
Run containers
Understand container state
Stop and restart containers
To use a Docker image as a particular instance on a host machine you run it as a container. You can run in either a detached or foreground (interactive) mode.
Run the image we pulled as a container with an interactive bash terminal:
docker run -it sl:7 /bin/bash
The -i option here enables the interactive session, the -t option gives access to a terminal and the /bin/bash command makes the container start up in a bash session.
You are now inside the container in an interactive bash session. Check the file directory
pwd
ls -alh
/
total 56K
drwxr-xr-x   1 root root 4.0K Jun 22 15:47 .
drwxr-xr-x   1 root root 4.0K Jun 22 15:47 ..
-rwxr-xr-x   1 root root    0 Jun 22 15:47 .dockerenv
lrwxrwxrwx   1 root root    7 Jun  1 15:03 bin -> usr/bin
dr-xr-xr-x   2 root root 4.0K Apr 12  2018 boot
drwxr-xr-x   5 root root  360 Jun 22 15:47 dev
drwxr-xr-x   1 root root 4.0K Jun 22 15:47 etc
drwxr-xr-x   2 root root 4.0K Jun  1 15:03 home
lrwxrwxrwx   1 root root    7 Jun  1 15:03 lib -> usr/lib
lrwxrwxrwx   1 root root    9 Jun  1 15:03 lib64 -> usr/lib64
drwxr-xr-x   2 root root 4.0K Apr 12  2018 media
drwxr-xr-x   2 root root 4.0K Apr 12  2018 mnt
drwxr-xr-x   2 root root 4.0K Apr 12  2018 opt
dr-xr-xr-x 215 root root    0 Jun 22 15:47 proc
dr-xr-x---   2 root root 4.0K Jun  1 15:04 root
drwxr-xr-x  11 root root 4.0K Jun  1 15:04 run
lrwxrwxrwx   1 root root    8 Jun  1 15:03 sbin -> usr/sbin
drwxr-xr-x   2 root root 4.0K Apr 12  2018 srv
dr-xr-xr-x  13 root root    0 Jun 22 15:47 sys
drwxrwxrwt   2 root root 4.0K Jun  1 15:04 tmp
drwxr-xr-x  13 root root 4.0K Jun  1 15:03 usr
drwxr-xr-x  18 root root 4.0K Jun  1 15:03 var
and check the host to see that you are not in your local host system
hostname
<generated hostname>
Further, check the os-release to see that you are actually inside a release of Scientific Linux:
cat /etc/os-release
NAME="Scientific Linux"
VERSION="7.9 (Nitrogen)"
ID="scientific"
ID_LIKE="rhel centos fedora"
VERSION_ID="7.9"
PRETTY_NAME="Scientific Linux 7.9 (Nitrogen)"
ANSI_COLOR="0;31"
CPE_NAME="cpe:/o:scientificlinux:scientificlinux:7.9:GA"
HOME_URL="http://www.scientificlinux.org//"
BUG_REPORT_URL="mailto:scientific-linux-devel@listserv.fnal.gov"

REDHAT_BUGZILLA_PRODUCT="Scientific Linux 7"
REDHAT_BUGZILLA_PRODUCT_VERSION=7.9
REDHAT_SUPPORT_PRODUCT="Scientific Linux"
REDHAT_SUPPORT_PRODUCT_VERSION="7.9"
Monitoring Containers
Open up a new terminal tab on the host machine and list the containers that are currently running
docker ps
CONTAINER ID        IMAGE         COMMAND             CREATED             STATUS              PORTS               NAMES
<generated id>      <image:tag>   "/bin/bash"         n minutes ago       Up n minutes                            <generated name>
containercommandYou can also list the containers by using
docker container ls
Notice that the name of your container is some randomly generated name. To make the name more helpful, rename the running container
docker rename <CONTAINER ID> my-example
and then verify it has been renamed
docker ps
CONTAINER ID        IMAGE         COMMAND             CREATED             STATUS              PORTS               NAMES
<generated id>      <image:tag>   "/bin/bash"         n minutes ago       Up n minutes                            my-example
Renaming by name
You can also identify containers to rename by their current name
docker rename <NAME> my-example
Specifying a name
You can also startup a container with a specific name
docker run -it --name my-example sl:7 /bin/bash
Exiting a container
As a test, go back into the terminal used for your container, and create a file in the container
touch test.txt
In the container exit at the command line
exit
You are returned to your shell. If you list the containers you will notice that none are running
docker ps
CONTAINER ID IMAGE COMMAND CREATED STATUS PORTS NAMES
but you can see all containers that have been run and not removed with
docker ps -a
CONTAINER ID        IMAGE         COMMAND             CREATED            STATUS                     PORTS               NAMES
<generated id>      <image:tag>   "/bin/bash"         n minutes ago      Exited (0) t seconds ago                       my-example
Restarting a container
To restart your exited Docker container start it again and then attach it interactively to your shell
docker start <CONTAINER ID>
docker attach <CONTAINER ID>
Attach shortcut
The two commands above (
docker startanddocker attach) can be combined into a single command as shown below:docker start -ai <CONTAINER ID>
execcommandThe attach command used here is a handy shortcut to interactively access a running container with the same start command (in this case
/bin/bash) that it was originally run with.In case you’d like some more flexibility, the exec command lets you run any command in the container, with options similar to the run command to enable an interactive (
-i) session, etc.For example, the
execequivalent toattaching in our case would look like:docker start <CONTAINER ID> docker exec -it <CONTAINER ID> /bin/bashYou can start multiple shells inside the same container using
exec.
Starting and attaching by name
You can also start and attach containers by their name
docker start <NAME>
docker attach <NAME>
Notice that your entry point is still / and then check that your
test.txt still exists
ls -alh test.txt
-rw-r--r-- 1 root root 0 Sep 25 08:39 test.txt
So this shows us that we can exit Docker containers for arbitrary lengths of time and then return to our working environment inside of them as desired.
Clean up a container
If you want a container to be cleaned up — that is deleted — after you exit it then run with the
--rmoption flagdocker run --rm -it <IMAGE> /bin/bash
Stopping a container
Sometimes you will exited a container and it won’t stop. Other times your container may crash or enter a bad state, but still be running. In order to stop a container you will exit it (exit) and then enter:
docker stop <CONTAINER ID> # or <NAME>
Stopping the container is a prerequisite for its removal.
Key Points
Run containers with
docker runMonitor containers with
docker psExit interactive sessions just as you would a shell, with
exitStop a container with
docker stopRestart stopped containers with
docker start
Removal of Containers and Images
Overview
Teaching: 5 min
Exercises: 5 minQuestions
How do you cleanup old containers?
How do you delete images?
Objectives
Learn how to cleanup after Docker
You can cleanup/remove a container docker rm
docker rm <CONTAINER NAME>
Note: A container must be stopped in order for it to be removed.
Remove old containers
Start an instance of the tutorial container, exit it, and then remove it with
docker rmSolution
docker run sl:latest
docker ps -a
docker rm <CONTAINER NAME>
docker ps -a
CONTAINER ID IMAGE COMMAND CREATED STATUS PORTS NAMES <generated id> <image:tag> "/bin/bash" n seconds ago Exited (0) t seconds ago <name> <generated id> CONTAINER ID IMAGE COMMAND CREATED STATUS PORTS NAMES
You can remove an image from your computer entirely with docker rmi
docker rmi <IMAGE ID>
Remove an image
Pull down the Python 2.7 image (2.7-slim tag) from Docker Hub and then delete it.
Solution
docker pull python:2.7-slim
docker images python
docker rmi <IMAGE ID>
docker images python
2.7: Pulling from library/python <some numbers>: Pull complete <some numbers>: Pull complete <some numbers>: Pull complete <some numbers>: Pull complete Digest: sha256:<the relevant SHA hash> Status: Downloaded newer image for python:2.7-slim docker.io/library/python:2.7-slim REPOSITORY TAG IMAGE ID CREATED SIZE python 3.7-slim <SHA> 2 weeks ago <size> python 2.7-slim <SHA> 2 years ago <size> Untagged: python@sha256:<the relevant SHA hash> Deleted: sha256:<layer SHA hash> Deleted: sha256:<layer SHA hash> Deleted: sha256:<layer SHA hash> Deleted: sha256:<layer SHA hash> Deleted: sha256:<layer SHA hash> REPOSITORY TAG IMAGE ID CREATED SIZE python 3.7-slim <SHA> 2 weeks ago <size>
Helpful cleanup commands
What is helpful is to have Docker detect and remove unwanted images and containers for you. This can be done with
prune, which depending on the context will remove different things.
docker container pruneremoves all stopped containers, which is helpful to clean up forgotten stopped containers.docker image pruneremoves all unused or dangling images (images that do not have a tag). This is helpful for cleaning up after builds. It is similar to the more explicit commanddocker rmi $(docker images -f "dangling=true" -q). Another useful command isdocker image prune -a --filter "until=24h", which will remove all images older than 24 hours.docker system pruneremoves all stopped containers, dangling images, and dangling build caches. This is very helpful for cleaning up everything all at once.
Key Points
Remove containers with
docker rmRemove images with
docker rmiPerform faster cleanup with
docker container prune,docker image prune, anddocker system prune
File I/O with Containers
Overview
Teaching: 5 min
Exercises: 5 minQuestions
How do containers interact with my local file system?
Objectives
Learn how to copy files to and from a container
Understand when and how to mount a file/volume inside a container
Copying
Copying files between the local host and Docker containers is possible. On your local host find a file that you want to transfer to the container and then
touch io_example.txt
# If on Mac need to do: chmod a+w io_example.txt
echo "This was written on local host" > io_example.txt
docker cp io_example.txt <NAME>:<remote path>
Note: Remember to do docker ps if you don’t know the name of your container.
From the container check and modify the file in some way
pwd
ls
cat io_example.txt
echo "This was written inside Docker" >> io_example.txt
<remote path>
io_example.txt
This was written on local host
and then on the local host copy the file out of the container
docker cp <NAME>:<remote path>/io_example.txt .
and verify if you want that the file has been modified as you wanted
cat io_example.txt
This was written on local host
This was written inside Docker
Volume mounting
What is more common and arguably more useful is to mount volumes to containers with the -v flag. This allows for direct access to the host file system inside of the container and for container processes to write directly to the host file system.
docker run -v <path on host>:<path in container> <image>
For example, to mount your current working directory on your local machine to the data directory in the example container
docker run --rm -it -v $PWD:/home/`whoami`/data sl:7
From inside the container you can ls to see the contents of your directory on your local machine
ls
and yet you are still inside the container
pwd
/home/<username>/data
You can also see that any files created in this path in the container persist upon exit
touch created_inside.txt
exit
ls *.txt
created_inside.txt
This I/O allows for Docker images to be used for specific tasks that may be difficult to do with the tools or software installed on the local host machine. For example, debugging problems with software that arise on cross-platform software, or even just having a specific version of software perform a task (e.g., using Python 2 when you don’t want it on your machine, or using a specific release of TeX Live when you aren’t ready to update your system release).
Mounts in Cygwin
Special care needs to be taken when using Cygwin and trying to mount directories. Assuming you have Cygwin installed at
C:\cygwinand you want to mount your current working directory:echo $PWD/home/<username>/<path_to_cwd>You will then need to mount that folder using
-v /c/cygwin/home/<username>/<path_to_cwd>:/home/docker/data
--volume (-v)versus--mountThe Docker documentation has a full and very interesting discussion about bind/volume mounting using these two options. However, much of it boils down to
--mountbeing a more explicit and customizable command. The-vsyntax combines many of the options found in--mountinto a single field.“Tip: New users should use the –mount syntax. Experienced users may be more familiar with the -v or –volume syntax, but are encouraged to use –mount, because research has shown it to be easier to use.”
Key difference: If a file/directory doesn’t exist on the host:
-vor--volumewill create the endpoint for you as a directory.--mountwill generate an error.
Key Points
Copy files to an from a container using
docker cpMount a folder/file inside a container using
-v <host path>:<container path>
Accessing CVMFS From Docker Locally
Overview
Teaching: 20 min
Exercises: 25 minQuestions
How can I access CVMFS from my computer?
How can I access CVMFS from Docker?
Objectives
Be aware of CVMFS with Docker options.
Successfully mount CVMFS via a privileged container.
The light-weight, and most commonly used, images for accessing the CMS software stack are Linux images that only contain the underlying base operating system (e.g. Scientific Linux 5/6/7 or CentOS 7/8), including additionally required system packages. These images have a size of a few hundred Megabytes, but rely on a good network connection to access the CVMFS share. The connection to CVMFS is crucial for accessing CMSSW, its external components, and the local GitHub mirrors.
In order to use CVMFS via Docker, a couple of extra steps need to be taken. There are different approaches:
- Installing CVMFS on your computer locally and mounting it from the container.
- Mounting CVMFS via another container and providing it to the analysis container.
- Mounting CVMFS from within the analysis container.
We will go through these options in the following.
This is where things get ugly
Unfortunately, all the options have some caveats, and they might not even work on your computer. At the moment, no clear recommendations can be given. Try for yourself which option works best for you.
Installing CVMFS on the host
CVMFS can be installed locally on your computer. The installation
packages are provided on the CVMFS Downloads page. In the
interest of time, we will not install CVMFS now, but instead use the third
option above in the following exercises. If you would like to install CVMFS on your computer, make sure to read the CVMFS Client Quick Start Guide. Please also have a look at the CVMFS with Docker documentation to avoid common pitfalls when running Linux on your computer and trying to bind mount CVMFS from the host. This is not necessary when running on a Mac. However, on a Mac you need to go to Docker Settings -> Resources -> File Sharing and add /cvmfs to enable bind mounting.

To run your analysis container and give it access to the /cvmfs mount, run
the following command (remember that --rm deletes the container after exiting):
docker run --rm -it -v /cvmfs:/cvmfs gitlab-registry.cern.ch/cms-cloud/cmssw-docker/cc7-cms /bin/bash
Limitations
I’m told that mounting cvmfs locally on Windows only works in WSL2 and that the Linux instructions have to be used.
Using the cvmfs-automounter
The first option needed CVMFS to be installed on the host computer (i.e. your laptop, a GitLab runner, or a Kubernetes node). Using the cvmfs-automounter is effectively mimicking what is done on the CERN GitLab CI/CD runners. First, a container, the cvmfs-automounter, is started that mounts CVMFS, and then this container provides the CVMFS mount to other containers. This is very similar to how modern web applications are orchestrated. If you are running Linux, the following command should work.
On a OSX and Windows+cygwin, however, this will not work (at least at the moment). This could work if you are using Windows Subsystem for Linux 2 (WSL2) in combination with Docker for WSL2, but not cygwin.
sudo mkdir /shared-mounts
docker run -d --name cvmfs --pid=host --user 0 --privileged --restart always -v /shared-mounts:/cvmfsmounts:rshared gitlab-registry.cern.ch/vcs/cvmfs-automounter:master
This container is running as a daemon (-d), but you can still see it via
docker ps and also kill it using docker kill cvmfs.
To mount CVMFS inside your analysis container use the following command:
docker run -v /shared-mounts/cvmfs:/cvmfs:rslave -v $(pwd):$(pwd) -w $(pwd) --name ${CI_PROJECT_NAME} ${FROM} /bin/bash
The downside to mounting CVMFS inside a container
The CVMFS cache will remain as long as the container is around. If the container is removed, so will the cache. This means it could take longer for commands to run the first time they are called after mounting CVMFS. This same caveat holds true for the methods which are discussed below.
Images which can take advantage of host/container shared CVMFS
There are many centrally produced images to suite the needs of CMSSW analyzers. Many of these images are built by either a centrally supported build service called cms-cloud or by the team which develops CMSSW. The cms-cloud images are built on CERN GitLab runners and the pushed to the relevant registries. They come in a vast variety of OS, architectures, capabilities, an sizes. The known varieties of images suitable for CMS development, but which don’t come with CVMFS capabilities of their own are:
| Source | Image | Tags | Registry |
|---|---|---|---|
| cmssw | alma8 | <see registry> | DockerHub |
| cmssw | ubi8 | <see registry> | DockerHub |
| cmssw | cs9 | <see registry> | DockerHub |
| cmssw | cs8 | <see registry> | DockerHub |
| cmssw | cc8 | <see registry> | DockerHub |
| cmssw | cc7 | <see registry> | DockerHub |
| cmssw | slc7-installer | latest | DockerHub |
| cmssw | slc6 | latest, amd64* | DockerHub |
| cmssw | slc5 | latest | DockerHub |
| cmssw | cms | rhel7, rhel6, rhel7-m*, rhel6-m* | DockerHub |
| cms-cloud | cc7-cms | latest, <see registry> | CERN GitLab and Docker Hub |
| cms-cloud | slc6-cms | latest, <see registry> | CERN GitLab and Docker Hub |
| cms-cloud | slc5-cms | latest, <see registry> | CERN GitLab and Docker Hub |
| cmsopendata |
Note that the cms-cloud versions contain updated/additional packages which are useful for interactive development and have a nicer shell prompt.
Mounting CVMFS inside the analysis container
This method seems to work on OSX, Windows 10, and most Linux systems. For the most part, it does not rely on the host system configuration. The caveat is that the container runs with elevated privileges, but if you trust us, you can use it.
The known varieties of light-weight, CVMFS capable cms-cloud images are:
| Source | Image | Tags | Registry |
|---|---|---|---|
| cms-cloud | cc7-cvmfs | latest, <see registry> | CERN GitLab and Docker Hub |
| cms-cloud | slc6-cvmfs | latest, <see registry> | CERN GitLab and Docker Hub |
We can start by running one of these light weight images.
docker run --rm -it --cap-add SYS_ADMIN --device /dev/fuse gitlab-registry.cern.ch/cms-cloud/cmssw-docker/cc7-cvmfs bash
If you get an error similar to:
/bin/sh: error while loading shared libraries: libtinfo.so.5: failed to map segment from shared object: Permission denied
you need to turn off SElinux security policy enforcing on your computer:
sudo setenforce 0
This can be changed permanently by editing /etc/selinux/config, setting SELINUX to permissive or disabled. Mind, however, that there are certain security issues with disabling SElinux security policies as well as running privileged containers.
The downsides to starting CVMFS in the container
- The CVMFS daemon is started when the container is started for the first time. It is not started again when you e.g. lose your network connection or simply connect back to the container at a later stage. At that point, you won’t have CVMFS access anymore.
- Every container will have their own instance of the CVMFS daemon and the associated cache. It would be more efficient to share a single mount and cache.
- The automounting capabilities are up to the image creator and not provided by the CVMFS development team.
Exercise: Give the image a try!
Try to run the following command:
docker run --rm -it --cap-add SYS_ADMIN --device /dev/fuse gitlab-registry.cern.ch/cms-cloud/cmssw-docker/cc7-cvmfs:latest bashYou will most likely receive an error message, like the one below, when trying to start the container.
chgrp: invalid group: 'fuse'
::: cvmfs-config...
Failed to get D-Bus connection: Operation not permitted
Failed to get D-Bus connection: Operation not permitted
::: mounting FUSE...
CernVM-FS: running with credentials 998:995
CernVM-FS: loading Fuse module... done
CernVM-FS: mounted cvmfs on /cvmfs/cms.cern.ch
CernVM-FS: running with credentials 998:995
CernVM-FS: loading Fuse module... done
CernVM-FS: mounted cvmfs on /cvmfs/cms-opendata-conddb.cern.ch
::: mounting FUSE... [done]
::: Mounting CVMFS... [done]
::: Setting up CMS environment...
::: Setting up CMS environment... [done]
Nevertheless, the image should still work. Although the container will print the error messages above, it is still able to mount CVMFS. One caveat is that this image hasn’t been tested on Linux recently.
Current downsides to these images:
- If the mounting of CVMFS fails the image immediately exits. You must change the entrypoint in order to debug the issue.
- If the CVMFS daemon is interrupted there is no automatic way to reconnect.
- The container has sudo privileges. In other words, the user permissions can be elevated. Not necessarily a bad thing, but something to be aware of.
- There is little to no support for X11 or VNC.
Exercise: Simple workflow (if needed)
I recommend taking a look around the light-weight container once you have it up and running; check out its capabilities. If you need a simple example workflow, feel free to use the one below.
Workflow
echo $SCRAM_ARCH
scramv1 list CMSSW
# Note, this next step might take a moment to run the first time (~3 minutes)
cmsrel CMSSW_10_6_25
ls
cd CMSSW_10_6_25/src/
cmsenv
echo $CMSSW_BASE
git config --global user.name 'J Doe'
git config --global user.email 'j.doe@lpchats2021.gov'
git config --global user.github jdoe
# This next command will also take a while the first time (~10 minutes)
git-cms-init
ls -alh
scram b
# Example taken from "SWGuide - 6.2 Generating Events - Sample Configuration Files for the Particle Gun"
#  https://twiki.cern.ch/twiki/bin/view/CMSPublic/WorkBookGeneration#SampleConfig
cmsDriver.py Configuration/Generator/python/SingleElectronPt10_pythia8_cfi.py -s GEN --conditions auto:mc --datatier 'GEN-SIM-RAW' --eventcontent RAWSIM -n 10 --no_exec --python_filename SingleElectronPt10_pythia8_cfi_py_GEN_IDEAL.py
# This next command will also take a while the first time (~10 minutes)
cmsRun SingleElectronPt10_pythia8_cfi_py_GEN_IDEAL.py
ls -alh
edmDumpEventContent SingleElectronPt10_pythia8_cfi_py_GEN.root
root -l -b SingleElectronPt10_pythia8_cfi_py_GEN.root
Events->Show(0)
Events->Draw("recoGenJets_ak4GenJetsNoNu__GEN.obj.pt()")
c1->SaveAs("ak4GenJetsNoNuPt.png")
.q
You can then copy the resulting PNG out of the container using:
docker cp <container name>:/home/cmsusr/CMSSW_10_6_25/src/ak4GenJetsNoNuPt.png <local path>
Developing CMS code on your laptop
By using containers, you can effectively develop any and all HEP-related code (and beyond) on your local development machine, and it doesn’t need to know anything about CVMFS or CMSSW in the first place.
Key Points
It is more practical to use light-weight containers and obtain CMSSW via CVMFS.
You can install CVMFS on your local computer.
The
cvmfs-automounterallows you to provide CVMFS to other containers on Linux.Privileged containers can be dangerous.
You can mount CVMFS from within a container on container startup.
Using the cms-cvmfs-docker Image
Overview
Teaching: 20 min
Exercises: 20 minQuestions
What is so special about this image?
What problems does it solve and what still remain?
How do I interact with this image?
Objectives
Be able to startup the cms-cvmfs-docker image.
Be proficient in the use of the images more advanced features.
At the moment, this is the method I recommend! This image has been developed for the most demanding of CMSSW use cases. It can do everything the previous containers do and then some. It’s also been configured to comply with the Fermilab security policies, at least pre-COVID-19 (I haven’t tested this lately). It is based on the Docker official sl:7 image. The most up-to-date and comprehensive documentation can be found in the projects GitHub README. The images themselves are built an stored on Docker Hub.
The benefits of this image include:
- X11 and VNC support.
- Host UID and GID mapping inside the container.
- Some rudimentary CVMFS mount verification and re-mounting support.
- Greater support for a variety of CVMFS mounts (compared to the cms-cloud images):
- cms.cern.ch
- cms-ib.cern.ch
- oasis.opensciencegrid.org
- cms-lpc.opensciencegrid.org
- sft.cern.ch
- cms-bril.cern.ch
- cms-opendata-conddb.cern.ch
- ilc.desy.de
- The ability to mount all, a subset, or none of the CVMFS mount points.
- The image still allows access even if CVMFS is unreachable.
- No ability to
sudo. This is better for security, but sometimes a pain, especially if you need to install some software and there is no user level installation available.
Basics
Like most Docker containers, the basic run command for this container is:
docker run --rm -it fnallpc/cms-cvmfs-docker:latest
While the --rm is not strictly necessary, it is useful for this tutorial so that we don’t end up with a huge number of containers at the end. The output will look something like:
chmod: cannot access '/dev/fuse': No such file or directory
MY_UID variable not specified, defaulting to cmsusr user id (1000)
MY_GID variable not specified, defaulting to cmsusr user group id (1000)
Not mounting any filesystems.
Not necessary to check the CVMFS mounts points.
Unable to source /cvmfs/cms.cern.ch/cmsset_default.sh
Unable to setup the grid utilities from /cvmfs/oasis.opensciencegrid.org/
Many of these warnings are simply because we haven’t yet given the container the ability to mount CVMFS. Others are simply informative. The user should be fully informed of the containers state by the time it start up.
Mounting CVMFS
Next we will give the container the ability to mount CVMFS:
docker run --rm -it --device /dev/fuse --cap-add SYS_ADMIN -e CVMFS_MOUNTS="cms.cern.ch oasis.opensciencegrid.org" fnallpc/cms-cvmfs-docker:latest
MY_UID variable not specified, defaulting to cmsusr user id (1000)
MY_GID variable not specified, defaulting to cmsusr user group id (1000)
Mounting the filesystem "cms.cern.ch" ... DONE
Mounting the filesystem "oasis.opensciencegrid.org" ... DONE
Checking CVMFS mounts ... DONE
    The following CVMFS folders have been successfully mounted:
        cms.cern.ch
        oasis.opensciencegrid.org
The following options are available for the CVMFS_MOUNTS environment variable:
- If the variable is not specified or if its value is
"none", none of the CVMFS mounts will be added. - It can take a space separated list of mount points (i.e.
"cms.cern.ch oasis.opensciencegrid.org") and it will only mount the areas specified. - It can take the value
"all"and all of the mount points specified above will be added to the container.
Every time you start the container or exec into it as the user cmsusr, the mount integrity will be checked. If any of the mounts fail this probe, the system will attempt to remount the CVMFS points.
docker exec -it --user=cmsusr <container_name> /bin/bash
Checking CVMFS mounts ... DONE
    The following CVMFS folders have been successfully mounted:
        cms.cern.ch
        oasis.opensciencegrid.org
Getting a grid certificate
The problem with getting a grid certificate is that it relies on private information (i.e. the certificate files) and a set of folder/file permissions. We don’t want to build these files into the image (see the lesson on image security!). We also don’t want the cumbersome task of copying the file(s) into the container every time we want to use them. Even if we did that, we’d need to set the permissions, so it would be a multi-step task. To top it all off, once the certificate files are in the container, you still can’t use them because the files are tied to the UID and GID of the user who created them.
Have I convinced you yet that we need a better solution?
A way to accomplish everything we want is to setup the ~/.globus/ directory on the host machine, complete with the .pem certificate files and the correct permissions. Then we can mount that directory into the container where it would normally belong. The next thing we need to do is make sure the UID and GID of the remote user (cmsusr) matches the UID and GID of the host user. All of this comes together into a command which looks like:
docker run --rm -it --device /dev/fuse --cap-add SYS_ADMIN -e CVMFS_MOUNTS="cms.cern.ch oasis.opensciencegrid.org" -e MY_UID=$(id -u) -e MY_GID=$(id -g) -v ~/.globus:/home/cmsusr/.globus fnallpc/cms-cvmfs-docker:latest
Mounting the filesystem "cms.cern.ch" ... DONE
Mounting the filesystem "oasis.opensciencegrid.org" ... DONE
Checking CVMFS mounts ... DONE
    The following CVMFS folders have been successfully mounted:
        cms.cern.ch
        oasis.opensciencegrid.org
We added in the two CVMFS mounts because having access to the certificate files isn’t that useful unless you have the grid tools to go along with it.
Please not that the voms-proxy-init command has been aliased to:
voms-proxy-init -voms cms --valid 192:00 -cert ~/.globus/usercert.pem -key ~/.globus/userkey.pem
Not only does that make sure people don’t forget the typical options, but for some reason the base command is unable to find the user certificate automatically. So we gave it a little help.
Exercise: Try a standard CMS workflow
See if you can start a container with the ability to do
voms-proxy-initand usexrdfs.Solution
docker run --rm -it --device /dev/fuse --cap-add SYS_ADMIN -e CVMFS_MOUNTS="cms.cern.ch oasis.opensciencegrid.org" -e MY_UID=$(id -u) -e MY_GID=$(id -g) -v ~/.globus:/home/cmsusr/.globus fnallpc/cms-cvmfs-docker:latest
voms-proxy-init
xrdfs root://cmseos.fnal.gov/ ls /store/user/hats/2020
Mounting the filesystem "cms.cern.ch" ... DONE Mounting the filesystem "oasis.opensciencegrid.org" ... DONE Checking CVMFS mounts ... DONE The following CVMFS folders have been successfully mounted: cms.cern.ch oasis.opensciencegrid.org Enter GRID pass phrase: **** Your identity: /DC=ch/DC=cern/OU=Organic Units/OU=Users/CN=<username>/CN=<number>/CN=<Name> Creating temporary proxy .................................................................................... Done Contacting voms2.cern.ch:15002 [/DC=ch/DC=cern/OU=computers/CN=voms2.cern.ch] "cms" Done Creating proxy ......................................................................................................... Done Your proxy is valid until Mon Oct 5 05:16:52 2020 /store/user/hats/2020/JEC /store/user/hats/2020/Tau /store/user/hats/2020/Visualization
X11 support
It’s often useful to display graphical windows which originate from within the container. in order to do so, we will need some components in place first. You will need to have a properly configured X Window System. There are some notes about this in the setup directions. We also recommend restricting the default ip address to 127.0.0.1 as specified in the Ports section of the image security lesson.
If you would like to display X11 windows on the host machine which originate inside the container you will need to add the option -e DISPLAY=host.docker.internal:0, which will give you a command like:
docker run --rm -it -e DISPLAY=host.docker.internal:0 fnallpc/cms-cvmfs-docker:latest
Note: The X11 options are slightly different on Linux. You may need to use some or all of -e DISPLAY=$DISPLAY -e XAUTHORITY=~/.Xauthority -v ~/.Xauthority:/home/cmsusr/.Xauthority -v /tmp/.X11-unix/:/tmp/.X11-unix.
Special note for OSX users
To comply with FNAL security policies, you will need to turn on access controls using
xhost. This program adds and delets host/user names which are allowed to connect to the X server. The best practice is to restrict access to only the localhost. While not strictly necessary, I find it’s often easiest to clear the list of accepted hosts and then add back the localhost.xhost - xhost +127.0.0.1 xhostaccess control enabled, only authorized clients can connect 127.0.0.1 being added to access control list access control enabled, only authorized clients can connect INET:localhost
Exercise: X11 support, no CVMFS
See if you can open a container without mounting CVMFS and simply test your X11 support by starting
xeyes.Solution
docker run --rm -it -e DISPLAY=host.docker.internal:0 fnallpc/cms-cvmfs-docker:latest
xeyes
Note: You may see some benign warnings.
chmod: cannot access '/dev/fuse': No such file or directory
MY_UID variable not specified, defaulting to cmsusr user id (1000)
MY_GID variable not specified, defaulting to cmsusr user group id (1000)
Not mounting any filesystems.
Not necessary to check the CVMFS mounts points.
Unable to source /cvmfs/cms.cern.ch/cmsset_default.sh
Unable to setup the grid utilities from /cvmfs/oasis.opensciencegrid.org/
Trick: If all you want to do is start
xeyesand you don’t need to access thebashprompt, then send the command when starting the container. As soon asxeyesstops, the container will exit.docker run --rm -e DISPLAY=host.docker.internal:0 fnallpc/cms-cvmfs-docker:latest -c xeyeschmod: cannot access '/dev/fuse': No such file or directory MY_UID variable not specified, defaulting to cmsusr user id (1000) MY_GID variable not specified, defaulting to cmsusr user group id (1000) Not mounting any filesystems.

Easily make your image X11 ready
The
X11ifyrepository is available to make many images X11 ready. The Dockerfile in this repository will build off of your chosen image, installing the necessary components. For more information take a look at the GitHub README.
Use a VNC server inside the container
Some people prefer to work with VNC rather than X11. I’ve even been told that this is preferable by some of my colleagues who use Windows 10. Using VNC avoids opengl+x11+? graphical incompatibilities. In order to facilitate this use case, the image comes with a built-in VNC server and noVNC+WebSockify, so that the host can connect via a web browser.
To run a VNC server inside the container you will need to open two ports using the options -P -p 5901:5901 -p 6080:6080. Once you’re inside the container, use the command start_vnc to start the VNC server.
You will now have two or three with which to connect:
- VNC viewer address: 127.0.0.1:5901
- OSX built-in VNC viewer command: open vnc://127.0.0.1:5901
- Web browser URL: http://127.0.0.1:6080/vnc.html?host=127.0.0.1&port=6080
Special note for OSX users
You will need to go to System Preferences -> Sharing and turn on Screen Sharing if using a VNC viewer, built-in or otherwise. You will not need to do this if using the browser.
More information about this feature can be found in the images GitHub README.
Exercise: Use cmsShow over VNC
See if you can start a container and use cmsShow through VNC, not X11.
Solution
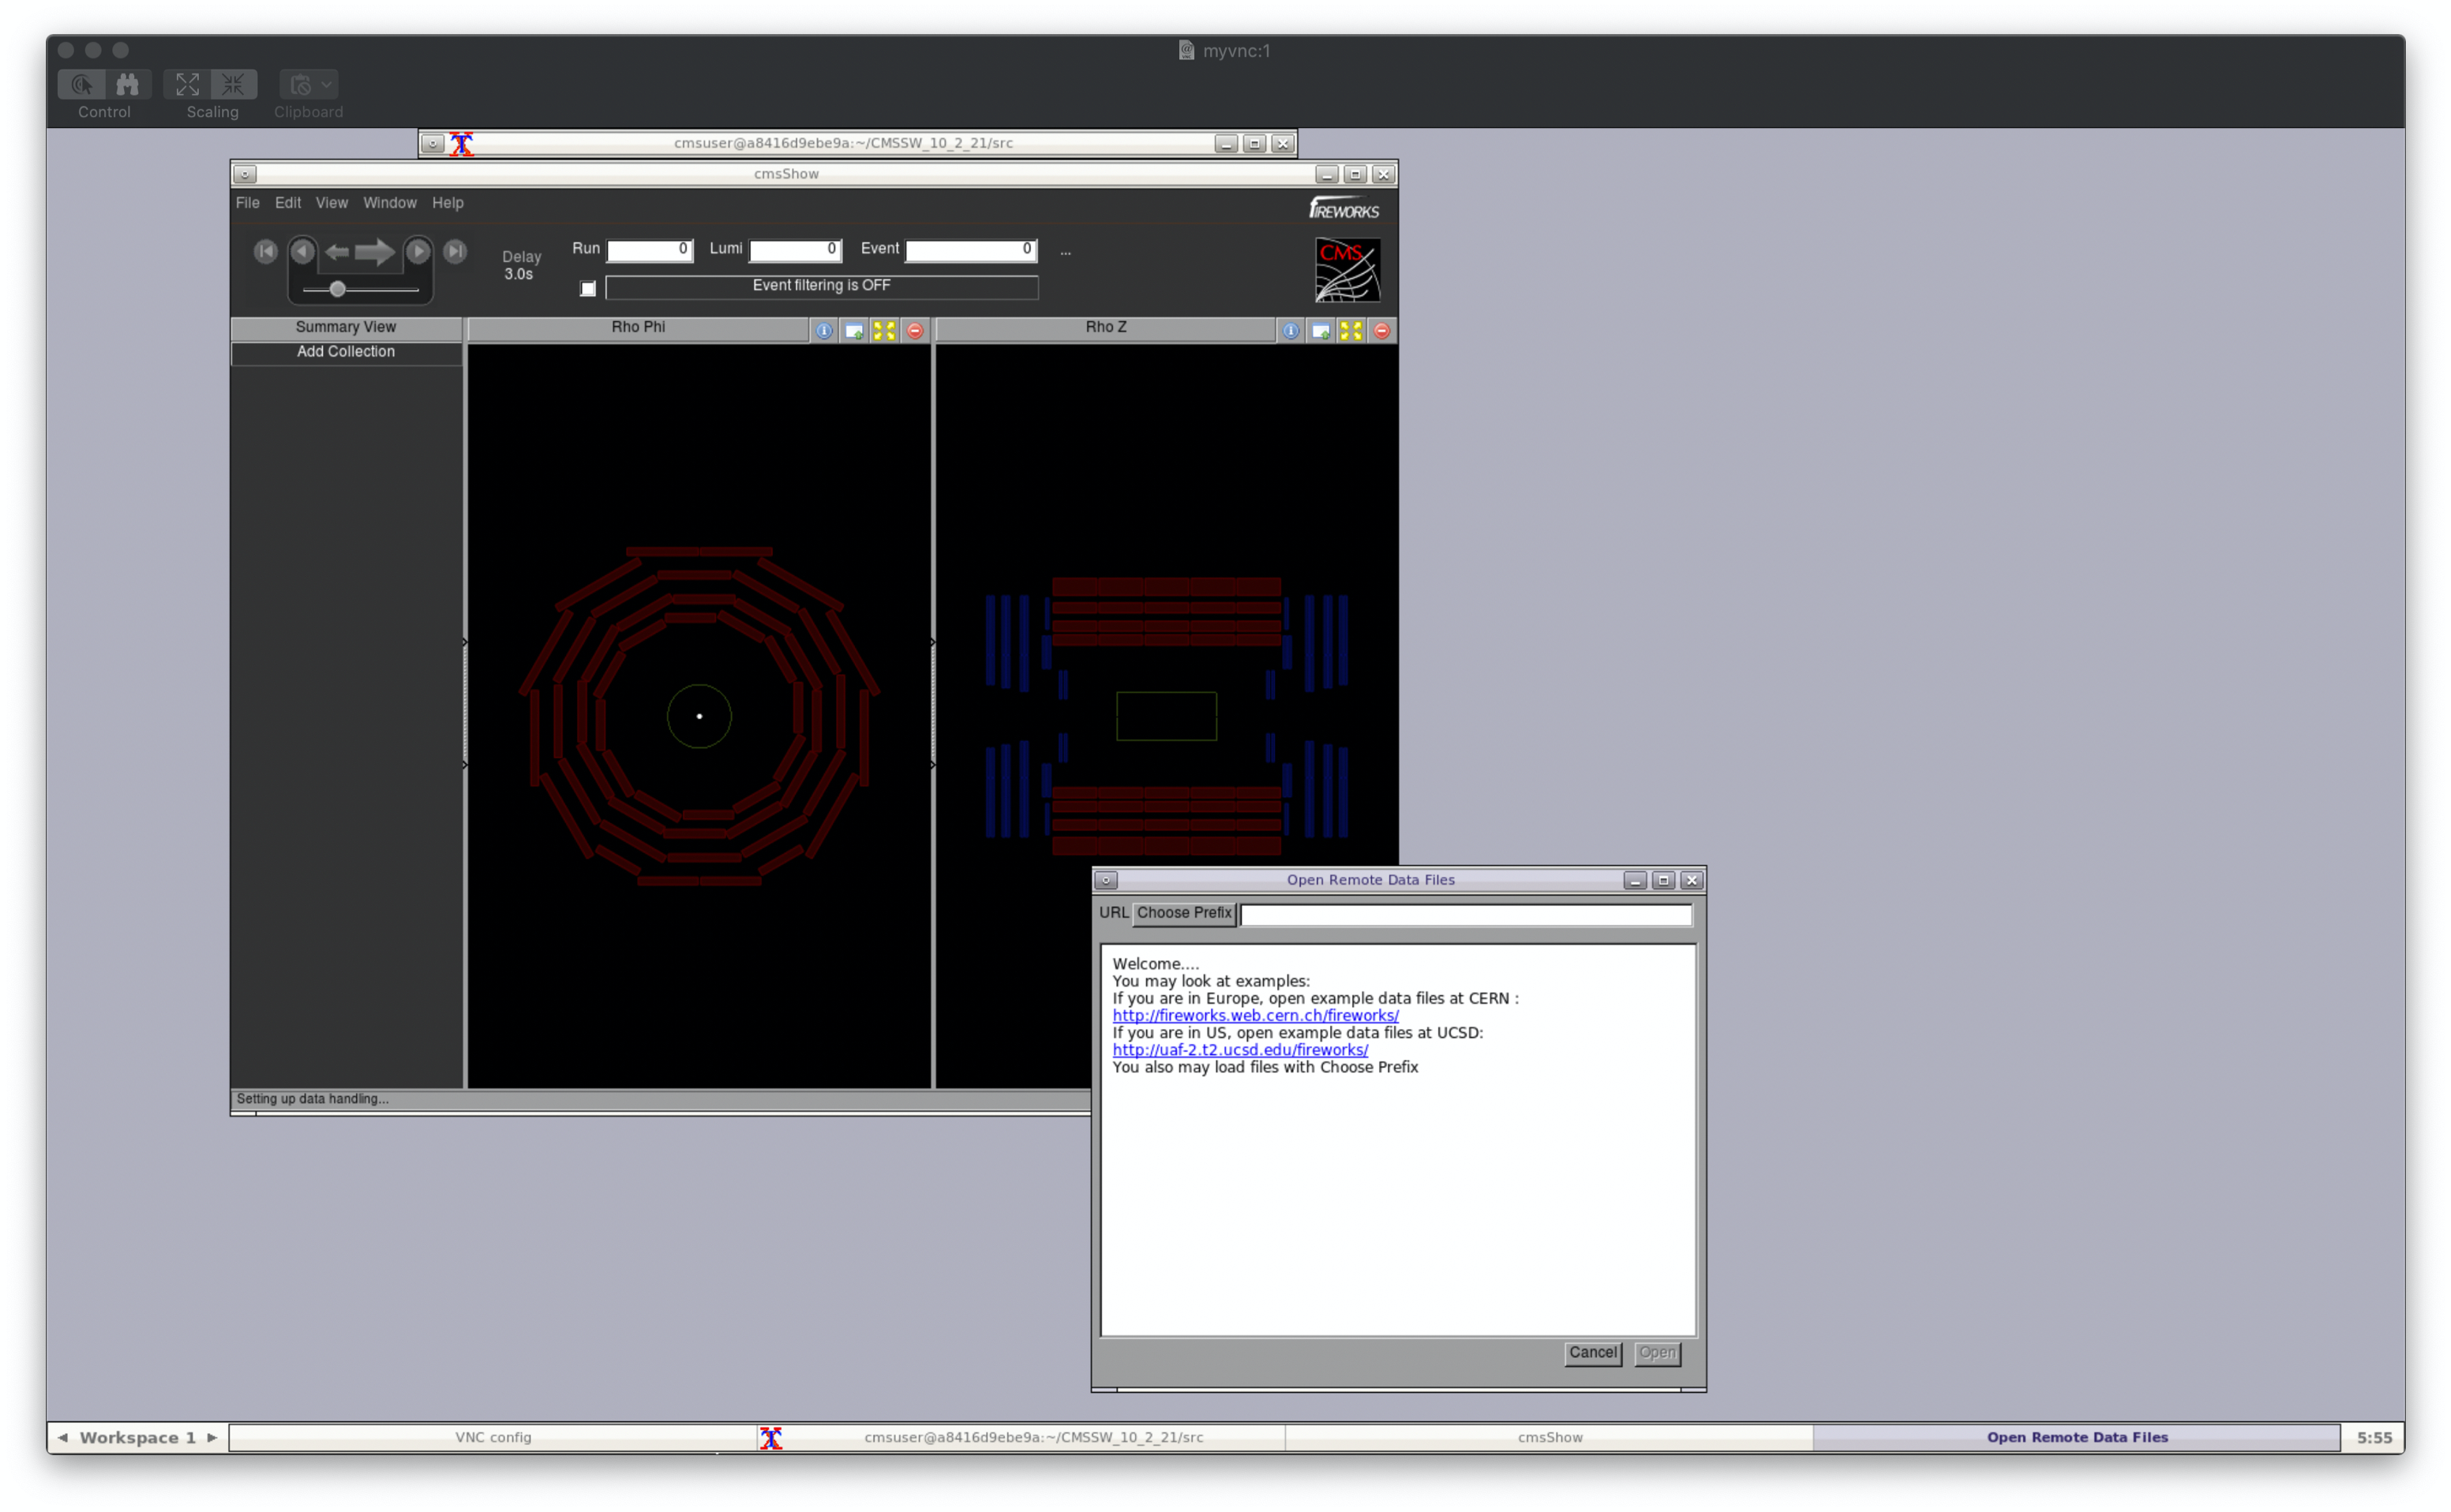
docker run --rm -it -P -p 5901:5901 -p 6080:6080 --device /dev/fuse --cap-add SYS_ADMIN -e CVMFS_MOUNTS="cms.cern.ch oasis.opensciencegrid.org" fnallpc/cms-cvmfs-docker:latest
cmsrel CMSSW_10_2_21
cd CMSSW_10_2_21/src/
cmsenv
start_vnc verbose
cmsShow
Note: Be patient, it may take a while before the
cmsShowcommand shows any printouts or displays any graphics.MY_UID variable not specified, defaulting to cmsusr user id (1000) MY_GID variable not specified, defaulting to cmsusr user group id (1000) Mounting the filesystem "cms.cern.ch" ... DONE Mounting the filesystem "oasis.opensciencegrid.org" ... DONE Checking CVMFS mounts ... DONE The following CVMFS folders have been successfully mounted: cms.cern.ch oasis.opensciencegrid.org WARNING: Release CMSSW_10_2_21 is not available for architecture slc7_amd64_gcc820. Developer's area is created for available architecture slc7_amd64_gcc700. WARNING: Developer's area is created for non-production architecture slc7_amd64_gcc700. Production architecture for this release is slc6_amd64_gcc700. You will require a password to access your desktops. Password: Verify: Would you like to enter a view-only password (y/n)? y Password: Verify: xauth: file /home/cmsusr/.Xauthority does not exist New 'myvnc:1' desktop is a8416d9ebe9a:1 Creating default config /home/cmsusr/.vnc/config Starting applications specified in /home/cmsusr/.vnc/xstartup Log file is /home/cmsusr/.vnc/a8416d9ebe9a:1.log [1] 451 VNC connection points: VNC viewer address: 127.0.0.1:5901 OSX built-in VNC viewer command: open vnc://127.0.0.1:5901 Web browser URL: http://127.0.0.1:6080/vnc.html?host=127.0.0.1&port=6080 To stop noVNC enter 'pkill -9 -P 451' To kill the vncserver enter 'vncserver -kill :1' [cmsusr@a8416d9ebe9a src]$ Warning: could not find self.pem Using local websockify at /usr/local/novnc-noVNC-0e9bdff/utils/websockify/run Starting webserver and WebSockets proxy on port 6080 Navigate to this URL: http://a8416d9ebe9a:6080/vnc.html?host=a8416d9ebe9a&port=6080 Press Ctrl-C to exit WebSocket server settings: - Listen on :6080 - Web server. Web root: /usr/local/novnc-noVNC-0e9bdff - No SSL/TLS support (no cert file) - proxying from :6080 to 127.0.0.1:5901 Starting cmsShow, version CMSSW_10_2_21. Info: No data file given. Info: Load idToGeo 2017 from /cvmfs/cms.cern.ch/slc7_amd64_gcc700/cms/cmssw/CMSSW_10_2_21/external/slc7_amd64_gcc700/data/Fireworks/Geometry/data/cmsGeom10.root
Easily make your image VNC ready
The
vncifyrepository is available to make many images capable of running a VNC server and noVNC+WebSockify. The Dockerfile in this repository will build off of your chosen image, installing the necessary components. For more information take a look at the GitHub README.
Using Jupyter within the container
Many people prefer to use a Jupyter Notebook environment for code/analysis development these days. While the cms-cvmfs-docker container does not have Jupyter Notebook installed (to keep the image small), Jupyter is accessible through the sft.cern.ch CVMFS mount.
Exercise: Start a Jupyter server and view it in your browser
See if you can start a Jupter server in your container and view it in your browser. Make sure you also have interactive access to the container. You already have all of the information you need to accomplish this – that is, assuming you know how to start a Jupyter server.
Solution
Begin by opening up a container:
docker run --rm -it -p 8888:8888 --device /dev/fuse --cap-add SYS_ADMIN -e CVMFS_MOUNTS="cms.cern.ch oasis.opensciencegrid.org sft.cern.ch" fnallpc/cms-cvmfs-docker:latestMY_UID variable not specified, defaulting to cmsusr user id (1000) MY_GID variable not specified, defaulting to cmsusr user group id (1000) Mounting the filesystem "cms.cern.ch" ... DONE Mounting the filesystem "oasis.opensciencegrid.org" ... DONE Mounting the filesystem "sft.cern.ch" ... DONE Checking CVMFS mounts ... DONE The following CVMFS folders have been successfully mounted: cms.cern.ch oasis.opensciencegrid.org sft.cern.chYou need to have a port mapped in order to access the Jupyter server from outside of the container. We have chosen port
8888, but you are free to choose a different port.Take a look at the running containers and identify the container name and ID for the one you just spun up:
docker psCONTAINER ID IMAGE COMMAND CREATED STATUS PORTS NAMES <CONTAINER_ID> fnallpc/cms-cvmfs-docker:latest "/run.sh" N minutes ago Up N minutes 127.0.0.1:8888->8888/tcp <CONTAINER_NAME>Next, we will open up a second view into the container so that we can interact with the container’s file system on one and run the Jupyter server from the other. Make sure to use
docker exechere, rather thandocker attach, so that you can open up a new shell process. If you simply attach to the container your new prompt will be in the same shell process as the original one. Also, make sure to specify the same user as in the original shell. By defaultdocker execwill enter the container as therootuser rather thancmsusr.docker exec -it --user=cmsusr <CONTAINER_NAME> /bin/bashSource the the relevant LCG environment in whichever prompt you prefer and then start the Jupyter server:
which jupyter
source /cvmfs/sft.cern.ch/lcg/views/LCG_96python3/x86_64-centos7-gcc8-opt/setup.sh
which jupyter
jupyter notebook --ip 0.0.0.0 --no-browser --notebook-dir . --port 8888
/usr/bin/which: no jupyter in (/cvmfs/oasis.opensciencegrid.org/mis/osg-wn-client/3.4/3.4.54/el6-x86_64/usr/bin:/cvmfs/oasis.opensciencegrid.org/mis/osg-wn-client/3.4/3.4.54/el6-x86_64/usr/sbin:/cvmfs/cms.cern.ch/common:/usr/local/sbin:/usr/local/bin:/usr/sbin:/usr/bin:/sbin:/bin) /cvmfs/sft.cern.ch/lcg/views/LCG_96python3/x86_64-centos7-gcc8-opt/bin/jupyter [I 04:53:32.923 NotebookApp] Writing notebook server cookie secret to /home/cmsusr/.local/share/jupyter/runtime/notebook_cookie_secret [I 04:53:50.245 NotebookApp] Serving notebooks from local directory: /home/cmsusr [I 04:53:50.245 NotebookApp] The Jupyter Notebook is running at: [I 04:53:50.245 NotebookApp] http://(0f8888173907 or 127.0.0.1):8888/?token=27fe7fba0ba5211333328ca3fb57960d5a119843fc81eb32 [I 04:53:50.245 NotebookApp] Use Control-C to stop this server and shut down all kernels (twice to skip confirmation). [C 04:53:50.322 NotebookApp] To access the notebook, open this file in a browser: file:///home/cmsusr/.local/share/jupyter/runtime/nbserver-1256-open.html Or copy and paste one of these URLs: http://(0f8888173907 or 127.0.0.1):8888/?token=27fe7fba0ba5211333328ca3fb57960d5a119843fc81eb32From there you should follow the directions and enter the url
http:// 127.0.0.1:8888/?token=27fe7fba0ba5211333328ca3fb57960d5a119843fc81eb32into your browser.
Because we love our users … you’re welcome
The
cvmfs_dockerhelper functionWe know this can be a lot to remember. I certainly don’t want to type all of those commands every time I start a container. Therefore, we have developed a bash function with a handy help message. Instead of typing the docker command manually, just run the function and let it start the container for you.
To obtain the bash function, clone the GitHub repository and source the
.cms-cvmfs-dockerscript:git clone https://github.com/FNALLPC/cms-cvmfs-docker.git source cms-cvmfs-docker/.cms-cvmfs-dockerHelp message
cvmfs_docker -h[-h] [-m "space separated mounts"] [-l <local path to mount>] [-r <remote path to mount>] -- opens a temporary docker container for mounting CVMFS simply specify the mount points or for all and then specify an additional folder to mount into the container where: -d print the command being used to invoke the docker container (default: false) -g mount the global gitconfig file from the host (default: false) -h show this help text -l [LOCAL] local path to mount in container (default: ) -m [MOUNTS] sets the mount points; space separate multiple points inside quotes (default: ) -n [NAME] make the container persistent (default: ) -r [REMOTE] remote path to mount in the container (default: /root/local_mount/) -s mount the .ssh folder (default: false) -v expose the ports needed to use a VNC viewer (default: ) example: cvmfs_docker -m "cms.cern.ch oasis.opensciencegrid.org" -l /Users/aperloff/Documents/CMS/FNAL/HATS/Docker_Singularity -r /root/workdir
Key Points
The cms-cvmfs-docker image includes a lot of features missing from other CMS images.
It has graphics support, CVMFS mount integrity support, and ID mapping support.
It is Fermilab security compliant.
Using Full CMSSW Containers
Overview
Teaching: 10 min
Exercises: 0 minQuestions
How can I obtain a standalone CMSSW container?
What are the advantages and disadvantages of this type of container?
Objectives
Understanding how to find and use standalone CMSSW containers.
CMS does not have a concept of separating analysis software from the rest of the experimental software stack such as event generation, data taking, and reconstruction. This means that there is just one CMSSW, and the releases have a size of several Gigabytes (around 35 GB for the last releases).
From the user’s and computing point of view, this makes it very impractical to build and use images that contain a full CMSSW release. Imagine running several hundred batch jobs where each batch node first needs to download several Gigabytes of data before the job can start, amounting to a total of tens of Terabytes. These images, however, can be useful for offline code development, in case CVMFS is not available, as well as for overall preservation of the software.
Because images that contain full CMSSW releases can be very big, CMS computing does not routinely build these images. However, as part of the CMS Open Data effort, images are provided for some releases. You can find those on Docker Hub. In addition, a build service is provided, which you can use to request images. Those images can be found on CERN GitLab and can be mirrored to Docker Hub upon request.
If you would like to use these images, you can use them in the same way as
any other CMS images (see next episode) with the only difference that the CMSSW software in the
container is in /opt/cms and not within /cvmfs/cms.cern.ch. The ability to partially replicate the /cvmfs/cms.cern.ch directory within these containers is under development. The goal being to have the same paths to CMSSW regardless of the way in which CMSSW is accessed within the container.
You can run the containers as follows (pick either bash or zsh) when
using the cmsopendata version published on Docker Hub:
docker run --rm -it cmscloud/standalone:cmssw_10_6_25-slc7_amd64_gcc700 /bin/zsh
If you would like to use the cms-cloud images from the CERN GitLab registry (this can be slow when outside CERN):
docker run --rm -it gitlab-registry.cern.ch/cms-cloud/cmssw-docker/cmssw_10_6_25-slc7_amd64_gcc700:latest /bin/zsh
Note, just recently the cms-cloud images have started to be mirrored on Docker Hub.
Do not use for large-scale job submission nor on GitLab!
Due to the large size of these images, they should only be used for local development.
Note
One important thing to note is that for most CMS images, the default username is
cmsusr. This will hold true for all of the centrally produced CMS images mentioned in these lessons.
Key Points
Full CMSSW release containers are very big.
Standalone CMSSW containers are currently not routinely built due to their size.
They need to be built/requested when needed.
Running Containers on CMSLPC/LXPLUS Using Apptainer
Overview
Teaching: 20 min
Exercises: 10 minQuestions
How can I run a container on CMSLPC/LXPLUS?
Objectives
Understand some of the differences between Apptainer and Docker.
Successfully run a custom analysis container on CMSLPC/LXPLUS.
Learn about the LPC Apptainer containers for machine learning.
Introduction
![]()
One thing that has not been covered in detail is that containers do not necessarily have to be executed using Docker. While Docker is the most popular containerization tool these days, there are several so-called container run-times that allow the execution of containers. The one chosen by CMS for invisibly running CRAB/HTCondor pilot jobs is Apptainer, which is centrally supported and documented. The main reason for choosing Apptainer is that it is popular in high-performance and high-throughput computing and does not require any root privileges.
While executing images on CMSLPC/LXPLUS and HTCondor is more practical with Apptainer, running in GitLab CI is by default done using Docker. Since Apptainer uses a proprietary image format, but supports reading and executing Docker images, building images is better done using Docker.
The previous episode has given you an idea how complicated it can be to run containers with CVMFS access on your computer. However, at the same time it gives you the possibility to develop code on a computer that doesn’t need to know anything about CMS software in the first place. The only requirement is that Docker is installed. These same container can then be run in GitLab CI/CD via Docker.
You will also have noticed that in several cases privileged containers
are needed. These are not available to you on CMSLPC/LXPLUS (nor is the docker command). On CMSLPC/LXPLUS, the tool to run containers is Apptainer. The following commands will therefore all be run on CMSLPC (cmslpc-sl7.fnal.gov or specifically).
Docker vs Apptainer
Apptainer does not required a privileged daemon process, so it is usable by non-
rootusers on shared clusters, which are commonly employed in HEP.

From Singularity to Apptainer
Apptainer is free, community-supported container software that is part of the Linux Foundation. It was formerly known as Singularity, an open-source project started at Lawrence Berkeley National Laboratory. The name Singularity is still used by an alternate, commercial version of the project by the company Sylabs. More details about this change can be found here.
The transition from Singularity to Apptainer is intended to be seamless. The commmand
singularityis now aliased toapptainer, andSINGULARITYenvironment variables will be used if the correspondingAPPTAINERenvironment variables are not defined. More details on backwards compatibility and relevant changes can be found here.
CMS documentation on Apptainer
Before we go into any detail, you should be aware of the
central CMS documentation. These commands are only
available via /cvmfs/cms.cern.ch/common. The cmssw-env command is
actually a shell script that sets some variables automatically and then
runs Apptainer. The nice thing about Apptainer is that you can
mount /cvmfs, /eos, and /afs without any workarounds. This is
automatically done when running the cmssw-env command.
Exercise: Run the CC8 Apptainer container
Confirm that you can access your home directory (
~or${HOME}), EOS area (/eos/uscms/store/user/${USER}on cmslpc), and ‘nobackup’ directory (${HOME}/nobackupon cmslpc) from within the Apptainer CC8 shell.Solution: Run the CC8 Apptainer container
cat /etc/redhat-release
cmssw-cc8 --bind /uscms_data
cat /etc/redhat-release
ls /eos/uscms/store/user/${USER}
ls ${HOME}
ls ${HOME}/nobackup
exit
Running custom images with Apptainer
The CMS script discussed above is “nice-to-have” and works well if you simply want to run some CMSSW code on a different Linux distribution, but it also hides a lot of the complexity when running Apptainer. For the purpose of running your analysis image, we cannot use the script above, but instead need to run Apptainer manually.
As an example, we are going to run a container using the ubuntu:latest image. Before running Apptainer, you should set the cache directory (i.e.
the directory to which the images are being pulled) to a
place outside your $HOME space (here we use the ~/nobackup directory):
export APPTAINER_CACHEDIR="`readlink -f ~/nobackup/`/.apptainer/cache"
apptainer shell -B `readlink $HOME` -B /uscms_data -B /cvmfs docker://ubuntu:latest
# try accessing cvmfs inside of the container
source /cvmfs/cms.cern.ch/cmsset_default.sh
INFO:    Converting OCI blobs to SIF format
INFO:    Starting build...
Getting image source signatures
Copying blob 345e3491a907 done
Copying blob 57671312ef6f done
Copying blob 5e9250ddb7d0 done
Copying config 7c6bc52068 done
Writing manifest to image destination
Storing signatures
2021/06/08 01:10:42  info unpack layer: sha256:345e3491a907bb7c6f1bdddcf4a94284b8b6ddd77eb7d93f09432b17b20f2bbe
2021/06/08 01:10:44  info unpack layer: sha256:57671312ef6fdbecf340e5fed0fb0863350cd806c92b1fdd7978adbd02afc5c3
2021/06/08 01:10:44  info unpack layer: sha256:5e9250ddb7d0fa6d13302c7c3e6a0aa40390e42424caed1e5289077ee4054709
INFO:    Creating SIF file...
INFO:    Converting SIF file to temporary sandbox...
WARNING: underlay of /etc/localtime required more than 50 (66) bind mounts
If you are asked for a docker username and password, just hit enter twice.
It’s not really a great practice to bind /eos/uscms into the container and you really shouldn’t need to use the EOS fuse mount anyway.
One particular difference from Docker is that the image name needs to be prepended by docker:// to tell Apptainer that this is a Docker image. Apptainer has its own registry system, which doesn’t have a de facto default registry like Docker Hub.
As you can see from the output, Apptainer first downloads the layers from the registry, and is then unpacking the layers into a format that can be read by Apptainer, the Singularity Image Format (SIF). This is a somewhat technical detail, but is different from Docker. It then unpacks the SIF file into what it calls a sandbox, the uncompressed image files needed to make the container.
-B(bind strings)The -B option allows the user to specify paths to bind to the Apptainer container. This option is similar to ‘-v’ in docker. By default paths are mounted as rw (read/write), but can also be specified as ro (read-only).
You must bind any mounted file systems to which you would like access (i.e.
nobackup).If you would like Apptainer to run your
.bashrcfile on startup, you must bind mount your home directory.
In the next example, we are executing a script with Apptainer using the same image.
export APPTAINER_CACHEDIR="`readlink -f ~/nobackup/`/.apptainer/cache"
echo -e '#!/bin/bash\n\necho "Hello World!"\n' > hello_world.sh
apptainer exec -B `readlink $HOME` -B /uscms_data docker://ubuntu:latest bash hello_world.sh
execvs.shellApptainer differentiates between providing you with an interactive shell (
apptainer shell) and executing scripts non-interactively (apptainer exec).
Saving the Apptainer Sandbox
You may have noticed that Apptainer caches both the Docker and SIF images so that they don’t need to be pulled/created on subsequent Apptainer calls. That said, the sandbox needed to be created each time we started a container. If you will be using the same container multiple times, it may be useful to store the sandbox and use that to start the container.
Begin by building and storing the sandbox:
export APPTAINER_CACHEDIR="`readlink -f ~/nobackup/`/.apptainer/cache"
apptainer build --sandbox ubuntu/ docker://ubuntu:latest
INFO:    Starting build...
Getting image source signatures
Copying blob 345e3491a907 skipped: already exists
Copying blob 57671312ef6f skipped: already exists
Copying blob 5e9250ddb7d0 [--------------------------------------] 0.0b / 0.0b
Copying config 7c6bc52068 done
Writing manifest to image destination
Storing signatures
2021/06/08 01:13:24  info unpack layer: sha256:345e3491a907bb7c6f1bdddcf4a94284b8b6ddd77eb7d93f09432b17b20f2bbe
2021/06/08 01:13:24  warn xattr{etc/gshadow} ignoring ENOTSUP on setxattr "user.rootlesscontainers"
2021/06/08 01:13:24  warn xattr{/uscms_data/d2/aperloff/build-temp-220308461/rootfs/etc/gshadow} destination filesystem does not support xattrs, further warnings will be suppressed
2021/06/08 01:13:47  info unpack layer: sha256:57671312ef6fdbecf340e5fed0fb0863350cd806c92b1fdd7978adbd02afc5c3
2021/06/08 01:13:47  info unpack layer: sha256:5e9250ddb7d0fa6d13302c7c3e6a0aa40390e42424caed1e5289077ee4054709
INFO:    Creating sandbox directory...
INFO:    Build complete: ubuntu/
Once we have the sandbox we can use that when starting the container. Run the same command as before, but use the sandbox rather than the Docker image:
export APPTAINER_CACHEDIR="`readlink -f ~/nobackup/`/.apptainer/cache"
apptainer exec -B `readlink $HOME` -B /uscms_data ubuntu/ bash hello_world.sh
WARNING: underlay of /etc/localtime required more than 50 (66) bind mounts
Hello World!
You will notice that the startup time for the container is significantly reduced.
Authentication with Apptainer
In case your image is not public, you can authenticate to
the registry in two different ways: either you append the
option --docker-login to the apptainer command, which
makes sense when running interactively, or via environment
variables (e.g. on GitLab):
export APPTAINER_DOCKER_USERNAME=${CERNUSER}
export APPTAINER_DOCKER_PASSWORD='mysecretpass'
Knowing how to authenticate will be important when pulling images from GitLab. For example:
export APPTAINER_CACHEDIR="`readlink -f ~/nobackup/`/.apptainer/cache"
apptainer shell -B `readlink $HOME` -B /uscms_data docker://gitlab-registry.cern.ch/[repo owner's username]/[repo name]:[tag] --docker-login
Custom containers for machine learning at the LPC
There are three GPUs available for use at the LPC. Rather than installing the myriad of packages necessary for machine learning on the bare-metal machines or manually synchronizing an Anaconda distribution to CVMFS (as done in the past), custom Apptainer images have been built for this purpose.
Currently we have several images built and ready to use:
- PyTorch: (latest Dockerfile)
- 1.8.1 w/ CUDA 11.1
- 1.9.0 w/ CUDA 11.1
- 1.13.0 w/ CUDA 11.6
- 2.0.0 w/ CUDA 11.7
- TensorFlow: (latest Dockerfile)
- 2.6.0 w/ GPU support
- 2.10.0 w/ GPU support
- 2.12.0 w/ GPU support
Of course there are many more packages installed in these images than just PyTorch or TensorFlow. If you don’t see the exact variety you need, tell us and we can probably make it in ~1 day. The images are stored on Docker Hub.
Access to the GPU
In order to give the container access to the CUDA drivers and GPU on the host machine you will need to add the
--nvoption to yourapptainercommand.
Using Jupyter within the image
You can start Jupyter Notebook using the
apptainer execcommand, passing the directivejupyter notebook --no-browser --port <port_number>at the end of the command. Apptainer, unlike Docker, doesn’t require explicit port mapping. For example:apptainer exec --nv --bind $PWD:/run/user --bind /uscms_data /cvmfs/unpacked.cern.ch/registry.hub.docker.com/fnallpc/fnallpc-docker:pytorch-1.9.0-cuda11.1-cudnn8-runtime-singularity jupyter notebook --no-browser --port 1234
A word of warning, these images are rather large (about 5 GB compressed). For that reason, it would be prohibitively expensive to make each user download, convert, and uncompress the images. Therefore, the unpacked sandboxes are stored on CVMFS at /cvmfs/unpacked.cern.ch/registry.hub.docker.com/fnallpc/. The service which does the unpacking and uploading to CVMFS will be discussed in detail in the next lesson. For now we’ll just say, use the unpacked images if working with Apptainer.
Exercise: PyTorch workflow
Try to run a simple PyTorch workflow on a machine with a GPU
Solution
Log into one of the cmslpc GPU nodes and start a PyTorch container.
ssh -Y <username>@cmslpcgpu<2-3>.fnal.gov
export APPTAINER_CACHEDIR="`readlink -f ~/nobackup/`/.apptainer/cache"
apptainer shell --nv --bind $PWD:/run/user --bind /uscms_data /cvmfs/unpacked.cern.ch/registry.hub.docker.com/fnallpc/fnallpc-docker:pytorch-1.9.0-cuda11.1-cudnn8-runtime-singularity
Create a script called
testPytorch.pywhich has the following content:#!/usr/bin/env python import torch from datetime import datetime print("torch.version.cuda = ",torch.version.cuda) print("torch._C._cuda_getCompiledVersion() = ",torch._C._cuda_getCompiledVersion()) for i in range(10): x = torch.randn(10, 10, 10, 10) # similar timings regardless of the tensor size t1 = datetime.now() x.cuda() print(i, datetime.now() - t1)Execute that script using:
python testPytorch.pyYou should see an output which looks similar to:
torch.version.cuda =  11.1
torch._C._cuda_getCompiledVersion() =  11010
0 0:00:45.501856
1 0:00:00.000083
2 0:00:00.000066
3 0:00:00.000041
4 0:00:00.000041
5 0:00:00.000040
6 0:00:00.000038
7 0:00:00.000039
8 0:00:00.000041
9 0:00:00.000039
Other useful Apptainer images for CMS analyzers
There are some additional, ready-made Apptainer images which might be useful to know about. Those include:
- Pre-built coffea + scientific python environment
- Great if you want a ready to use environment with all of the most popular dependencies pre-installed
- There are also Docker images available
- SONIC for Triton Inference Server
- The image runs the Nvidia Triton inference server needed by SONIC
- Can access local CPU and/or GPU resources
- Can be run using Docker instead of Apptainer if needed
Going deeper
Follow the bonus lesson on advanced usage of Apptainer to learn more!
Key Points
Apptainer needs to be used for running containers on CMSLPC/LXPLUS.
CMS Computing provides a wrapper script to run CMSSW in different Linux environments (SLC5, SLC6, CC7, CC8).
The centrally supported way to run CMSSW in a container is using Apptainer.
To run your own container, you need to run Apptainer manually.
Using unpacked.cern.ch
Overview
Teaching: 10 min
Exercises: 5 minQuestions
What is
unpacked.cern.ch?How can I use
unpacked.cern.ch?Objectives
Understand how your images can be put on
unpacked.cern.ch
As was pointed out in the previous episode, Apptainer uses unpacked Docker
images. These are by default unpacked into the current working directory,
and the path can be changed by setting the APPTAINER_CACHEDIR variable.
The EP-SFT group provides a service that unpacks Docker images and makes them available via a dedicated CVMFS area. In the following, you will learn how to add your images to this area. Once you have your image(s) added to this area, these images will be automatically synchronized from the image registry to the CVMFS area within a few minutes whenever you create a new version of the image.
Exploring the CVMFS unpacked.cern.ch area
The unpacked area is a directory structure within CVMFS:
ls /cvmfs/unpacked.cern.ch/
gitlab-registry.cern.ch registry.hub.docker.com
You can see the full directory structure of an image:
ls /cvmfs/unpacked.cern.ch/registry.hub.docker.com/fnallpc/fnallpc-docker:tensorflow-2.12.0-gpu-singularity/
bin   dev          etc   lib    libgpuarray  mnt  proc  run   singularity  sys  usr
boot  environment  home  lib64  media        opt  root  sbin  srv          tmp  var
This can be useful for investigating some internal details of the image.
As mentioned above, the images are synchronized with the respective registry. However, you don’t get to know when the synchronization happened1, but there is an easy way to check by looking at the time-stamp of the image directory:
ls -l /cvmfs/unpacked.cern.ch/registry.hub.docker.com/fnallpc/fnallpc-docker:tensorflow-2.12.0-gpu-singularity
lrwxrwxrwx 1 cvmfs cvmfs 79 Apr 17 19:12 /cvmfs/unpacked.cern.ch/registry.hub.docker.com/fnallpc/fnallpc-docker:tensorflow-2.12.0-gpu-singularity -> ../../.flat/7b/7b4794b494eaee76f7c03906b4b6c1174da8589568ef31d3f881bdf820549161
In the example given here, the image has last been updated on August 17th at 13:54.
Adding to the CVMFS unpacked.cern.ch area
You can add your image to the unpacked.cern.ch area by making a merge
request to the unpacked sync repository. In this repository
there is a file called recipe.yaml, to which you
simply have to add a line with your full image name (including registry)
prepending https://:
- 'https://registry.hub.docker.com/fnallpc/fnallpc-docker:tensorflow-2.12.0-gpu-singularity'
As of 14th February 2020, it is also possible to use wildcards for the tags, i.e. you can simply add
- 'https://registry.hub.docker.com/fnallpc/fnallpc-docker:*'
and whenever you build an image with a new tag it will be synchronized
to /cvmfs/unpacked.cern.ch.
Image removal
There is currently no automated ability to remove images from CVMFS. If you would like your image to be permanently removed, contact the developers or open a GitLab issue.
Running Apptainer using the unpacked.cern.ch area
Running Apptainer using the unpacked.cern.ch area is done using the
same commands as listed in the previous episode with the only difference
that instead of providing a docker:// image name to Apptainer,
you provide the path in /cvmfs/unpacked.cern.ch:
apptainer exec --nv -B `readlink $HOME` -B /uscms_data -B /cvmfs /cvmfs/unpacked.cern.ch/registry.hub.docker.com/fnallpc/fnallpc-docker:tensorflow-2.12.0-gpu-singularity /bin/bash
Now you should be in an interactive shell almost immediately without any image pulling or unpacking.
Note
Mind that you cannot change/write files into the container file system with Apptainer. If your activity will create or modify files in the container you will need to write those files to EOS or a mounted directory.
Where to go from here?
Knowing that you can build images on your local machine, Docker Hub, GitHub, or GitLab and have them synchronized to the
unpacked.cern.charea, you now have the power to run reusable and versioned stages of your analysis. While we have only run these containers locally, you can run them on the batch system, i.e. your full analysis in containers with effectively only advantages.
-
You can figure it out by looking at the Jenkins logs. ↩
Key Points
The
unpacked.cern.chCVMFS area provides a very fast way of distributing unpacked docker images for access via Apptainer.Using this approach you can run versioned and reusable stages of your analysis.
Container Security
Overview
Teaching: 20 min
Exercises: 0 minQuestions
What are the best practices when it comes to container security?
What are the Fermilab security dos and don’ts?
Objectives
Learn how to run a container without compromising the host security
Understand what practices will get you booted off the Fermilab network
Best practices for building/choosing/running containers 1,2,3
- Containers should be as ephemeral as possible; that means that they should be able to be stopped, destroyed, and recreated with a minimum of effort. In other words, they should be stateless, with any data that must be preserved residing in a stateful backing service (i.e. save your data to a mounted volume).
- Understand your build context – the directory in which you issue the build command – and know what’s in it. Including extra files can unnecessarily bloat your image.
- Understand why you’re creating each layer in the container and make sure it is necessary.
- Don’t install unnecessary packages. Beyond increasing the size of your image, these can open unintended security holes.
- Decouple containers/applications when possible. This means you should not have one massive container for every purpose. This isn’t a hard rule, but simply helpful for speed and flexibility. This will also make it easier to secure your containers.
- Remember, to keep security in mind when choosing an image to run. If you have a choice of (base) images, run the more secure version.
- Choose a specific tag for your base image, don’t rely on the
latesttag. Doing so may mean that your images changes on subsequent builds and is not necessarily using the (secure) image you intended. - Only provide as many permissions and capabilities as necessary to run the container. Limiting the capabilities of the container can significantly increase the security of said container.
- DO NOT, DO NOT, DO NOT store sensitive information in your Docker images. This can leak your private information into the public domain. There are ways to access sensitive files or credentials which are stored outside of the container.
The Docker daemon (dockerd) 4
Unless you’re running in rootless mode (experimental), the Docker daemon must be run as the root user on the home machine. This means that it has significant privileges on the host machine. Be careful when mounting directories into the container. The container can then modify the host filesystem, which can cause issues if you add/delete to the wrong directory. Think rm -rf /.
Some of this danger can be mitigated by limiting which directories can be bind mounted within the container. These settings are found in Preferences -> Resources -> File Sharing.
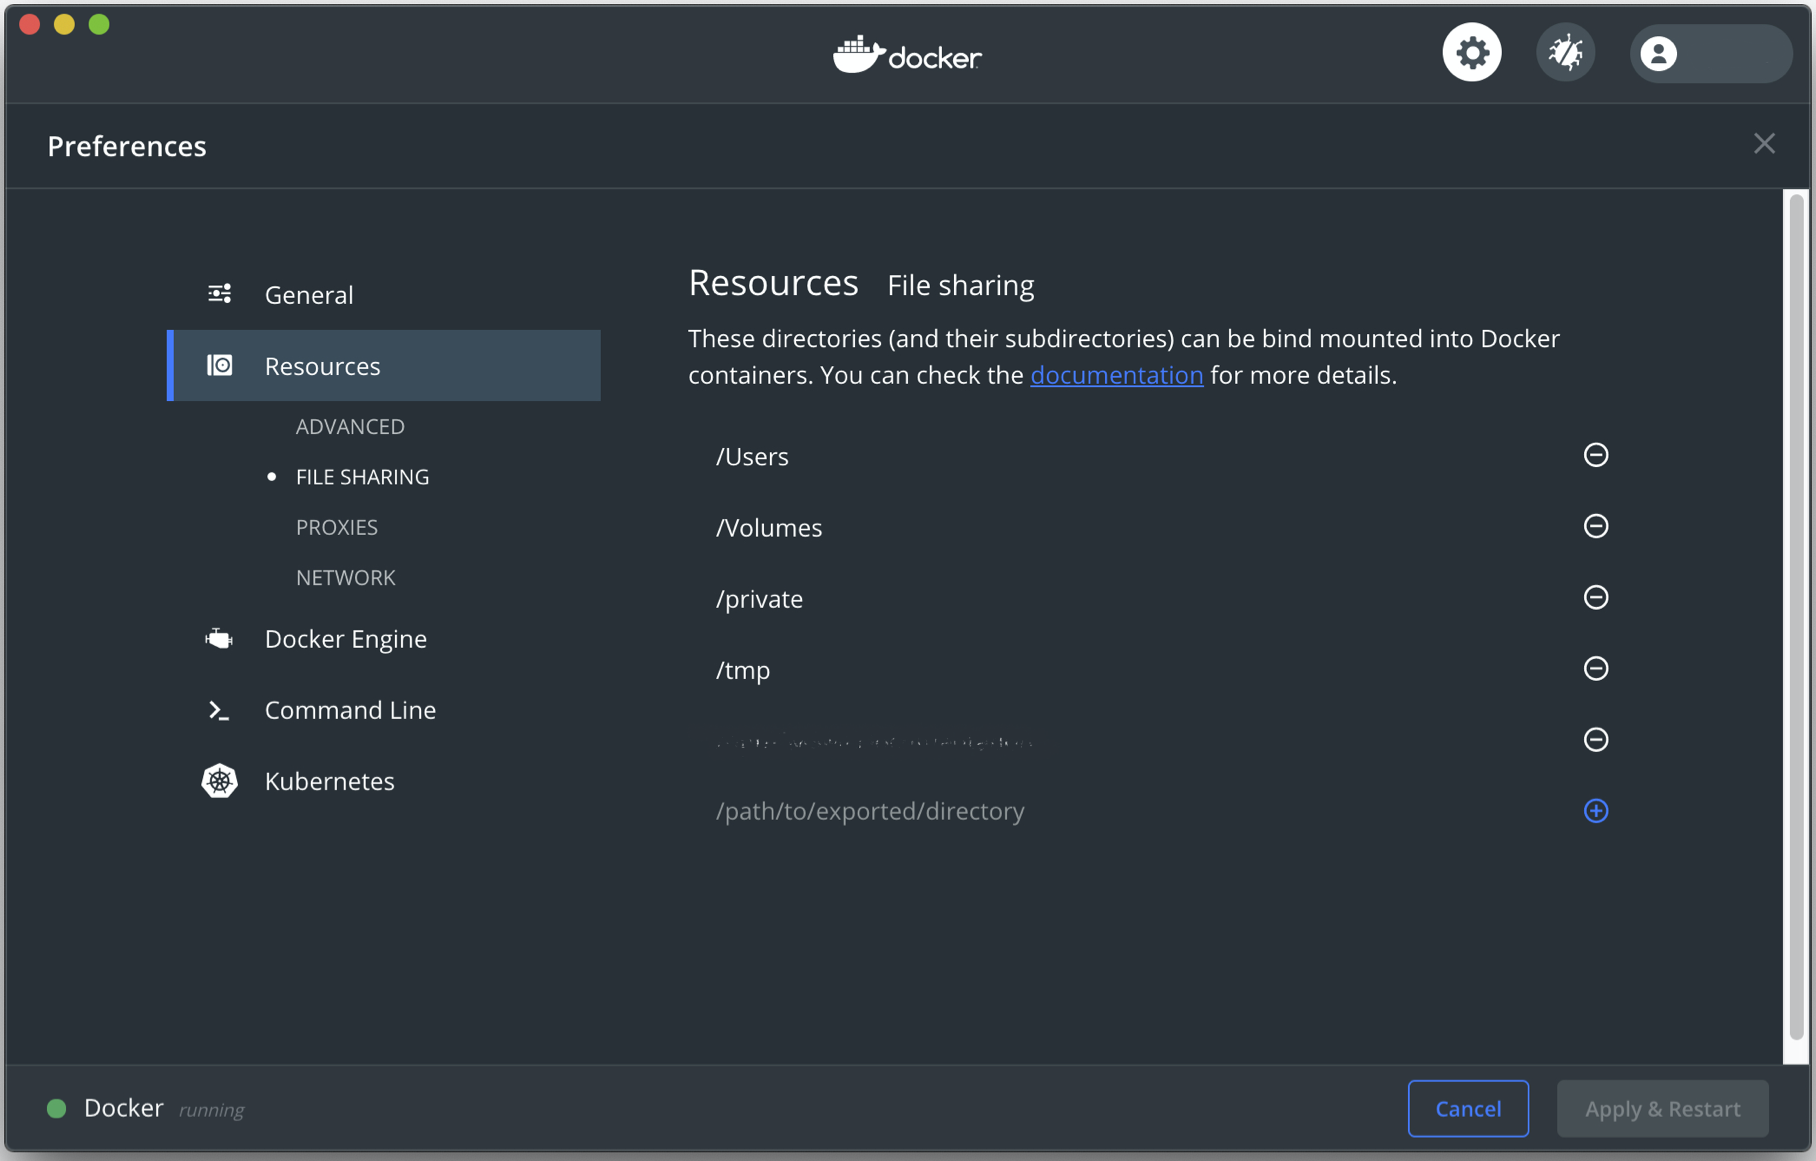
There are many more implications to the Docker daemon being run as the root user. However, what we’ve discussed is sufficient for most people running on their own computer. We encourage you to do your own research into the subject if you are an administrator of a shared computing resource.
Ports 4
By construction, Docker isolates each container in its own namespace. This means that the processes in one container cannot see or affect those in another container or the host. Furthermore, each container is given its own, isolated network stack.
That said, the user can choose to specify public ports and link containers or the host. Take care when opening ports to your docker container. Open ports are the way by which an intruder can get into your system. Even if your host machine is locked down, the same may not be true of the remote machine. If you then open a port between the remote machine and the host, the intruder can get into your computer and your network via the remote machine.
By default the Docker daemon will bind open ports to the ip address 0.0.0.0. To change this default address you can either use the daemon directly using the command dockerd --ip <ip_address> or by going to Preferences -> Docker Engine and adding the line "ip": "<ip_address>". It’s a good practice to bind ports to the localhost, which is address 127.0.0.1. This will prevent container ports from being bound to an arbitrary address.
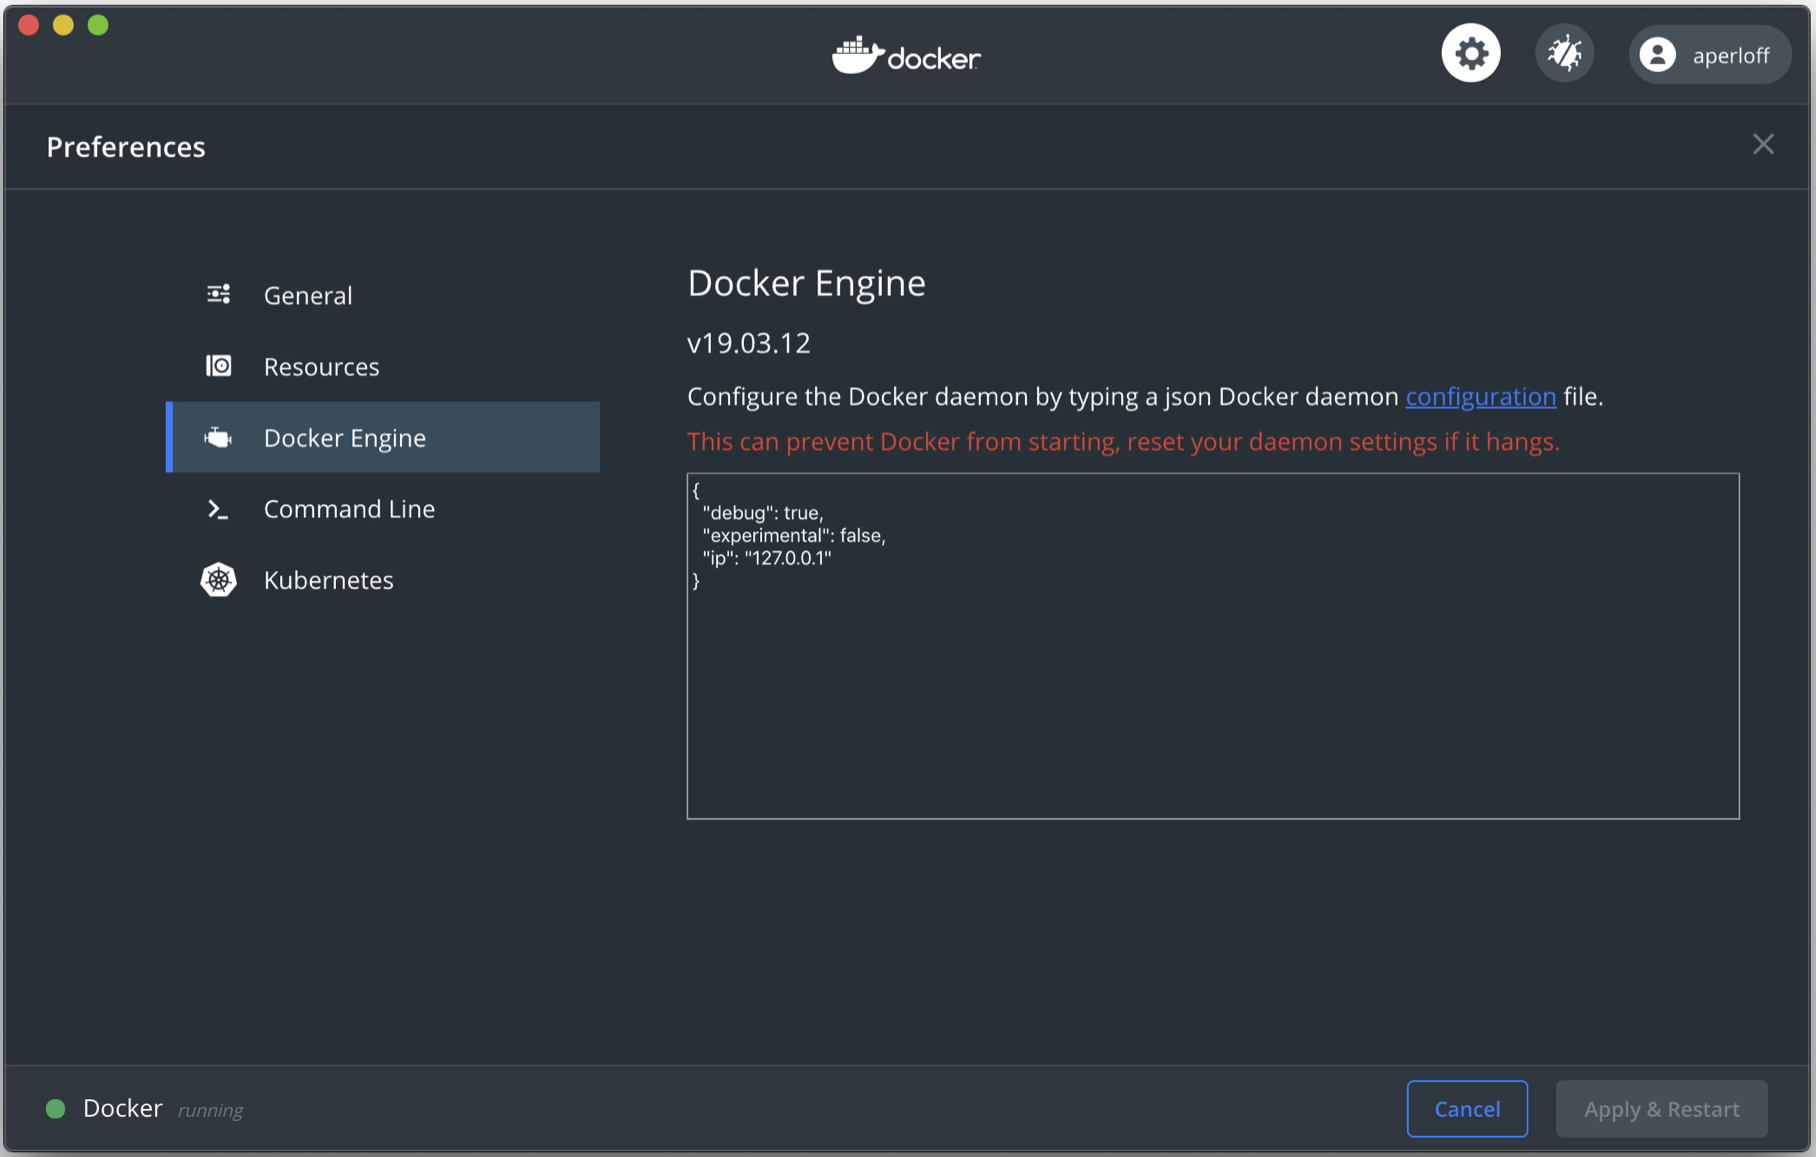
Note for Linux users
If you’re on Linux, Docker has its own table in
iptables. If you have a host port which is firewalled or otherwise inaccessible, binding a port in Docker may silently open a hole in the firewall.
Container users 5
By default the user inside the container is root. This raises some serious security concerns. While having a root user inside the container is not necessarily bad, adding a non-root user inside the container can add a small level of protection, especially in production environments. Yes, often times the container user can break out and become root, but that is not a good excuse for abdicating our responsibility to secure the images we create.
Privileged containers 6,7
Be wary of using a privileged container (i.e. using the --privileged flag). This gives the container root privileges on the host machine, which is necessary when the container needs direct hardware access. With root access to the container it is possible for the user to escape the container and interact with the host system. Instead of granting full host access to the container, there are ways of giving the container access to a subset of “capabilities.”
SSH
Unless it’s necessary for your containerized application, it’s probably not a good idea to run an ssh service inside the container in order to access it. As we’ve shown, there are better and more secure ways to do this. Running your own service inside a container means you will need to follow good security practices.
Base image choice
Not everyone will build a Docker image. However, for those of you that do it is important to keep in mind the capabilities and security of your chosen base image. Many of the systems we use at labs and universities are security hardened versions of commercial Linux distributions (i.e. Scientific Linux). Often it is possible to use these specific Linux distributions as base images (i.e. Official containers for Scientific Linux (SL)). Using one of these images is recommended as you will need to do far fewer manual modifications in order to secure your container.
If you’re using a base image which has an unverified provenance, you may want to: 2
- find out how the image was created and know what packages are installed into the image.
- verify that the image wasn’t modified after its creation. You can use the SHA256 digest to do this. In other contexts the digest is known as a checksum. You can view the digests for all of your pulled images by doing
docker images --digests. - scan for security vulnerabilities. There are tools to do this sort of static analysis, but that goes far beyond this document.
Fermilab computing
When on the Fermilab network we must follow the Fermilab Policy on Computing at all times. This applies event to containers. If there is an activity which is restricted or prohibited on the host system, then in general it is likewise restricted or prohibited on the remote system. To be safe, any setting or configuration which applies to the host machine must also be set on the remote machine (i.e. ssh configuration parameters).
If your system is deemed to be in violation of the FNAL computing policies it will first be blocked from the Fermilab network. You may receive and email listing the violated security policies, but that may not show up on your computer if you’ve been blocked from the network. This should not be taken lightly as in the computing policy it says, “Individuals who violate this policy will be denied access to laboratory computing and network facilities and may be subject to further disciplinary action depending on the severity of the offense.”
We list this not to scare you or discourage the use of containers, but to remind you that the duty to keep the Fermilab network safe rests with all of us. This goes for Fermilab and all of the networks on which we work.
Key Points
Pre-made images are not an excuse for poor security practices
It’s better to err on the side of caution when building images and running containers
DO NOT store sensitive information in your containers!
Writing Dockerfiles and Building Images
Overview
Teaching: 20 min
Exercises: 10 minQuestions
How are Dockerfiles written?
How are Docker images built?
Objectives
Write simple Dockerfiles
Build a Docker image from a Dockerfile
Docker images are built through the Docker engine by reading the instructions from a Dockerfile.1 These text based documents provide the instructions though an API similar to the Linux operating system commands to execute commands during the build.
We can take a look at a simple Dockerfile, which is an extension of the official Python 3.6.8 Docker image. We can then take this image and extend it further using out own Dockerfile.
Begin by creating a Dockerfile on your local machine
touch Dockerfile
and then write in it the Docker engine instructions to add cowsay and scikit-learn to the environment
# Dockerfile

# Specify the base image that we're building the image on top of
FROM matthewfeickert/intro-to-docker:latest

# Build the image as root user
USER root

# Run some bash commands to install packages
RUN apt-get -qq -y update && \
    apt-get -qq -y upgrade && \
    apt-get -qq -y install cowsay && \
    apt-get -y autoclean && \
    apt-get -y autoremove && \
    rm -rf /var/lib/apt-get/lists/* && \
    ln -s /usr/games/cowsay /usr/bin/cowsay
RUN pip install --no-cache-dir -q scikit-learn

# This sets the default working directory when a container is launched from the image
WORKDIR /home/docker

# Run as docker user by default when the container starts up
USER docker
Dockerfile layers (or: why all these ‘&&’s??)
Each
RUNcommand in a Dockerfile creates a new layer to the Docker image. In general, each layer should try to do one job and the fewer layers in an image the easier it is compress. This is why you see all these ‘&& 's in theRUNcommand, so that all the shell commands will take place in a single layer. When trying to upload and download images on demand the smaller the size the better.Another thing to keep in mind is that each
RUNcommand occurs in its own shell, so any environment variables, etc. set in oneRUNcommand will not persist to the next.
Garbage cleanup
Notice that the last few lines of the
RUNcommand clean up and remove unneeded files that get produced during the installation process. This is important for keeping images sizes small, since files produced during each image-building layer will persist into the final image and add unnecessary bulk.
Don’t run as
rootBy default Docker containers will run as
root. This is a bad idea and a security concern. Instead, setup a default user (likedockerin the example) and if needed give the user greater privileges. Please don’t take this Dockerfile as an example of a super secure image.
Then build an image from the Dockerfile and tag it with a human
readable name
docker build -f Dockerfile -t extend-example:latest .
You can now run the image as a container and verify for yourself that your additions exist
docker run --rm -it extend-example:latest /bin/bash
which cowsay
cowsay "Hello from Docker"
pip list | grep scikit
python3 -c "import sklearn as sk; print(sk)"
/usr/bin/cowsay
 ___________________
< Hello from Docker >
 -------------------
        \   ^__^
         \  (oo)\_______
            (__)\       )\/\
                ||----w |
                ||     ||

scikit-learn       0.21.3
<module 'sklearn' from '/usr/local/lib/python3.6/site-packages/sklearn/__init__.py'>
Tags
In the examples so far the built image has been tagged with a single tag (e.g. latest).
However, tags are simply arbitrary labels meant to help identify images and images can
have multiple tags.
New tags can be specified in the docker build command by giving the -t flag multiple
times or they can be specified after an image is built by using
docker tag.
docker tag <SOURCE_IMAGE[:TAG]> <TARGET_IMAGE[:TAG]>
Add your own tag
Using
docker tagadd a new tag to the image you built.Solution
docker images extend-example
docker tag extend-example:latest extend-example:my-tag
docker images extend-example
REPOSITORY TAG IMAGE ID CREATED SIZE extend-example latest b571a34f63b9 t seconds ago 1.59GB REPOSITORY TAG IMAGE ID CREATED SIZE extend-example latest b571a34f63b9 t seconds ago 1.59GB extend-example my-tag b571a34f63b9 t seconds ago 1.59GB
Tags are labels
Note how the image ID didn’t change for the two tags: they are the same object. Tags are simply convenient human readable labels.
COPY
Docker also gives you the ability to copy external files into a Docker image during the build with the COPY Dockerfile command.
Which allows copying a target file from a host file system into the Docker image
file system
COPY <path on host> <path in Docker image>
For example, if there is a file called install_python_deps.sh in the same directory as
the build is executed from
touch install_python_deps.sh
with contents
cat install_python_deps.sh
#!/usr/bin/env bash

set -e

pip install --upgrade --no-cache-dir pip setuptools wheel
pip install --no-cache-dir -q scikit-learn
then this could be copied into the Docker image of the previous example during the build and then used (and then removed as it is no longer needed).
Create a new file called Dockerfile.copy:
touch Dockerfile.copy
and fill it with a modified version of the above Dockerfile, where we now copy install_python_deps.sh from the local working directory into the container and use it to install the specified python dependencies:
# Dockerfile.copy
FROM matthewfeickert/intro-to-docker:latest
USER root
RUN apt-get -qq -y update && \
    apt-get -qq -y upgrade && \
    apt-get -qq -y install cowsay && \
    apt-get -y autoclean && \
    apt-get -y autoremove && \
    rm -rf /var/lib/apt-get/lists/* && \
    ln -s /usr/games/cowsay /usr/bin/cowsay
COPY install_python_deps.sh install_python_deps.sh
RUN bash install_python_deps.sh && \
    rm install_python_deps.sh
WORKDIR /home/data
USER docker
docker build -f Dockerfile.copy -t copy-example:latest .
For very complex scripts or files that are on some remote, COPY offers a straightforward way to bring them into the Docker build.
COPY vs ADD
The
COPYandADDDockerfile commands are nearly identical. However, there are some subtle differences which make theCOPYcommand more desirable for novice users. TheADDcommand is technically more powerful, but can lead to unintended consequences if you don’t know what it’s doing. For more information see the Best practices for writing Dockerfiles document.
-
This is not the only way to build an image as specified in the Best practices for writing Dockerfiles. ↩
Key Points
Dockerfiles are written as text file commands to the Docker engine
Docker images are built with
docker buildDocker images can have multiple tags associated to them
Docker images can use
COPYto copy files into them during build
Using CMD and ENTRYPOINT in Dockerfiles
Overview
Teaching: 0 min
Exercises: 0 minQuestions
How are default commands set in Dockerfiles?
Objectives
Learn how and when to use
CMDLearn how and when to use
ENTRYPOINT
So far everytime we’ve run the Docker containers we’ve typed
docker run --rm -it <IMAGE>:<TAG> <command>
like
docker run --rm -it python:3.7 /bin/bash
Running this dumps us into a Bash session
printenv | grep SHELL
SHELL=/bin/bash
However, if no /bin/bash is given then you are placed inside the Python 3.7 REPL.
docker run --rm -it python:3.7
Python 3.7.4 (default, Jul 13 2019, 14:04:11)
[GCC 8.3.0] on linux
Type "help", "copyright", "credits" or "license" for more information.
>>>
These are very different behaviors, so let’s understand what is happening.
The Python 3.7 Docker image has a default command that runs when the container is executed,
which is specified in the Dockerfile with CMD.
Create a file named Dockerfile.defaults
touch Dockerfile.defaults
# Dockerfile.defaults
# Make the base image configurable
ARG BASE_IMAGE=python:3.7
FROM ${BASE_IMAGE}
USER root
RUN apt-get -qq -y update && \
    apt-get -qq -y upgrade && \
    apt-get -y autoclean && \
    apt-get -y autoremove && \
    rm -rf /var/lib/apt-get/lists/*
# Create user "docker"
RUN useradd -m docker && \
    cp /root/.bashrc /home/docker/ && \
    mkdir /home/docker/data && \
    chown -R --from=root docker /home/docker
ENV HOME /home/docker
WORKDIR ${HOME}/data
USER docker

CMD ["/bin/bash"]
Now build the dockerfile, specifying its name with the -f argument since docker will otherwise look for a file named Dockerfile by default.
docker build -f Dockerfile.defaults -t defaults-example:latest .
Now running
docker run --rm -it defaults-example:latest
again drops you into a Bash shell as specified by CMD.
As has already been seen, CMD can be overridden by giving a command after the image
docker run --rm -it defaults-example:latest python3
The ENTRYPOINT builder command allows to define a command or
commands that are always run at the “entry” to the Docker container.
If an ENTRYPOINT has been defined then CMD provides optional inputs to the ENTRYPOINT.
# entrypoint.sh
#!/usr/bin/env bash

set -e

function main() {
    if [[ $# -eq 0 ]]; then
        printf "\nHello, World!\n"
    else
        printf "\nHello, %s!\n" "${1}"
    fi
}

main "$@"

/bin/bash
# Dockerfile.defaults
# Make the base image configurable
ARG BASE_IMAGE=python:3.7
FROM ${BASE_IMAGE}
USER root
RUN apt-get -qq -y update && \
    apt-get -qq -y upgrade && \
    apt-get -y autoclean && \
    apt-get -y autoremove && \
    rm -rf /var/lib/apt-get/lists/*
# Create user "docker"
RUN useradd -m docker && \
    cp /root/.bashrc /home/docker/ && \
    mkdir /home/docker/data && \
    chown -R --from=root docker /home/docker
ENV HOME /home/docker
WORKDIR ${HOME}/data
USER docker

COPY entrypoint.sh $HOME/entrypoint.sh
ENTRYPOINT ["/bin/bash", "/home/docker/entrypoint.sh"]
CMD ["Docker"]
docker build -f Dockerfile.defaults -t defaults-example:latest --compress .
So now
docker run --rm -it defaults-example:latest
Hello, Docker!
docker@2a99ffabb512:~/data$
Applied
ENTRYPOINTandCMDWhat will be the output of
docker run --rm -it defaults-example:latest $USERand why?
Solution
Hello, <your user name>!
docker@2a99ffabb512:~/data$
$USERis evaluated and then overrides the defaultCMDto be passed toentrypoint.sh
Key Points
CMDprovide defaults for an executing container
CMDcan provide options forENTRYPOINT
ENTRYPOINTallows you to configure commands that will always run for an executing container
Gitlab CI for Automated Environment Preservation
Overview
Teaching: 25 min
Exercises: 25 minQuestions
How can GitLab CI and Docker work together to automatically preserve my analysis environment?
What do I need to add to my GitLab repo(s) to enable this automated environment preservation?
Objectives
Understand what needs to be added to your
.gitlab-ci.ymlfile to keep the containerized environment continuously up to date for your repo.Learn how to write a Dockerfile to containerize your analysis code and environment.
Introduction
In a similar way to running CMSSW in GitLab, the images containing only the base operating system (e.g. Scientific Linux 5/6 or CentOS 7/8) plus additionally required system packages can be used to run CMSSW (and other related software). CMSSW needs to be mounted via CVMFS.
In this section, we learn how to combine the forces of Docker and GitLab CI to automatically keep our analysis environment up-to-date. This is accomplished by adding an extra stage to the CI pipeline for each analysis repo, which builds a container image that includes all aspects of the environment needed to run the code.
Adding analysis code to a light-weight container
Instead of using these containers only for compiling and running CMSSW, we can add our (compiled) code to those images, building on top of them. The advantage in doing so is that you will effectively be able to run your code in a version-controlled sandbox, in a similar way as grid jobs are submitted and run. Adding your code on top of the base image will only increase their size by a few Megabytes. CVMFS will be mounted in the build step and also whenever the container is executed. The important conceptual difference is that we do not use a Dockerfile to build the image since that would not have CVMFS available, but instead we use Docker manually as if it was installed on a local machine.
The way this is done is by requesting a docker-privileged GitLab runner. With such a runner we can run Docker-in-Docker, which allows to manually attach CVMFS to a container and run commands such as compiling analysis code in this container. Compiling code will add an additional layer to the container, which consists only of the effect of the commands run. After exiting this container, we can tag this layer and push the container to the container registry.
The YAML required looks as follows:
build_docker:
  only:
    - pushes
    - merge_requests
  tags:
    - docker-privileged
  image: docker:20.10.6
  services:
  # To obtain a Docker daemon, request a Docker-in-Docker service
  - docker:20.10.6-dind
  before_script:
    - docker login -u $CI_REGISTRY_USER -p $CI_BUILD_TOKEN $CI_REGISTRY
    # Need to start the automounter for CVMFS:
    - docker run -d --name cvmfs --pid=host --user 0 --privileged --restart always -v /shared-mounts:/cvmfsmounts:rshared gitlab-registry.cern.ch/vcs/cvmfs-automounter:master
  script:
    # ls /cvmfs/cms.cern.ch/ won't work, but from the container it will
    # If you want to automount CVMFS on a new docker container add the volume config /shared-mounts/cvmfs:/cvmfs:rslave
    - docker run -v /shared-mounts/cvmfs:/cvmfs:rslave -v $(pwd):$(pwd) -w $(pwd) --name ${CI_PROJECT_NAME} ${FROM} /bin/bash ./.gitlab/build.sh
    - SHA256=$(docker commit ${CI_PROJECT_NAME})
    - docker tag ${SHA256} ${TO}
    - docker push ${TO}
  variables:
    # As of GitLab 12.5, privileged runners at CERN mount a /certs/client docker volume that enables use of TLS to
    # communicate with the docker daemon. This avoids a warning about the docker service possibly not starting
    # successfully.
    # See https://docs.gitlab.com/ee/ci/docker/using_docker_build.html#docker-in-docker-with-tls-enabled
    DOCKER_TLS_CERTDIR: "/certs"
    FROM: gitlab-registry.cern.ch/cms-cloud/cmssw-docker/cc7-cms:latest
    TO: ${CI_REGISTRY_IMAGE}:${CI_COMMIT_SHORT_SHA}
This is pretty complicated, so let’s break this into smaller pieces.
The only section determines when the step is actually run. The default
should probably be pushes only so that a new image is built whenever there
are changes to a branch. If you would like to build a container already when
a merge request is created so that you can test the code before merging, also
add merge_requests as in the example provided here.
The next couple of lines are related to the special Docker-in-Docker runner.
For this to work, the runner needs to be privileged, which is achieved by
adding docker-privileged to the tags. The image to run is then
docker:20.10.6, and in addition a special service with the name
docker:20.10.6-dind is required.
Once the runner is up, the before_script section is used to prepare the
setup for the following steps. First, the runner logs in to the GitLab image
registry with an automatically provided token (this is a property of the job
and does not need to be set by you manually). The second command starts a
special container, which mounts CVMFS and makes it available to our analysis
container.
In the script section the analysis container is then started, doing the following:
- mounting the volume (
-v /shared-mounts/cvmfs:/cvmfs:rslave), - mounting the current working directory (
-v $(pwd):$(pwd)), - setting the current working directory mounted as working directory inside the container (
-w $(pwd)), - settings its name to the project name (
--name ${CI_PROJECT_NAME}), - and executing the command
/bin/bash ./.gitlab/build.sh.
The name of the image that is started is set via the ${FROM} variable,
which is set to be gitlab-registry.cern.ch/cms-cloud/cmssw-docker/cc7-cms:latest here.
After the command that has been run in the container exits, a new commit
will have been added to the container. We can find out the hash of this
commit by running docker commit ${CI_PROJECT_NAME} (this is why we set the
container name to ${CI_PROJECT_NAME}). With the following command, we then
tag this commit with the repository’s registry name and a unique hash that
corresponds to the git commit at which we have built the image. This allows
for an easy correspondence between container name and source code version. The last command simply pushed this image to the registry.
Recommended Tag Structure
You’ll notice the environment variable
TOin the.gitlab-ci.ymlscript above. This controls the name of the Docker image that is produced in the CI step. Here, the image name will be<reponame>:<short commit SHA>. The shortened 8-character commit SHA ensures that each image created from a different commit will be unique, and you can easily go back and find images from previous commits for debugging, etc.If you feel it’s overkill for your specific use case to save a unique image for every commit, you can replace
$CI_COMMIT_SHORT_SHAwith$CI_COMMIT_REF_SLUG, which will at least ensure that images built from different branches will not overwrite each other, and tagged commits will correspond to tagged images.
Exercise: Compile the analysis code inside the container
The one thing that has not yet been explained is what the
build.shscript does. This file needs to be part of the repository and contains the commands required to compile the code.Solution: Compile the analysis code inside the container
A possible solution could look like this:
#!/bin/bash

# exit when any command fails; be verbose
set -ex

# make cmsrel etc. work
shopt -s expand_aliases
export MY_BUILD_DIR=${PWD}
source /cvmfs/cms.cern.ch/cmsset_default.sh
cd /home/cmsusr
cmsrel CMSSW_10_6_8_patch1
mkdir -p CMSSW_10_6_8_patch1/src/AnalysisCode
mv ${MY_BUILD_DIR}/MyAnalysis CMSSW_10_6_8_patch1/src/AnalysisCode
cd CMSSW_10_6_8_patch1/src
cmsenv
scram b
Why the
.gitlabdirectory?Putting the
build.shscript into a directory called.gitlabis a recommended convention. If you develop code locally (e.g. on LXPLUS), you will have a different directory structure. Your analysis code will reside withinCMSSW_10_6_8_patch1/src/AnalysisCode, and executing the script from within the repository’s top level directory does not make much sense, because then you will create a CMSSW work area within an existing one. Therefore, using a hidden directory with a name that makes it clear that this is for running within GitLab, and is ignored otherwise, can be useful.
Using a Dockerfile
If a CVMFS mount is not necessary for your build (i.e. your code doesn’t rely on CMSSW or you’re using a full container) you can use a Dockerfile, along with GitLab CI, to specify your build commands and keep your analysis environment up-to-date.
Writing your GitLab Dockerfile
The goal of automated environment preservation is to create a Docker image in which you can immediately start executing your analysis code upon startup. Let’s review the needed components for this.
- Set up the OS, system libraries, and other dependencies for your code,
- Add your analysis code to the container, and
- Build the code so that it can be trivially executed inside the container.
As we’ve seen, all these components can be encoded in a Dockerfile. So the first step to set up automated image building is to add a Dockerfile to the repo specifying these components.
The
rootproject/root:6.22.02-condadocker imageIn this tutorial, we build our analysis environments on top of the
rootproject/root:6.22.02-condabase image (link to project area on Docker Hub). This image comes with root 6.22.02 and python 3.7 pre-installed. It also comes with XRootD for downloading files from EOS.
Exercise
Working from your bash shell, cd into the top level of the repo you would like to containerize. Create an empty file named
Dockerfile.touch DockerfileNow open the Dockerfile with a text editor and, starting with the following skeleton, fill in the FIXMEs to make a Dockerfile that fully specifies your analysis environment in this repo.
# Start from the rootproject/root:6.22.02-conda base image
[FIXME]

# Put the current repo (the one in which this Dockerfile resides) in a directory of your choosing
# Note that this directory is created on the fly and does not need to reside in the repo already
[FIXME]

# Make directory containing your repo the default working directory (again, it will create the directory if it doesn't already exist)
[FIXME]

# Compile an executable from source.
# For example, you can compile an executable named 'skim' from the skim.cxx source file
RUN echo ">>> Compile skimming executable ..." &&  \
    COMPILER=[FIXME] && \
    FLAGS=[FIXME] && \
    [FIXME]
Solution
# Start from the rootproject/root-conda base image
FROM rootproject/root:6.22.02-conda

# Put the current repo (the one in which this Dockerfile resides) in the /analysis/skim directory
# Note that this directory is created on the fly and does not need to reside in the repo already
COPY . <analysis_dir>

# Make /analysis/skim the default working directory (again, it will create the directory if it doesn't already exist)
WORKDIR <analysis_dir>

# Compile an executable from source.
# For example, you can compile an executable named 'skim' from the skim.cxx source file
RUN echo ">>> Compile skimming executable ..." &&  \
COMPILER=$(root-config --cxx) &&  \
FLAGS=$(root-config --cflags --libs) &&  \
$COMPILER -g -std=c++11 -O3 -Wall -Wextra -Wpedantic -o skim skim.cxx $FLAGS
Once you’re happy with your Dockerfile, you can commit it to your repo and push it to GitHub.
Hints
As you’re working, you can test whether the Dockerfile builds successfully using the
docker buildcommand. Eg.docker build -t payload_analysis .When your image builds successfully, you can
runit and poke around to make sure it’s set up exactly as you want, and that you can successfully run the executable you built:docker run -it --rm payload_analysis /bin/bashWhile this example used
rootto compile some code, this process will also work with scram when using the full CMSSW images.
Now, you can proceed with updating your .gitlab-ci.yml to actually build the container during the CI/CD pipeline and store it in the GitLab registry. You can later pull it from the gitlab registry just as you would any other container, but in this case using your CERN credentials.
Add the following lines at the end of the .gitlab-ci.yml file to build the image and save it to the Docker registry.
build_image:
  stage: build
  variables:
    TO: $CI_REGISTRY_IMAGE:$CI_COMMIT_REF_SLUG-$CI_COMMIT_SHORT_SHA
  tags:
    - docker-image-build
  script:
    - ignore
Once this is done, you can commit and push the updated .gitlab-ci.yml file to your gitlab repo and check to make sure the pipeline passed. If it passed, the repo image built by the pipeline should now be stored on the docker registry, and be accessible as follows:
docker login gitlab-registry.cern.ch
docker pull gitlab-registry.cern.ch/[repo owner's username]/[skimming repo name]:[branch name]-[shortened commit SHA]
You can also go to the container registry on the gitlab UI to see all the images you’ve built:
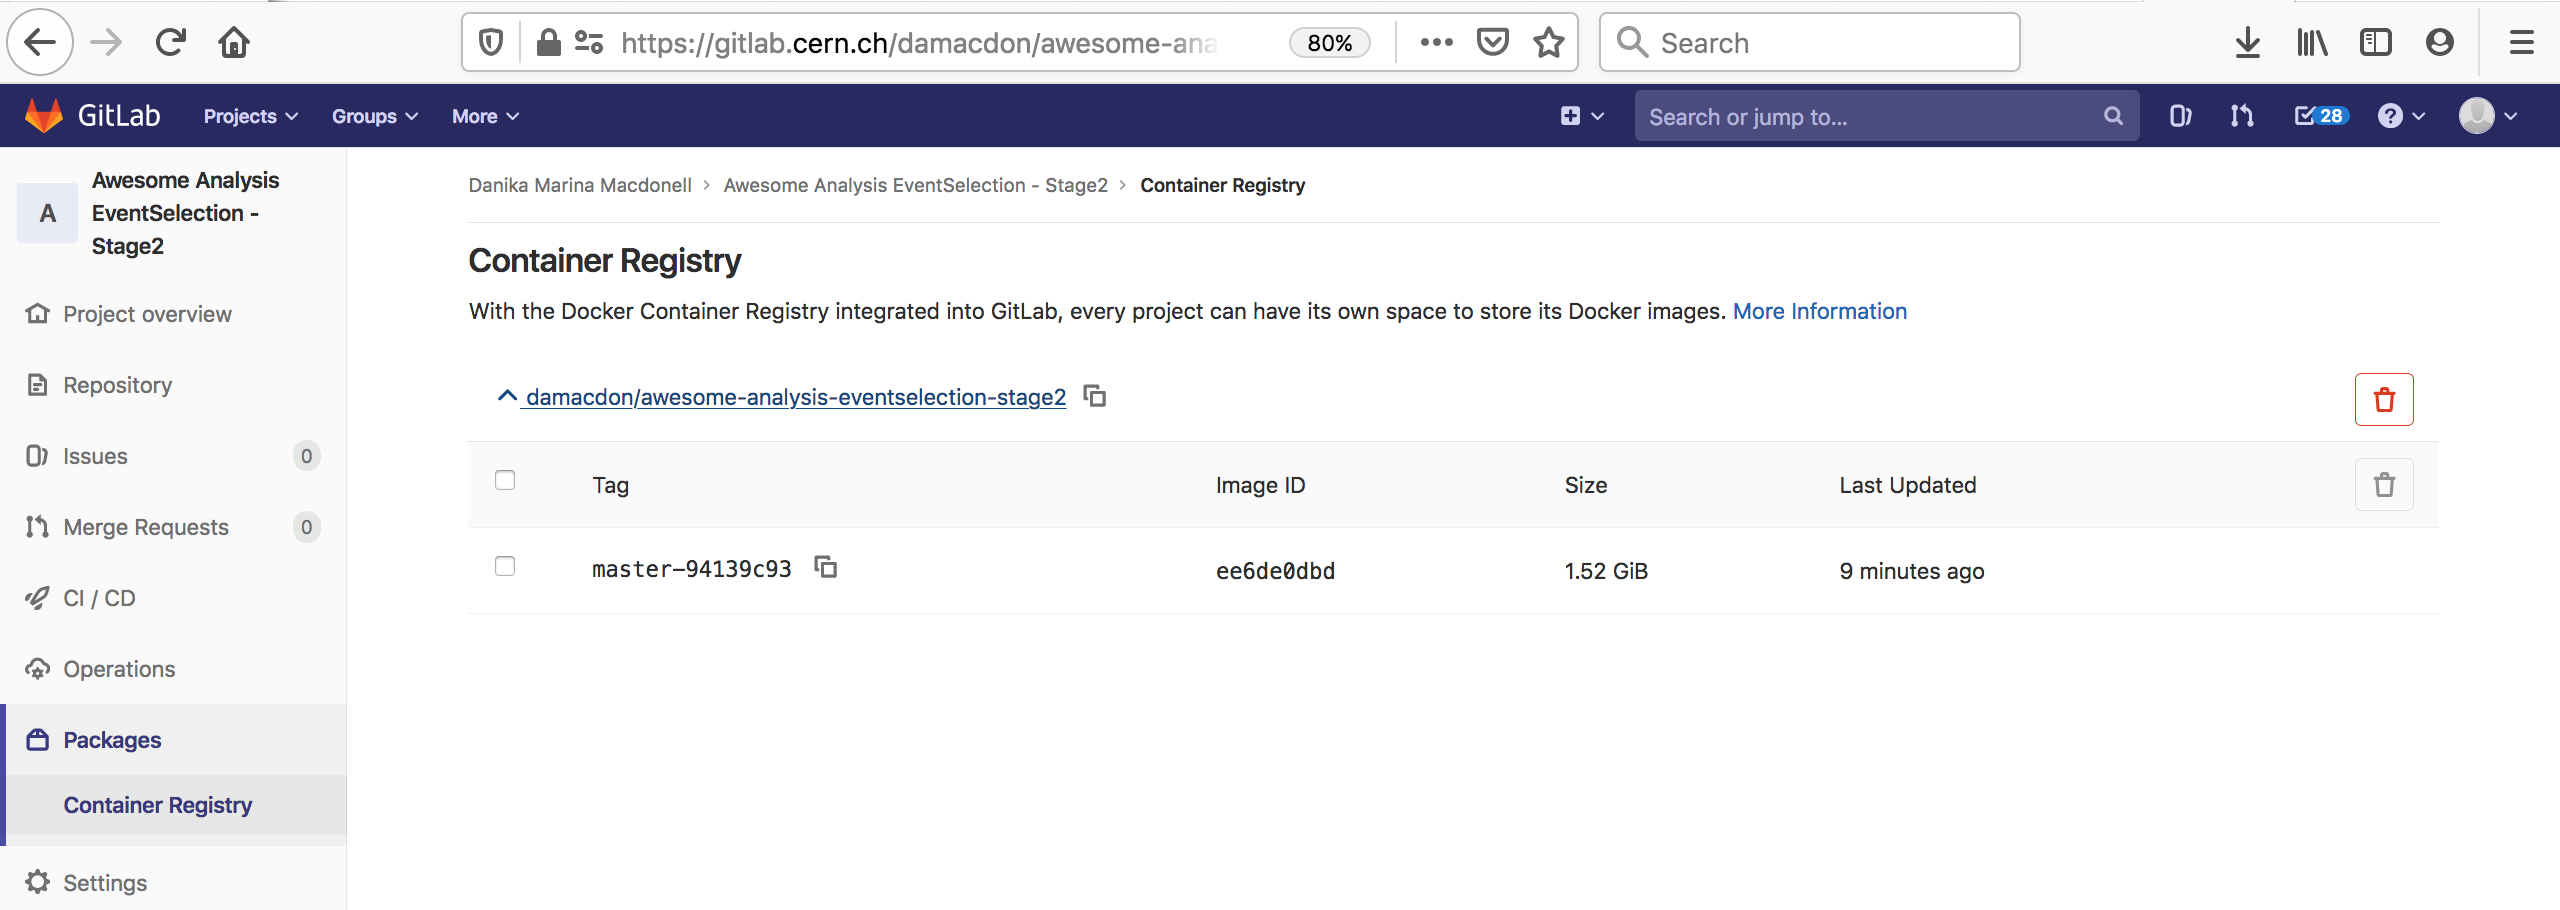
Notice that the script to run is just a dummy ‘ignore’ command. This is because using the docker-image-build tag, the jobs always land on special runners that are managed by CERN IT which run a custom script in the background. You can safely ignore the details.
Key Points
GitLab CI allows you to re-build a container that encapsulates the environment each time new commits are pushed to the analysis repo.
This can be accomplished in a scripted manner with Docker-in-Docker or with the use of a Dockerfile, which will specify how to build the environment.
You will need to add an image-building stage to the .gitlab-ci.yml file.
SSH Credentials
Overview
Teaching: 0 min
Exercises: 10 minQuestions
How do I access my SSH credentials within a container?
Objectives
How to run with SSH and not use
cp
Get SSH credentials in a container without
cpGet SSH credentials inside a container without using
cpSolution
Mount multiple volumes
docker run --rm -it --device /dev/fuse --cap-add SYS_ADMIN \
 -e CVMFS_MOUNTS="none" \
 -e MY_UID=$(id -u) -e MY_GID=$(id -g) \
 -w /home/cmsusr/workdir \
 -v $PWD:/home/cmsusr/workdir \
 -v $HOME/.ssh:/home/cmsusr/.ssh \
 -v $HOME/.gitconfig:/home/cmsusr/.gitconfig \
 fnallpc/cms-cvmfs-docker:latest
Key Points
Containers are very extensible
Building derived images from the cms-cvmfs-docker base image
Overview
Teaching: 20 min
Exercises: 20 minQuestions
Why is it harder to build derived images for this container?
When do I need to use a workaround to build a derived image and when is it okay to use standard methods?
Are there any limitations on what typed of derived images I can and cannot build?
Objectives
Be able to build a derived image using the cms-cvmfs-docker image as a base and installing software taken from CVMFS.
Know when and how to use Moby BuildKit.
It is possible to build derived images using the cms-cmvfs-docker image as a base. That said, there are some things you should know before you begin.
First an foremost, the CVMFS mount is not typically available during the build stage. The non-technical way of explaining this is that durring the build there is no running container and thus the mount points (i.e. CVMFS endpoints) aren’t connected; you’re just building an image layer by layer. This means that you can’t easily access or setup any of the software on CVMFS during the build. However, there are two workarounds available.
The first method relies on the ability of docker to save the state of a running container as an image. The proceedure, in a nutshell, looks like:
- Spin up a container using
fnallpc/cms-cvmfs-docker:latest. - wget, or download some other way, a setup script which specified all of the commands you would like to perform during the build. Typically these are the actions you would perform from within a Dockerfile.
- Run the setup script to install/setup the environment/software.
- (optional) clear the CVMFS cache.
- Use
docker committo save the state of the container. - (optional) Push the new image to a container registry.
A set of example commands would look like:
# Run the container and perform the setup actions
docker run -t -P --device /dev/fuse --cap-add SYS_ADMIN -e CVMFS_MOUNTS="cms.cern.ch" --name myimage --entrypoint "/bin/bash" fnallpc/cms-cvmfs-docker:latest -c "/run.sh -c \"wget <url to setup script>/setup.sh && chmod +x setup.sh && ./setup.sh\" && cvmfs_config wipecache"
# Create an image from the state of the container
docker commit -c 'ENTRYPOINT ["/run.sh"]' -c 'CMD []' myimage [user]/myimage:latest
# Login to a container registry (i.e. DockerHub) if you intend to push an image
echo "<DockerHub password>" | docker login -u <DockerHub username> --password-stdin
# Push the image to a container registry (i.e. DockerHub)
docker push [user]/myimage:latest
The second method is funcationally simpler, but relies on very recent features introduced for Docker. You will want to make sure that you have an updated Docker build (>=18.09). Recent versions of Docker come bundled with Moby BuildKit (GitHub, blog post), which comes with a number of build enhancements.
There are several ways in which to specify that you would like to use the new build feature. If you would like to manually tell docker to use BuildKit, then you can append DOCKER_BUILDKIT=1 in front of each build command (e.g. DOCKER_BUILDKIT=1 docker build .). If you would like to turn on BuildKit by default, then you can add { "features": { "buildkit": true } } in the daemon configuration, either through Docker Desktop or by editing /etc/docker/daemon.json (default path on a Linux host). A third way is to directly call the BuildKit builder using the modified build command docker buildx build.
Once you have up-to-date build capabilities, you can create a Dockerfile which uses the latest frontend syntax features by adding a comment to the first line of the file:
# syntax=docker/dockerfile:1
This will make sure you’re using the latest release of the version 1 syntax (i.e. the current version). The Dockerfile used to build the modified image would look something like:
# syntax=docker/dockerfile:1

FROM fnallpc/cms-cvmfs-docker:latest

USER root

ARG ARG_CVMFS_MOUNTS
ARG ARG_MY_UID
ARG ARG_MY_GID

ENV CVMFS_MOUNTS=$ARG_CVMFS_MOUNTS
ENV MY_UID=$ARG_MY_UID
ENV MY_GID=$ARG_MY_GID

RUN --security=insecure source /mount_cvmfs.sh  && \
    mount_cvmfs && \
    ls /cvmfs/cms.cern.ch && \
    source /home/cmsusr/.bashrc && \
    <do domething interesting here> && \
    ls -alh

ENTRYPOINT ["/run.sh"]
There are a few pieces that deserve to be highlighted. First, notice that the USER specified is the root user. This is necessary so that the user inside the container has enough permission to mount CVMFS. This can potentially be lowered later using something like su cmsusr. However, note that you cannot split apart the portions of the RUN command as CVMFS is only mounted on that specific layer/shell. Additionally, notice that the RUN command is followed by --security=insecure, which allows for the mounting of CVMFS. Also note that anny configuration arguments you usually use to configure the CVMFS mount can be passed as build arguments. Finally, it doesn’t matter that CMSSW was checked out as the root user since /run.sh chowns all of the files in /home/cmsusr.
Once you have the Dockerfile for the derived image you can run the following commands to get an image named cms-cvmfs-docker:derived:
docker buildx create --driver-opt image=moby/buildkit:master --use --name insecure-builder --buildkitd-flags '--allow-insecure-entitlement security.insecure'
docker buildx use insecure-builder
docker buildx build --load --allow security.insecure --build-arg ARG_CVMFS_MOUNTS="cms.cern.ch oasis.opensciencegrid.org" --build-arg ARG_MY_UID=$(id -u) --build-arg ARG_MY_GID=$(id -g) -t cms-cvmfs-docker:derived .
docker buildx rm insecure-builder
Notice that similar build arguments are passed to the build command as you would use to start a container using the base image. The other important pieces are --load to save the output image into the local database. You could use --push to send the image directly to a registry. Then there is --allow security.insecure, which is needed to allow for the mounting of CVMFS.
Once the build is done using either of the methods mentioned above you can start a container using the same commands as before.
Please note, much of the information here was obtained from the following pages in the Docker docs:
- Build images with BuildKit
- Docker Buildx
- docker buildx build If you have further questions about BuildKit syntax you might start by referencing:
- BuildKit Syntax Reference
- StackOverflow on Privileged buils with Docker and BuildKit
Key Points
Moby BuildKit is a new build engine for Docker and includes a lot of new and advanced features.
You can mount CVMFS when building images, with some caveats.
Using Buildah and Podman
Overview
Teaching: 30 min
Exercises: 30 minQuestions
Why should I use Buildah and Podman?
Are these cross-platform solutions?
What limitation or extras do Buildah and Podman possess compared to Moby BuildKit and Docker?
Objectives
Be able to choose for yourself whether Buildah and Podman are right for your workflow.
Learn how to use Podman and Buildah as replacements for Docker.
This is the world of containers as you now know it …
Build, store, run, delete ↻
End of story?
No! I already said there was a whole container tool ecosystem!
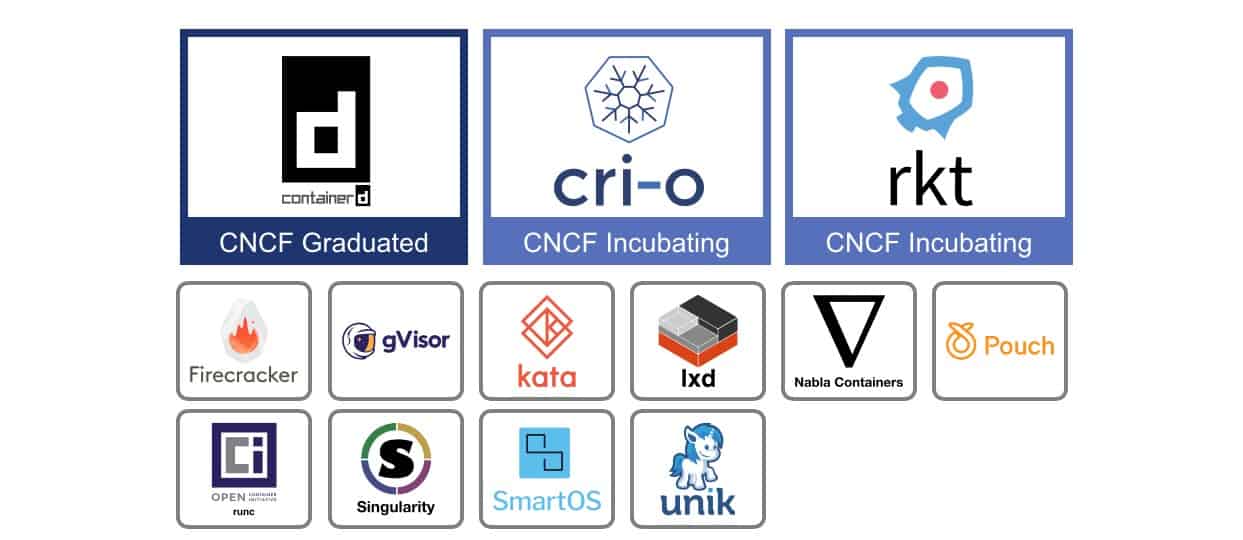
Here I will talk to you about two more applications in that ecosystem – Podman and Buildah, both Red Hat projects.


But first, let’s start to dissect how the various Docker components interact as a case study. This will help you to understand what motivates the use of these different applications. The image below shows how the Docker CLI (or desktop application) isn’t really the main component of the system. It’s the Docker daemon which is controlling everything – talking to the registries, working with image, communicating with the containers, and talking to the underlying kernel. The CLI is just the users way of communicating with the daemon.
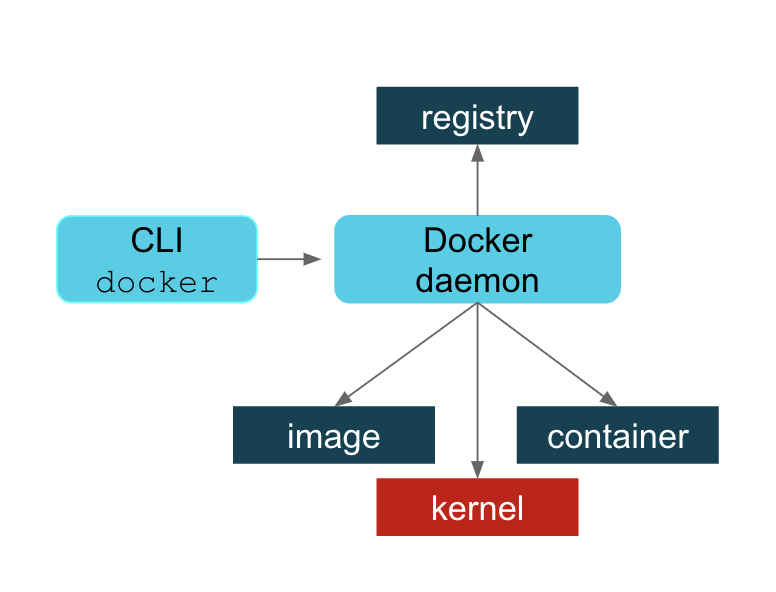
I’m not going to get into the wisdom or folly of choosing a centralized daemon. I’ll just say that some people feel strongly that this was not a wise design choice. A few of those reasons are:
- The daemon is a single point of failure.
- The daemon owns of of the child processes (the running containers).
- A failure of the daemon could mean orphaned processes.
- All Docker operations must be conducted using
rootprivileges. Everyone with access to the Docker CLI, even non-root users, can bypass most, if not all, of the security features. Anyone with access to thedockergroup should be treated as therootand since the daemon is running asroot, the user can then mount protected system folders and becomeroot. - Using the
--privilegedoption allows the container to run asrootand if the user breaks out, they will berooton the host.
Keep in mind, the person writing this tutorial is not a professional pen-tester nor a systems administrator. The descriptions here are very high level. Much of this information can be found in blog posts, articles, and tutorials. For example, I highly recommend watching:
R. McCune, Docker: security myths, security legends, Security BSides London, NCC Group, (July 2016) https://www.youtube.com/watch?v=uQigvjSXMLw.
Podman
To help alleviate some of these issues, Podman (the POD MANager) takes a different design approach. Instead of using an intermediary daemon to communicate with the various components, Podman directly interacts with the registries, images, containers, and kernels. One key outcome of this design choice is that Podman can be run both as the root user or as a non-root user (default). More on that later. Other than the major design choices, Podman makes a few other changes, like storing the images in a different place.
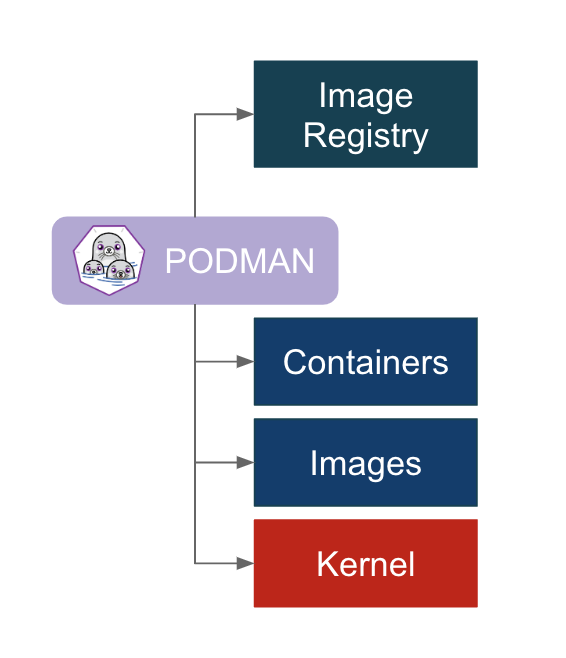
Special note for MacOS and Windows users
The one caveat to what I have just described is that on MacOS and Microsoft Windows Podman needs to be run inside a lightweight Linux virtual machine (VM). This is because all containers, that I’m aware of, use a Linux kernel and thus cannot run natively on MacOS or Windows. Docker does something similar using its LinuxKit VM, but is slightly more successful at hiding the VM usage from the casual user.
The first time the user starts the VM they will need Podman to download an image and do some setup. This is accomplished by using the command:
podman machine initThis step doesn’t need to be repeated unless you’d like to use a different VM or if the VM is deleted.
The following commands will allow you to start and/or stop the VM:
podman machine start
# do something interesting
podman machine stop
The goal when designing Podman was that is could seamlessly – yes, you heard me, seamlessly – be dropped in as a replacement for Docker. Therefore, all of the Docker commands you are familiar with should work with Podman. Occasionally something is developed for Docker that isn’t ported to Podman right away, but these usually aren’t very disruptive unless you are on the bleeding edge of Docker usage. Additionally, some convenience flags have been added to the Podman commands.
For example, a typical command to run a container using Docker would be:
docker run --name <container_name> <image> <command>
The same command using Podman would be:
podman run --name <container_name> <image> <command>
Note
By default Podman stores images and containers in the users home area. To avoid filling up your home area when space constrained, you will want to use the options
--root <path> --runroot <path>to specify a new path for Podman to use.
Additionally, both Docker and Podman images are based on the same OCI standard, so they are compatible. Podman can create containers from Docker images pulled from Docker Hub and can push images back there or any other OCI compatible container registry. The local repository of Podman images and containers is kept separate from Docker – because of the new rootless feature and to be compatible with the OCI standard – but otherwise works similarly to Docker. Podman even has the capability to push and pull images from the local repository managed by the Docker daemon into its own repository. For example:
podman push <image name> docker-daemon:<image name>:<tag>
podman pull docker-daemon:<image name>:<tag>
I hope you see that Podman isn’t somehow inferior to Docker, but instead takes a different design approach.
Buildah
We just said that Podman is a drop-in replacement for Docker and has image building capabilities. Why then do we need Buildah? Well, in fact Podman uses the same code as Buildah to do its image building, but contains a subset of Buildah’s functionality. Buildah, can be used on its own, without Podman and contains a superset of image creation and management features. While you can still use Dockerfiles to tell Buildah what to build, the most powerful way to interact with Buildah is by writing Bash scripts. There are a few additional points you should keep in mind:
- Buildah gives the user finer control of creating image layers and the ability to commit many changes to a single layer.
- Buildah’s
runcommand is like a Dockerfile’sRUNcommand, not Docker or Podman’sruncommand. This is because Buildah is meant for building images. Basically, you’re telling Buildah how to build an image, not how to run it. - Buildah can actually create images from scratch, meaning you start with nothing … yes. This is useful for creating lightweight images containing only the packages needed in order to run your application.
- Buildah makes OCI compatible images by default, but it can also produce other image formats.
- Buildah runs as an unprivileged user. Big win for security!
Fun Fact
Buildah is named because of the way Dan Walsh, a Distinguished Red Hat Developer, pronounces “builder” due to his Boston accent.
A typical set of commands to build and view an image using Docker would be:
docker build -f <dockerfile> -t <tag> <path>
docker images
The same commands using Buildah would be:
buildah build -f <dockerfile> -t <tag> <path>
buildah images
Note
By default Buildah stores the images in the users home area. To avoid filling up your home area when space constrained, you will want to use the options
--root <path> --runroot <path>to specify a new path for Buildah to use. Typically you will want this to be the same path used by Podman.
Running Unprivileged Containers
As mentioned before, one of the key advantages of Buildah and Podman are the ability to run the applications and containers in a rootless mode. While Docker also has the capability of running in rootless mode (i.e. executing the Docker daemon and containers in a user namespace), it’s seemingly less of a cross-platform solution.
More concretely, because the Podman program can be run as a normal user, a Podman container will use the user namespaces, even when running as root inside the container. Although some additional capabilities can be returned using the -privileged flag, rootless containers will never have more privileges than the user that launched them. This is true no matter which directories or volumes a user mounts inside their container. As a consequence of this, root inside a rootless Podman container will be the user on the host.
While all modern Podman releases can be used in rootless mode, some additional host side setup may be required. That said, the system administrator duties are somewhat beyond the scope of this tutorial. Instead we will focus on the Buildah and Podman installations already setup at the LPC. For more information about the prerequisites for rootless Buildah/Podman you can look at the article Basic setup and use of podman in a rootless environment.
To explain rootless Podman, image a user with username theuser, UID 12345, and GID 6789. Based on this, the user will have subuid (subordinate UID) and subgid (subordinate GID) values of 12345:123450000:10000, which means that user with UID 12345 has 10000 subuids starting at 123450000. Remember also that the root user has a UID and GID of 0.
The following test will show that no matter the image, running rootless Podman will enable users to run containers in a safe, non-privileged manner.
Rootless Podman With the root User
Next we will spin up a container using the sl:6 Docker image. By default this image runs as the root user inside the container. This will help us test what happens when a user runs a less secure images; one that does not drop the user into an unprivileged user namespace.
podman --root /tmp/`whoami`/ --runroot /tmp/`whoami`/ run -d --name useroutside-rootinside docker://docker.io/library/sl:6 tail -f /dev/null
podman --root /tmp/`whoami`/ --runroot /tmp/`whoami`/ exec -it useroutside-rootinside /bin/bash
Once inside you will find that you are the root user with UID 0 and GID 0. All processes running inside that container will belong to the same UID. However, outside the container you will find that the container processes are running with the UID 12345, meaning that those processes have no greater privileges than the user who started the container. Additionally, you’ll find that the podman process is running within a user namespace and owned by theuser.
From all of this we can infer that although the container didn’t use the best security practices, the host machine is nevertheless protected from the container user having elevated privileges.
Rootless Podman With a Non-root User
Next we will perform the exact same procedure as in the previous section. However, this time we will specify that we would like to run as a non-root user inside the container. We will need to chose a user in the /etc/passwd file on the host. For this example we will choose the sync user.
podman --root /tmp/`whoami`/ --runroot /tmp/`whoami`/ run -d -u sync --name useroutside-userinside docker://docker.io/library/sl:6 tail -f /dev/null
This time you should find that you are the sync user within the container, with UID 5 and GID 0. You will therefore find that within the container all of the processes are running with UID 5. Outside the container the processes will have a UID in the range [123450000,123460000].
Rootless Podman With a Built-in Non-root User
So far we’ve examined what happens when we run as root inside the container and as a non-privileged user in the container created at runtime. Next we will see what happens when we use a container which was built with an existing non-privileged user without sudo capabilities. For this example we will be using the fnallpc/cms-cvmfs-docker:latest image. By default this image runs as cmsusr inside of the container.
podman --root /tmp/`whoami`/ --runroot /tmp/`whoami`/ run --rm -it --name useroutside-userinside docker://docker.io/fnallpc/cms-cvmfs-docker:latest
Once the container is running it will drop us inside a bash shell. You will find that the UID and GID are 1000, the default for this image, and that the username is cmsusr. Outside the container you will find that the container processes once again run with a UID in the range [123450000,123460000].
Resources
If you would like to read some more articles on the differences between Docker and Podman/Buildah, take a look at:
For more information about what’s running under the hood and why containers running on MacOS and Windows need a VM, take a look at:
For more information on rootless Podman from the master himself (Dan Walsh), take a look at:
Key Points
Podman can be used as a replacement for Docker in almost every circumstance.
Buildah is a powerful image building platform with fine control over how layers are created.
Rootless Podman is a safe way to allow non-
rootusers to run containers on shared resources.
Containerizing a CMSSW Working Area
Overview
Teaching: 20 min
Exercises: 20 minQuestions
How do I create an image which contains my CMSSW working area?
How can I mount CVMFS inside that image?
Objectives
Learn how to use the
containerize.shscript to automate the process of creating OCI images from CMSSW directories.
Wouldn’t it be great if you could create a container around your CMSSW work area and ship that off to a worker node or CI/CD system for use? Now you can! The FNALLPC/lpc-scripts repository contains a script for containerizing any CMSSW release. The script is called containerize.sh and with just a few short commands it can have your CMSSW directory turned into an image in no time.
Initial Demo Setup
The LPC has specific nodes dedicated to building software packages and containers. You can access these nodes by logging into one of the following machines:
- cmslpc-sl7-heavy.fnal.gov
- cmslpc-c8-heavy01.fnal.gov
While this process isn’t strictly limited to the LPC computers, this is the environment where it was originally designed and tested.
For this demonstration we’ll want to setup a CMSSW release on the CMSLPC computers. It doesn’t matter which version or which packages it includes. Here we’ll use CMSSW_10_6_21_patch1 and checkout the JetMETCorrections/Modules package. Don’t forget to compile the code.
ssh -Y <username>@cmslpc-sl7-heavy.fnal.gov
# cd to some working location
cmsrel CMSSW_10_6_28_patch1
cd CMSSW_10_6_28_patch1/src
cmsenv
git-cms-init
git-cms-addpkg JetMETCorrections/Modules
scram b -j 8
cd CMSSW_10_6_28_patch1/src/
cmsenv
Once that’s setup, we can start to containerize the release.
Useful Aliases
You may wish to alias the buildah and podman commands as follows so that you don’t have to set the
rootandrunrootpaths each time.alias buildah='buildah --root /scratch/containers/`whoami`/ --runroot /scratch/containers/`whoami`/' alias podman='podman --root /scratch/containers/`whoami`/ --runroot /scratch/containers/`whoami`/'For the purposes of this demonstration we will also alias the
containerize.shshell script as follows:alias containerize='/cvmfs/cms-lpc.opensciencegrid.org/FNALLPC/lpc-scripts/containerize/containerize.sh'
To see a full list of options for containerize.sh use the command:
containerize -h
Containerize CMSSW and Mount External CVMFS Directory
To create the image from the CMSSW release, run a command similar to:
containerize -t containerize:demo1 -b docker://docker.io/aperloff/cms-cvmfs-docker:light -C
At this point we’ll see that the image does indeed exist. Then we’ll run the image and mount the host machines copy of CVMFS inside the container.
podman images -a
podman run --rm -it -v /cvmfs/cms.cern.ch/:/cvmfs/cms.cern.ch/:ro containerize:demo1
ls -alh ./
ls -alh /cvmfs/cms.cern.ch
The ls commands should show you the user area within the container as well as list the contents of the /cvmfs/cms.cern.ch/ mount.
Containerize CMSSW With Internal CVMFS Mount
In this case we will rely on the CVMFS mounting capabilities of the aperloff/cms-cvmfs-docker image. Create the image using the following command:
containerize -t containerize:demo2 -b docker://docker.io/aperloff/cms-cvmfs-docker:light
You can run a container with the resulting image, while mounting CVMFS, by using a command similar to:
podman run --rm -it -P --device /dev/fuse --cap-add SYS_ADMIN -e CVMFS_MOUNTS="cms.cern.ch" containerize:demo2
ls -alh ./
ls -alh /cvmfs/cms.cern.ch
You should similarly see the home area for the containers user and the /cvmfs/cms.cern.ch/ mount.
Save Resulting Images
If you’d like to save the resulting images for later use, you can either save the image to a tarball or push it to a registry. To save the image to a tarball use the command:
podman image save --compress -o "<name>.tar" localhost/<name>:<tag>
To save the image to a registry, use the commands:
podman login -u <DockerHub username> -p <DockerHub password> registry-1.docker.io
podman push localhost/<name>:<tag> <username>/<name>:<tag>
Further Customizing the Builds
Although we expect that the default options for containerize.sh should be good enough for most users, there are still plenty of command line options which can be used to modify the default behavior. Additionally, if a user had the need to modify the image building commands, they might consider creating their own version of /cvmfs/cms-lpc.opensciencegrid.org/FNALLPC/lpc-scripts/containerize/Dockerfile and specify to use that file using the -f option. If additional directories need to be cached, then the user could make a copy of /cvmfs/cms-lpc.opensciencegrid.org/FNALLPC/lpc-scripts/containerize/cache.json and specify its location using the -j option.
Key Points
Use the
containerize.shscript within theFNALLPC/lpc-scriptspackage in order to make an image containing an arbitrary CMSSW directory.
Advanced Usage of Apptainer
Overview
Teaching: 20 min
Exercises: 20 minQuestions
How do I modify the default behavior of Apptainer when entering a container?
How can I submit batch jobs when inside an Apptainer container?
How can I use Apptainer when I’m already inside an Apptainer container?
Objectives
Learn how to add custom prompts to your shell logon file and detect if you’re inside a container.
Learn how to run commands on the host machine while still inside a container.
Learn how to tell if your Apptainer installation can run nested containers (Apptainer-in-Apptainer).
Login file customization for Apptainer
Most environment variables from the host machine and session will be automatically inherited when starting an Apptainer container.
However, there are some exceptions,
among them the PS1 variable that specifies the shell prompt and optionally the terminal window title (see here for a nice guide).
You can specify a custom command line prompt so it’s easy to know at a glance if you’re inside a container or not.
For example, these two lines give the prompt [user@machine dir]$ on the host machine and [user@machine dir *]$ in a container,
using the asterisk to indicate that you’re in a container:
PS1="[\u@\h \W]\$ "
APPTAINERENV_PS1="[\u@\h \W *]\$ "
These settings can be placed in your .bashrc or .bash_login file.
You can also include an environment variable like $APPTAINER_NAME in the prompt or terminal window title,
which will display the name of the active container (if any).
Script customization for Apptainer
Whether in your login file or another script, you might want to have certain operations that only execute if you’re inside a container (or if you aren’t).
You can achieve this with a simple check (replace ... with your code):
if [ -n "$APPTAINER_CONTAINER" ]; then
    ...
fi
To reverse the check, use -z instead of -n (guide to bash comparison operators).
Using batch systems with Apptainer
Most containers do not include the HTCondor executables or configuration files.
There are several options to work around this, in order to continue to use legacy job submission code that may depend on software that only runs on older operating systems (e.g. CMSSW_10_6_X).
- Keep another terminal open in the host OS (outside of the container) and only execute batch commands there. This can be very tedious, so in general, it is not recommended.
- Build a new container that includes HTCondor. An example of this option can be found at https://gitlab.cern.ch/cms-cat/cmssw-lxplus (aimed at CERN lxplus). While this allows the use of batch systems transparently, it requires exactly replicating the host machine’s HTCondor configuration. It also does not scale well, because each possible container must be rebuilt whenever the container is updated, and potentially by each user (if the rebuilt containers are not distributed centrally). Therefore, in general, this option is not recommended.
- Use the
call_hostsoftware, which allows executing commands on the host OS while still inside the container.call_hostis set up by default to handle HTCondor commands, as well as EOS filesystem commands, but it can handle any command (that doesn’t require tty input). - Use the HTCondor Python bindings, which can be installed more easily inside most containers. The HTCondor configuration from the host OS must be correctly mounted inside the container. An example of this can be found at lpcjobqueue. This option works very well for some operations, but if a site is using customized HTCondor scripts, the bindings will not pick up the customizations.
Using containers in a batch job
HTCondor supports Apptainer (documentation). You can specify an Apptainer (or Docker) container that a job should use with the ClassAd:
+SingularityImage = "..."Some sites also have site-specific ClassAds for you to specify just the target OS so it can find the right container automatically, but these are not standardized.
Going deeper
Read the instructions for the
call_hostsoftware, install it on the cluster you usually use, and try it out. Besides HTCondor, what other commands are useful to call on the host?
Apptainer-in-Apptainer
There are several important cases where it may be necessary to invoke Apptainer when already inside an Apptainer container (nested Apptainer or Apptainer-in-Apptainer):
- Creating or using a container to preserve a workflow that involves the use of other containers
- Running batch jobs on the LHC computing grid: most batch jobs now start inside an Apptainer container to guarantee the user’s choice of operating system, so any further container use is nested
This is possible, but there are certain system requirements that must be met:
- The Apptainer configuration, by default at
/etc/apptainer/apptainer.conf, must include the lineallow setuid = no(and must not haveallow setuid = yes). - The operating system must have unprivileged user namespaces enabled.
The CMS software provides a script to test for this behavior: apptainer-check.sh.
If this behavior is not found on the machine you’re using, there are a few options:
- Ask your system administrator to enable the behavior, following the Apptainer User Namespace guide.
- Instead of using the system version of Apptainer, use the one distributed by the Open Science Grid on cvmfs at
/cvmfs/oasis.opensciencegrid.org/mis/apptainer/bin/apptainer. This executable has its own configuration file that follows the above requirements (though it may still not work for nested Apptainer use in all cases, depending on the local system settings). To force the use of this version, you can modify yourPATH:export PATH=/cvmfs/oasis.opensciencegrid.org/mis/apptainer/bin:$PATH.
Key Points